Category: Sharepoint

  • Automating Purchase Document Approvals in Dynamics 365 with Power Automate

    Automating Purchase Document Approvals in Dynamics 365 with Power Automate

    Manual approval processes are tedious, error-prone, and slow down procurement. Thankfully, Power Automate offers an elegant, fully automated solution that integrates seamlessly with Dynamics 365. In this blog, I’ll walk you through a complete approval automation flow for purchase documents using a real-world scenario.

    Let’s break it down.

    Flow Overview

    Automation kicks off when a purchase document approval is requested in Dynamics 365. From there, we:

    1. Fetch details about the request.
    2. Collect necessary metadata (like the approval link and user info).
    3. Trigger an approval request.
    4. Track the outcome and send email notifications accordingly.

    Here’s what the full flow looks like in Power Automate:

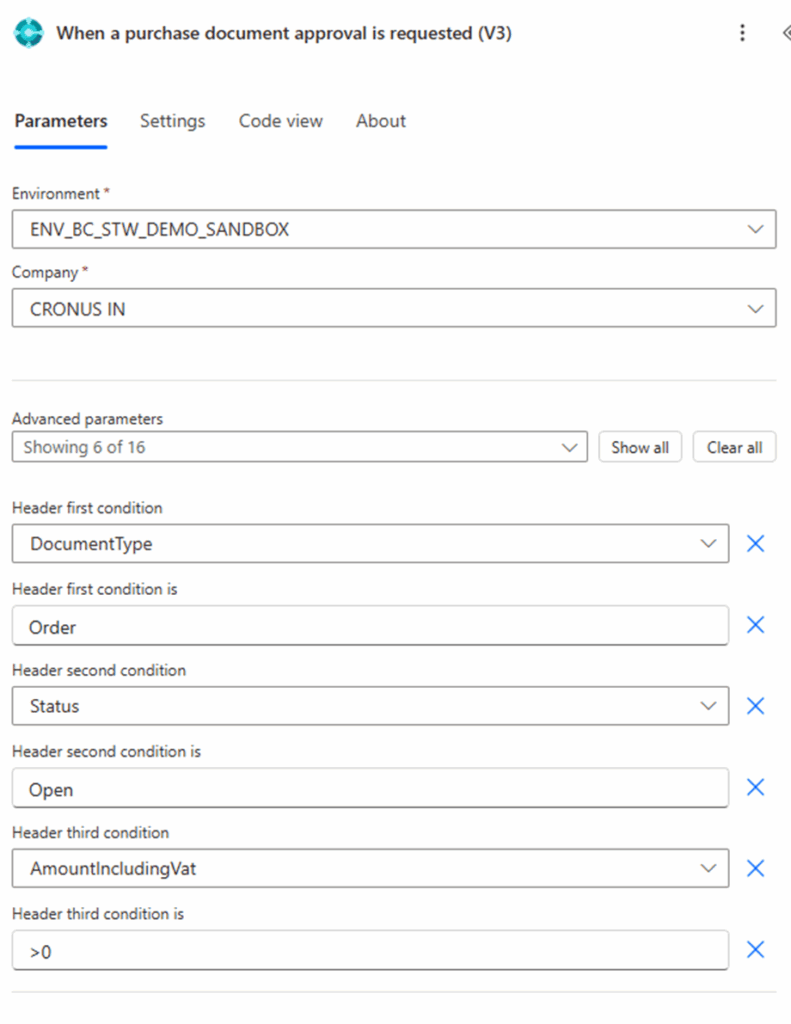
    Step 1: Trigger – When a purchase document approval is requested (V3)

    This is the starting point. The trigger activates whenever an approval is initiated in Dynamics 365 Business Central. It listens for approval requests of purchase documents (like purchase orders).
    Step 2: Get Record from Business Central

    Immediately after triggering, we fetch the full record details using the Get record action. This ensures we have all necessary data (e.g., vendor name, amount, due date) to display in the approval summary and emails.
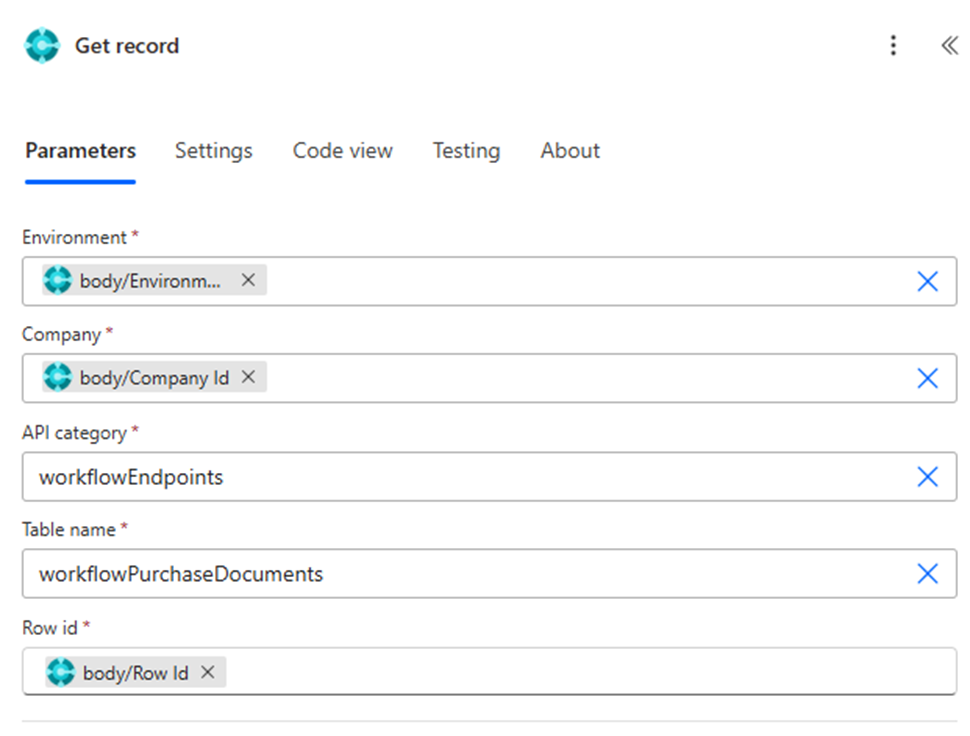
    • Connector: Dynamics 365 Business Central
    • Purpose: Retrieves a specific purchase document record using the Row ID passed from the trigger
    • Environment:
      • Dynamic input from the trigger using  ‘triggerOutputs()?[‘body/Environment Name’]’
    • Company:
      • Dynamic input using ‘triggerOutputs()?[‘body/Company Id’]’
    • API Category:
      • Set to ‘workflowEndpoints’
      • This points to custom or published API endpoint category in Business Central
    • Table Name:
      • Set to ‘workflowPurchaseDocuments’
      • Represents the API table containing the purchase documents eligible for approval
    • Row ID:
      • Dynamic ID input using ‘triggerOutputs()?[‘body/Row Id’]’
      • Identifies the exact document to retrieve from the specified table

    Step 3: Generate Business Central URL

    The Get URL action constructs a direct link to the record inside Business Central. This is essential for enabling approvers to quickly access and validate the request before acting.
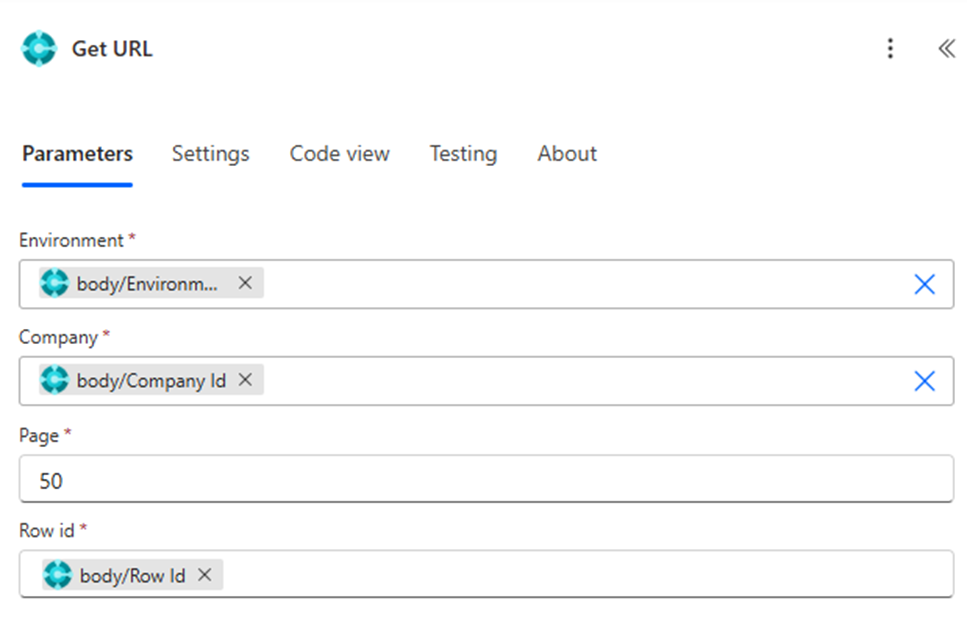
    • Connector:
       Dynamics 365 Business Central
    • Purpose:
       To generate a URL that opens the purchase order directly in Business Central
    • Environment:
       Dynamic value taken from the trigger
       Expression used: triggerOutputs()?[‘body’][‘Environment Name’]
       Ensures the URL corresponds to the correct environment (sandbox or production)
    • Company:
       Dynamic value from the trigger
       Expression used: triggerOutputs()?[‘body’][‘Company Id’]
       Ensures the link opens under the correct company, such as “CRONUS IN”
    • Page:
       Static value set to 50
       Page 50 generally refers to the Purchase Order List page in Business Central
    • Row ID:
       Dynamic value from the trigger
       Expression used: triggerOutputs()?[‘body’][‘Row Id’]
       This uniquely identifies the purchase document for which the URL is being generated

    Step 4: Fetch User Details (Microsoft 365)

    Using the Get user details action from Microsoft 365, we retrieve the approver’s name, email address, and other attributes. This step supports dynamic routing and personalized notifications.
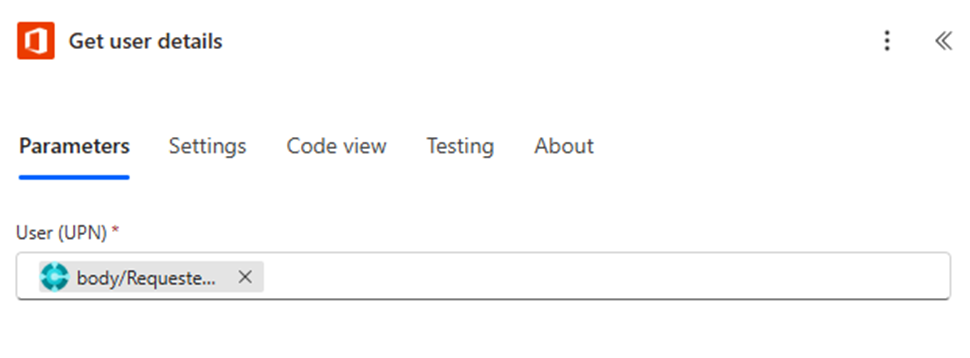
    • Connector:
       Office 365 Users
    • Purpose:
       To retrieve details of the requester such as display name, job title, department, and more
    • User (UPN):
       The value is dynamically provided using:
       triggerOutputs()?[‘body’][‘Requested By User Email’]
    • Where the UPN comes from:
       The email address of the requester is passed from the Business Central workflow trigger

    Step 5: Start and Wait for an Approval

    Now comes the key step — initiating the Start and wait for an approval action. This is a built-in approval connector in Power Automate. We configure:

    • Approval type: Typically “Approve/Reject – First to respond”.
    • Title & Details: Populated using record fields.
    • Link to document: Embedded from the Business Central URL.

    Once triggered, this pauses the flow until the approver responds.
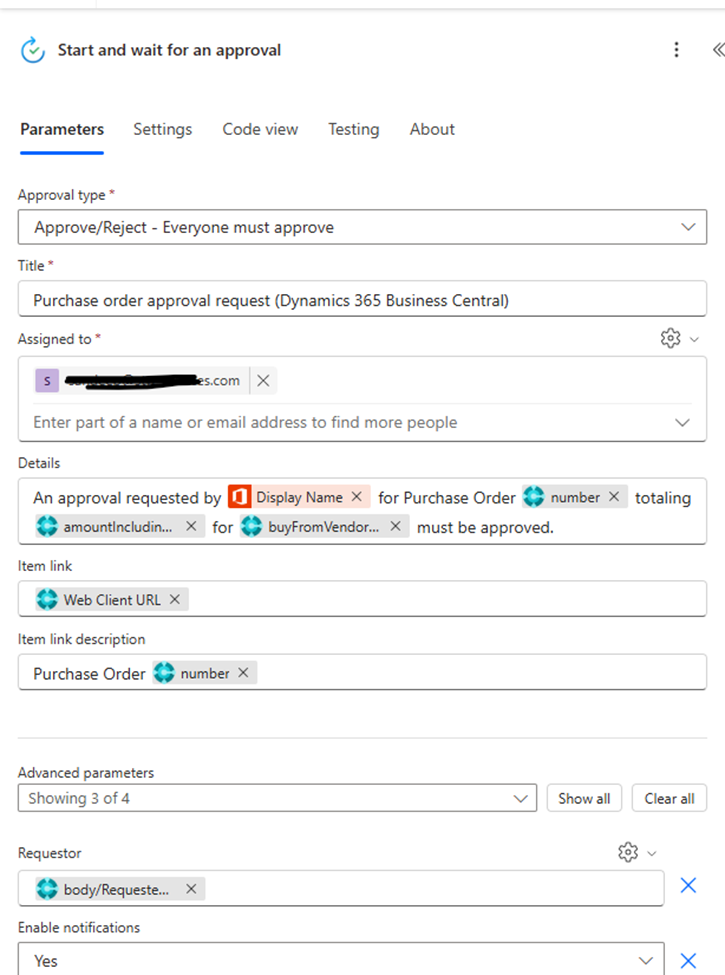
    • Approval type:
       Approve/Reject – Everyone must approve
       This ensures that all listed approvers must approve before it moves forward.
    • Title:
       Static text: Purchase order approval request (Dynamics 365 Business Central)
       Appears in the approval notification email and the Approvals app in Teams/Outlook.
    • Assigned to:
       Static email: sandeep@yourdomain.com
       The approval request will be sent to this user (or list of users).
    • Details:
       This section creates a dynamic message with data pulled from previous steps to provide full context.
       Format used:
       An approval requested by Display Name for Purchase Order {number} totaling {amountIncludingVat} for {buyFromVendorName} must be approved.

    Breakdown of dynamic fields:

    • Display Name → From the “Get user details” step
    • number → body(‘Get_record’)?[‘number’]
    • amountIncludingVat → body(‘Get_record’)?[‘amountIncludingVat’]
    • buyFromVendorName → body(‘Get_record’)?[‘buyFromVendorName’]
    • Item link:
       Uses Web Client URL
       This is generated in the “Get URL” step to provide a direct link to the PO in Business Central.
    • Item link description:
       Uses the purchase order number dynamically:
       Purchase Order {number} → body(‘Get_record’)?[‘number’]
    • Requestor:
       Dynamic expression:
       triggerOutputs()?[‘body’][‘Requested By User Email’]
       Identifies who originally submitted the purchase request.
    • Enable notifications:
       Set to Yes
       Sends email notifications to assigned users for the approval request.

    Step 6: Prepare Approval Summary

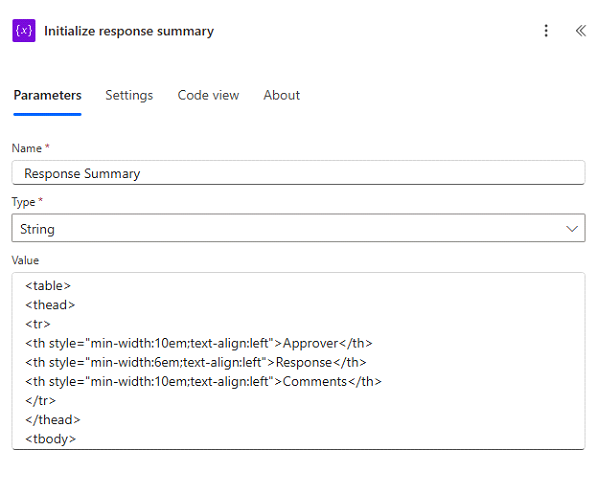
    After the approval, we Initialize a response summary variable to collect response details. Then we loop through each response (if multiple) using an Apply to each action and format it — e.g., approver name, comment, and decision timestamp.

    Finally, we finalize the summary by appending the formatted responses into a single string, making it suitable for email or audit logs.

    Step 7: Conditional Logic – React Based on Outcome

    Here’s where it gets smart.
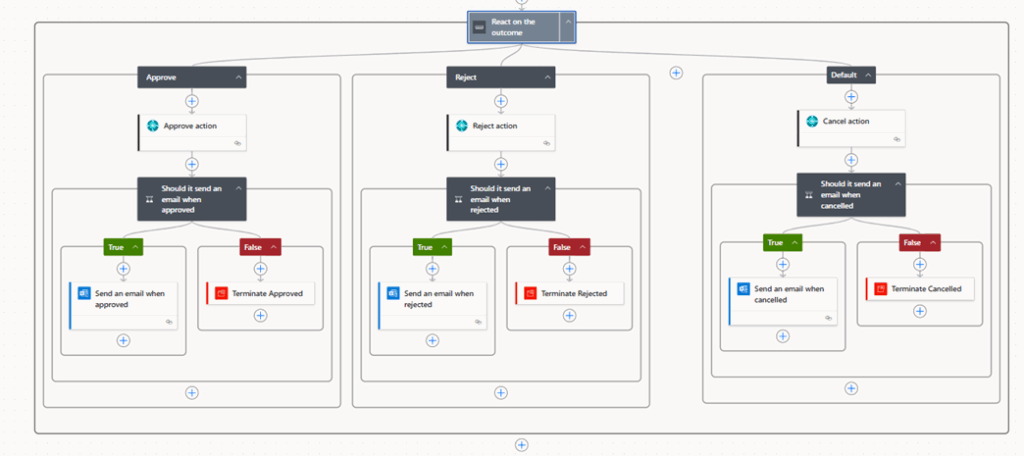
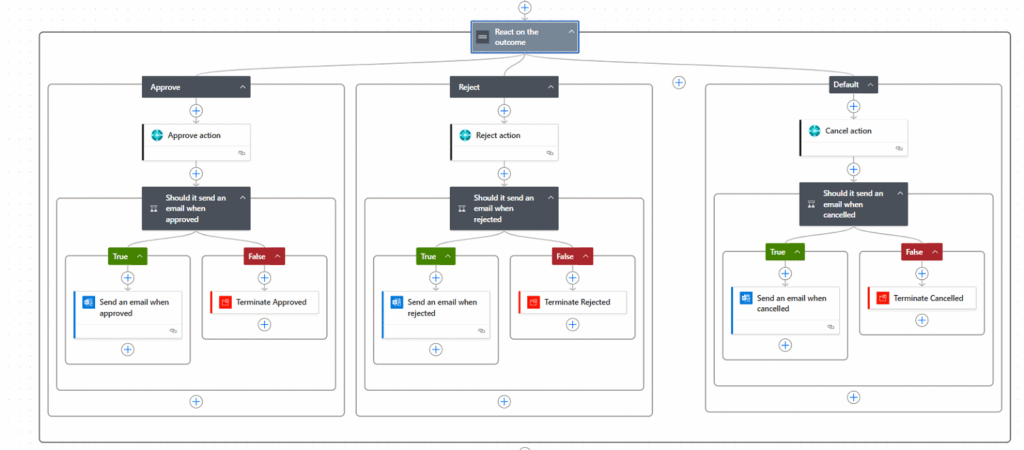
    We use a Switch Control (or condition tree) to react based on the outcome:

    • Approve Path:
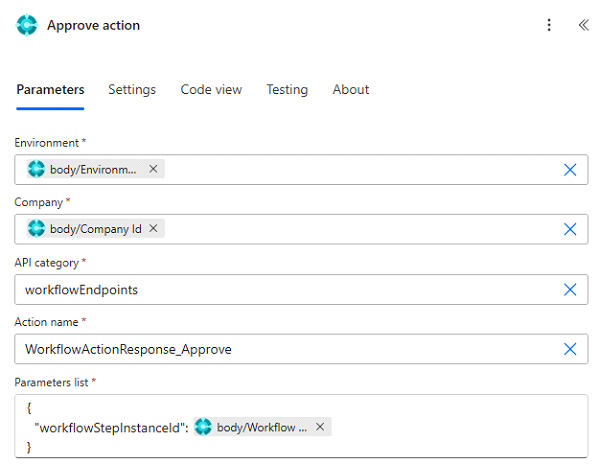
      • Executes an “Approve action” in Business Central.
      • If Send Email flag is true, send an Approval Confirmation Email.
      • If not, terminate with a success note.
    • Reject Path:
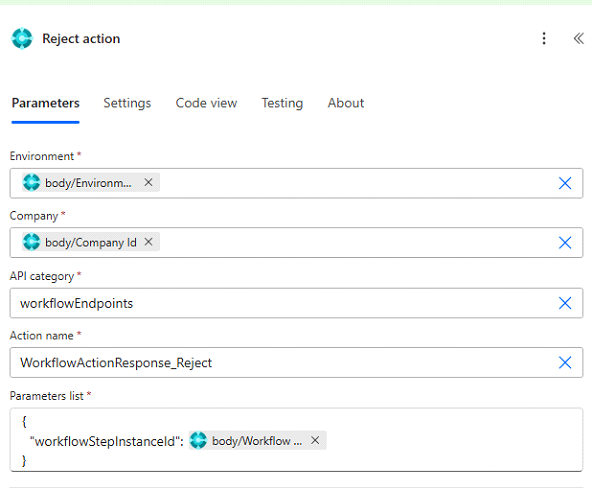
      • Executes the “Reject action”.
      • Sends a Rejection Email if enabled.
    • Cancel Path:
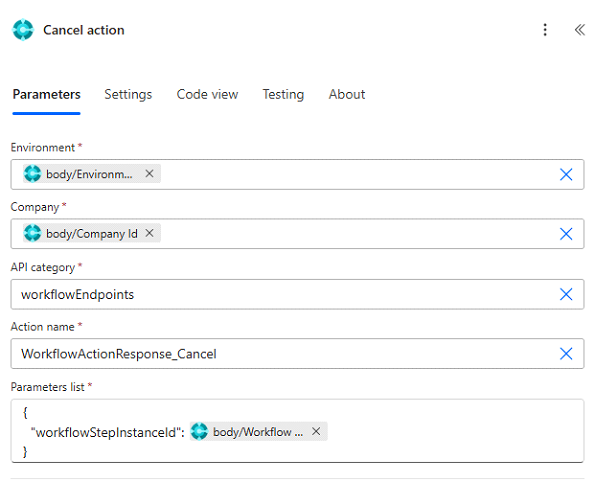
      • Triggers the “Cancel action”.
      • Optionally sends a Cancellation Notification.

    Each branch uses conditional checks (e.g., “Should it send an email when approved?”) before executing further steps, providing flexibility and avoiding unnecessary noise.

    Email Notifications

    Each branch includes dynamic, well-formatted email templates that:

    • Mention the approver’s decision and comments
    • Link back to the purchase document
    • Include the approval summary
    • Are sent only if enabled by a flag

    Key Benefits of This Flow

    1. No manual follow-ups – Everything runs on its own.
    2. Real-time visibility – Approvers get notified instantly.
    3. Audit-ready – Each approval decision is tracked and stored.
    4. Dynamic and scalable – Easily extend for multi-level or conditional approvals.

    Conclusion

    Automating document approvals in Dynamics 365 using Power Automate is not just about speed, it’s about transparency, accountability, and scale. The flow we walked through today not only streamlines decision-making but also ensures your finance and procurement teams are aligned in real time.

    If you’re using Business Central and haven’t implemented this yet, you’re missing out on serious efficiency.

    Have questions or need help customizing your flow? Drop them in the comments or contact us at STW Services LLP. We’re here to help your business automate the smart way.
  • Automating Client Document Management for CA Firms Using Power Automate and Google Workspace

    Automating Client Document Management for CA Firms Using Power Automate and Google Workspace

    Chartered Accountancy (CA) firms are constantly inundated with emails, attachments, and client documentation. Whether it’s invoices, bank statements, tax documents, or compliance reports, managing these files efficiently while maintaining audit readiness is critical.

    To address this, we implemented an end-to-end automation solution using Microsoft Power Automate, Gmail, Google Sheets, and Google Drive with the objective of streamlining document management from the moment a client sends an email to when their documents are stored and logged properly.

    Business Scenario

    Let’s consider a typical workflow at a CA firm. Clients send compliance-related documents over email sometimes once a week, sometimes multiple times a day. These documents must be saved to the correct client folder and logged into a tracker sheet for future reference, audit readiness, and internal accountability.

    Initially, one of our team members was manually downloading attachments and storing them in designated folders on Google Drive. Simultaneously, they maintained a spreadsheet recording the date, subject, and folder path of each document received. As volume grew, this process became error-prone and consumed nearly two hours daily. That’s when we decided to build an automated solution.

    Technical Flow Overview

    We built the automation using:

    • Trigger: Gmail (when a new email arrives)
    • Data Lookup: Google Sheet (Clients list with Email → Folder mapping)
    • Storage: Google Drive
    • Logging: Google Sheet (Receiving Log)
    • Logic & Workflow: Microsoft Power Automate

    Step-by-Step Breakdown

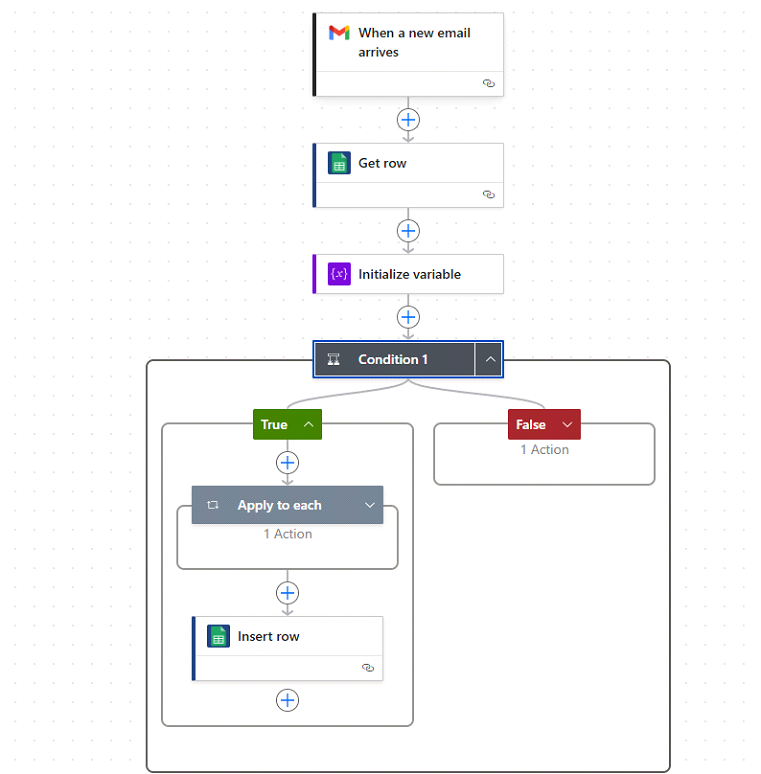
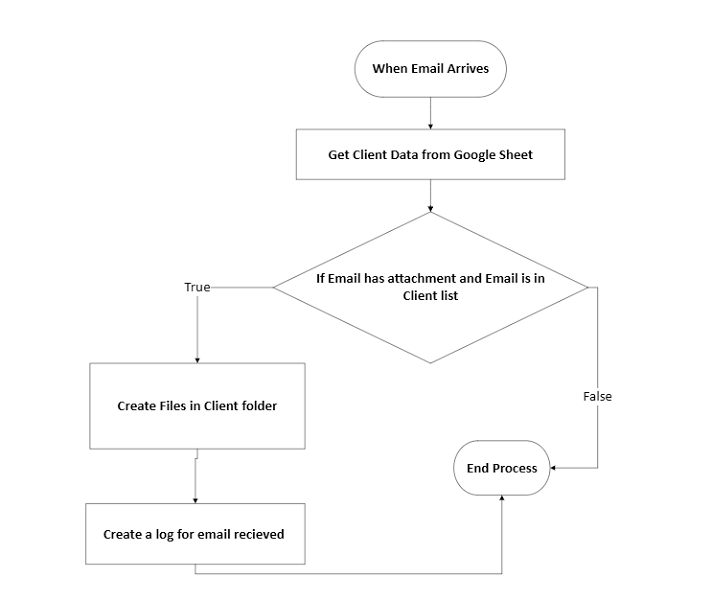
    Here is the Power Automate flow which we are going to discuss in this post:

    1. Trigger: New Email from Client

    The Power Automate flow is triggered when a new email arrives in Gmail. This is filtered further to ensure it includes attachments.

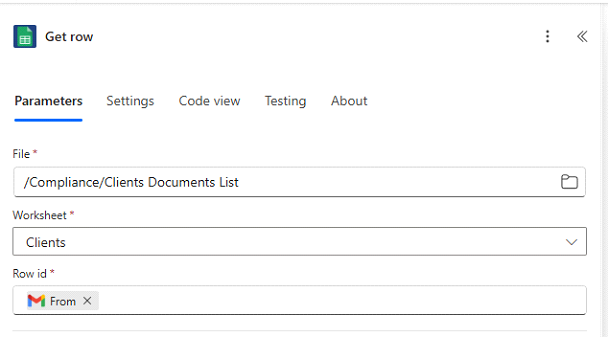
    2. Lookup Client Information

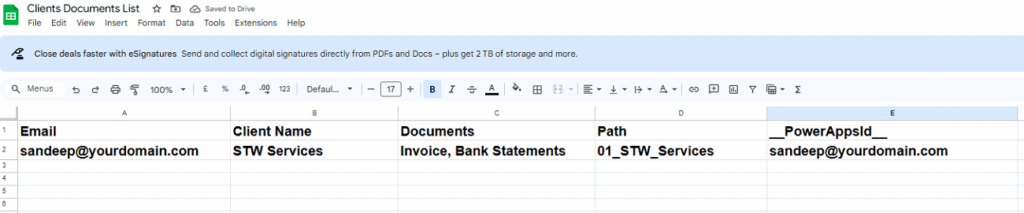
    We query a Google Sheet titled Clients to determine

    • Who sent the email?
    • What is their designated storage folder path?

    📄 Example Sheet:

    EmailClient NamePath
    sandeep@yourdomain.comSTW Services01_STW_Services

    ‘Row Id’ is value which you have in column ‘PowerAppsId’.

    Put value ‘triggerOutputs()?[‘body/From’]’

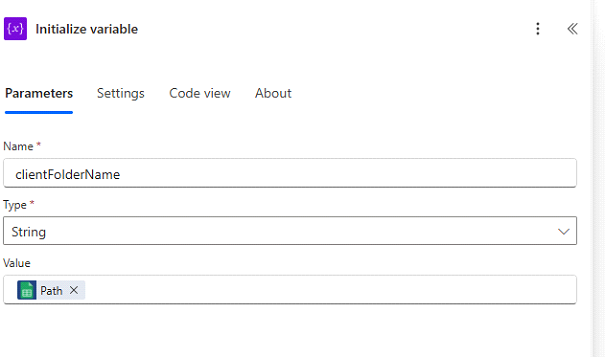
    3. Set Folder Path Dynamically

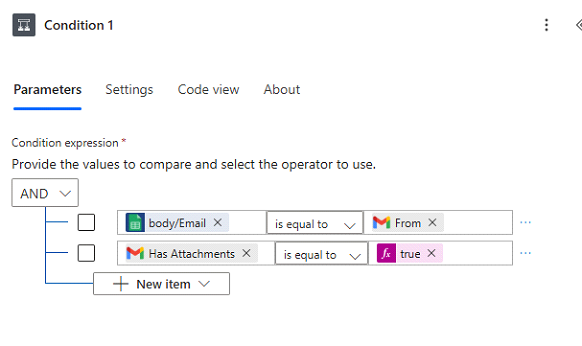
    4. Condition: Validate Sender and Attachment

    We ensure:

    • The email is from a known client (matched from Sheet).
    • It contains at least one attachment.

    5. Store Files in Client Folder (Google Drive)

    For each attachment:

    • File is stored inside the dynamic folder path.
    • Naming is retained from the original attachment.
    • Content is stored using the ContentBytes property.

    concat(‘/Compliance/’, variables(‘clientFolderName’))

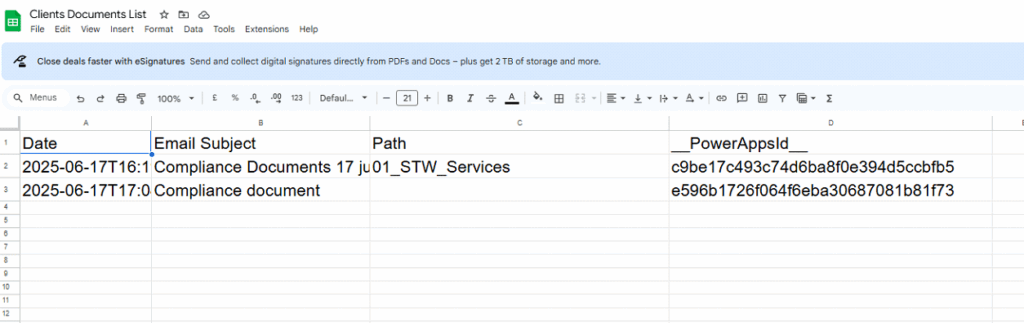
    Log Entry in Receiving Log (Google Sheet)

    We write a new row in another worksheet to maintain traceability.

    DateEmail SubjectPath
    2025-06-17T16:15:00ZCompliance Documents01_STW_Services

    This creates a clear audit trail of every document received and filed.

    Conclusion

    For any compliance-heavy business like a CA firm, automation of document workflows ensures operational efficiency and security. With Power Automate and Google Workspace, even small firms can implement smart document handling without writing a single line of code.

  • Automate Zendesk Ticket Alerts to Teams and Mobile No More Manual Tracking!

    Automate Zendesk Ticket Alerts to Teams and Mobile No More Manual Tracking!

    Introduction

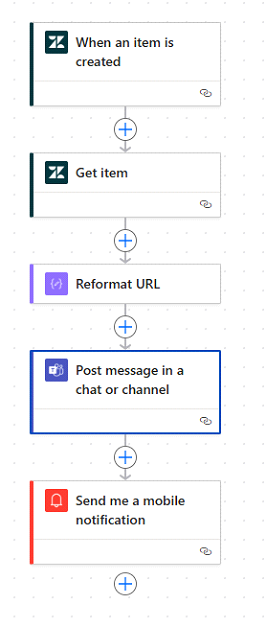
    As developers, we always want to avoid repetitive manual tasks. In this blog, I’ll show how I used Power Automate to create a flow that listens to new Zendesk tickets, gets the full user info, reformats a custom link, and sends alert messages in Microsoft Teams and as mobile notifications. This kind of automation helps IT support teams respond faster and stay updated. As per this Image –

    Let’s break it down step-by-step.

    Flow Breakdown –

    Here is the complete blog which we can going to break down in part and with details –

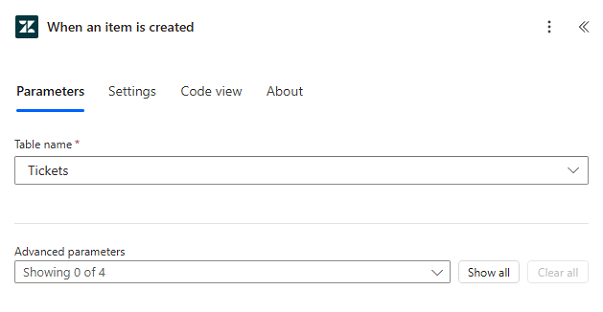
    Step 1: Trigger – When an item is created

    This is the starting point of our flow. We selected the Tickets table from Zendesk. Whenever a new ticket is created, the flow will trigger automatically.

    🛠️ Table name used: Tickets

    📌 Purpose: Detect new ticket instantly

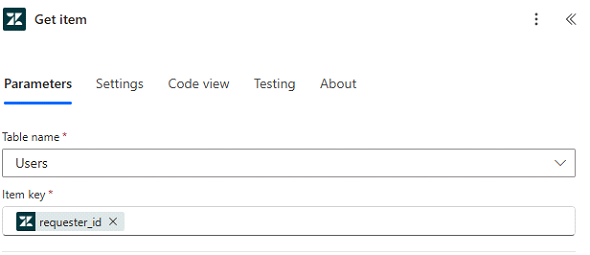
    Step 2: Get item – Pull requester details

    Next, we used the Zendesk Users table to fetch more info about the person who raised the ticket. We used requester_id as the lookup key.

    🛠️ Table name: Users

    🔍 Item key: requester_id

    This step helps us include the customer’s name in our Teams message.

    Step 3: Reformat URL – Custom logic

    We added a small logic (probably using an expression or script action) to create a usable Zendesk ticket URL. This step is useful for giving direct clickable access in alerts.

    concat(
    split(triggerOutputs()?[‘body/url’], ‘:’)[0],
    slice(triggerOutputs()?[‘body/url’], indexOf(triggerOutputs()?[‘body/url’], ‘:’), nthIndexOf(triggerOutputs()?[‘body/url’], ‘/’, 3)),
    slice(triggerOutputs()?[‘body/url’], nthIndexOf(triggerOutputs()?[‘body/url’], ‘/’, 5), nthIndexOf(triggerOutputs()?[‘body/url’], ‘.’, 3))
    )

    🔗 Example output: https://yourcompany.zendesk.com/ticket/12345

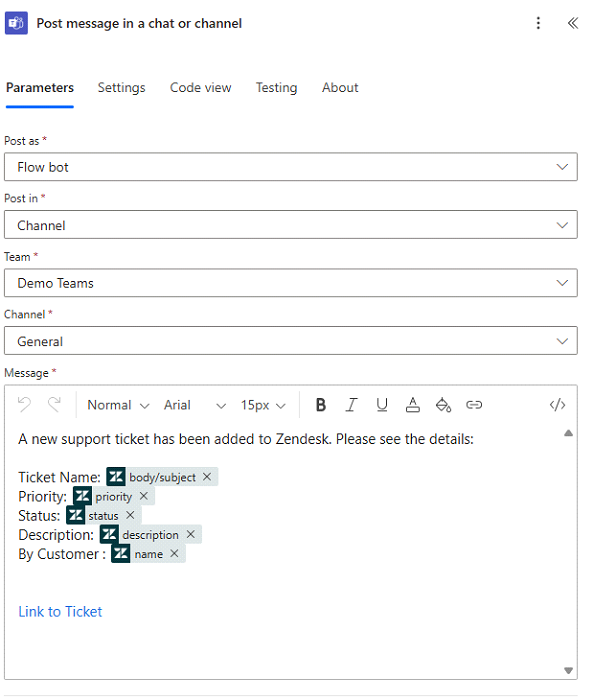
    Step 4: Post message to Teams channel

    This is the heart of the notification system. We send all ticket details in a Teams channel using a Flow bot. Here’s what goes in the message:

    A new support ticket has been added to Zendesk. Please see the details:

    Ticket Name:
    Priority:
    Status:
    Description:
    By Customer:

    Link to Ticket

    📢 Team: Demo Teams

    💬 Channel: General

    Makes it easy for your support team to stay in loop and click straight to the ticket.

    Step 5: Send mobile notification

    Lastly, we added a Power Automate mobile push notification step. This helps alert support leads even when they’re not checking Teams.

    📱 Message example: “New Zendesk ticket raised by John Doe: Printer not working”

    Summary

    In this flow, we used Power Automate to build a full Zendesk-to-Teams notification pipeline:

    • Trigger on new ticket
    • Fetch requester info
    • Reformat the ticket URL
    • Send full details to Teams
    • Send mobile alert for instant visibility

    This setup is simple to build, low-maintenance, and helps teams react faster to support tickets. Ideal for small-to-mid size service desks!

  • Automating Customer Approval Workflows in Business Central with Power Automate

    Automating Customer Approval Workflows in Business Central with Power Automate

    Introduction:

    In any growing organization, approvals play a critical role in maintaining process integrity, whether it’s for sales orders, purchase requests, or customer-specific terms. However, manual approval handling in Dynamics 365 Business Central can be time-consuming and prone to delays.

    This blog walks you through a fully automated customer approval process using Power Automate connected to Business Central, designed to streamline workflows, notify stakeholders, and ensure auditability at every step.

    Scenario: Customer Approval Flow

    Let’s consider a use case where a sales order or customer record in Business Central requires approval before proceeding. The process includes:

    • Detecting the approval request in Business Central.
    • Fetching relevant data and approver details.
    • Sending approval requests.
    • Processing the outcome (Approved, Rejected, Cancelled).
    • Sending conditional email notifications.

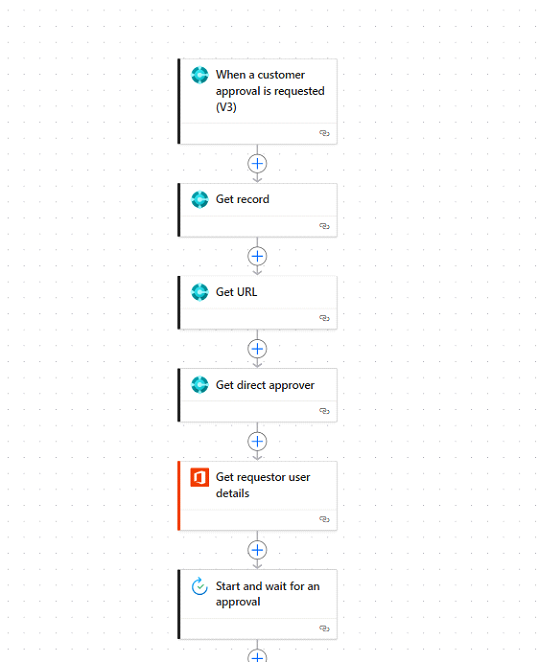
    Part 1: Initiation and Preparation

    Step-by-Step Breakdown of the Flow

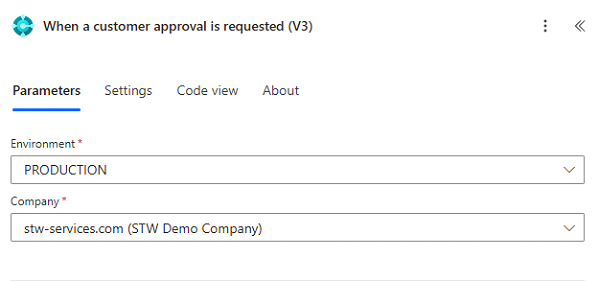
    1. Trigger – When a Customer Approval is Requested (V3)

    This Power Automate flow is triggered when a new customer approval request is initiated in Business Central via the “Workflows” module or a custom approval setup.

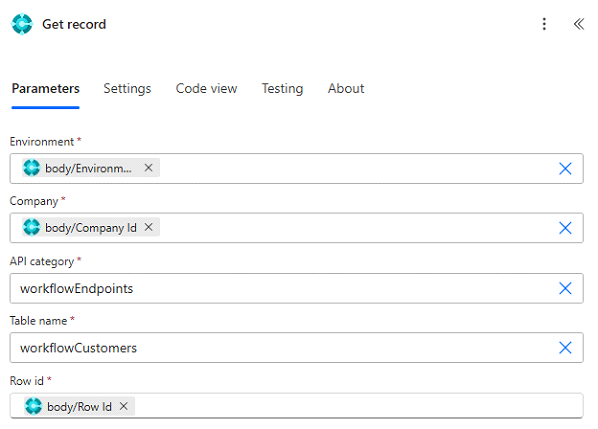
    2. Get Record

    The flow fetches detailed information about the customer or transaction from Business Central using the “Get record” action.

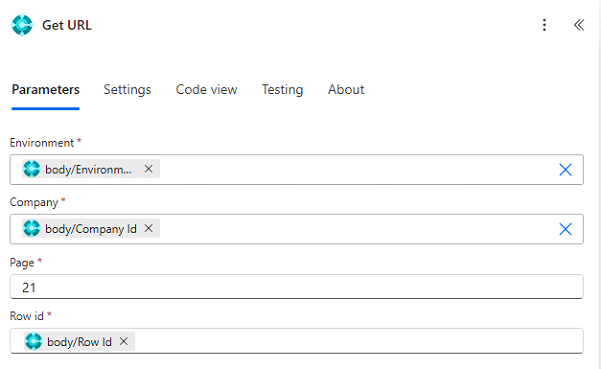
    3. Get URL

    This step constructs or retrieves a direct URL to the Business Central record so the approver can quickly access the relevant data for decision-making.

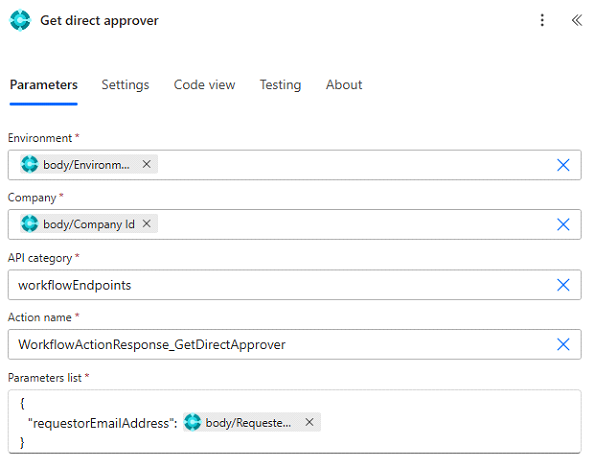
    4. Get Direct Approver

    The flow determines who the direct approver is—based on the requestor’s department, role, or custom logic. This step ensures the approval is routed correctly.

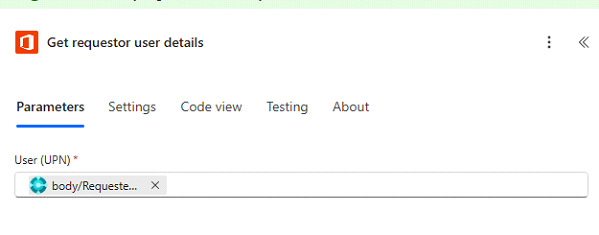
    5. Get Requestor User Details

    Using Office 365 Users, we retrieve the user profile of the original requestor for personalization and notifications.

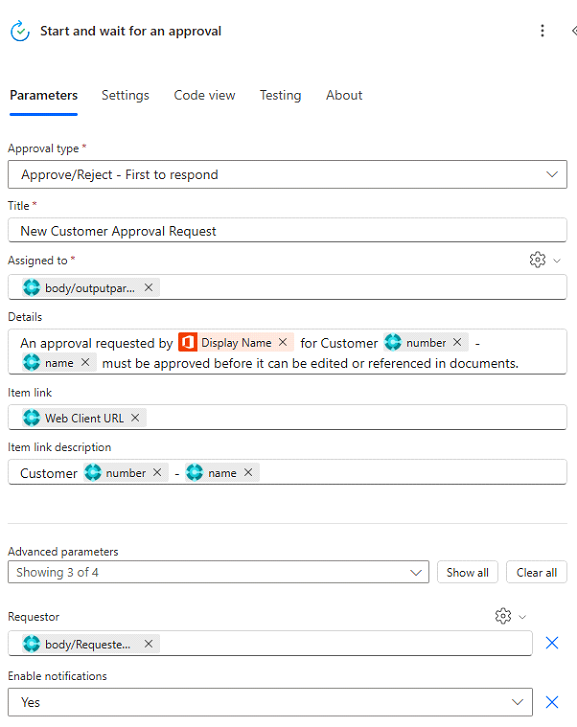
    6. Start and Wait for an Approval

    This is the core approval action. A request is sent with key information, and the flow pauses until the approver responds.

    Part 2: Handling Approval Responses

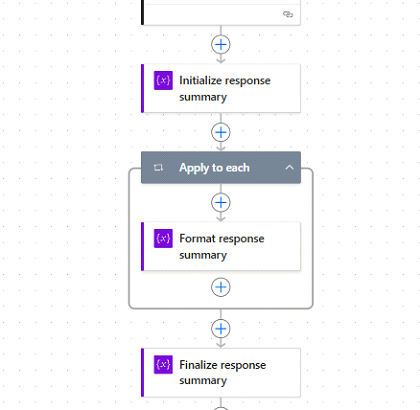
    7. Initialize and Format Response Summary

    The flow initializes a variable to hold a response summary. It then iterates through responses (if multiple approvers are involved), formats them, and stores a summary for recordkeeping or reporting.

    Part 3: Reacting to the Outcome

    Using a Switch-like structure, the flow branches into three sections:

    Approved

    Approve Action: Marks the approval as successful.

    Conditional Email: If configured, an email is sent to notify relevant parties of the approval. If not, the flow terminates cleanly.

    Rejected

    Reject Action: Marks the approval as rejected.

    Conditional Email: Optionally sends an email stating that the request was denied.

    Cancelled (Default Path)

    Cancel Action: Treats any fallback or unhandled scenario as a cancellation.

    Conditional Email: Sends a cancellation notice if needed.

    Each path ends in a Terminate action to gracefully end the flow, ensuring no unintended actions proceed after final decision handling.

    Conclusion

    Automating customer approval workflows with Power Automate not only streamlines internal processes but also enhances transparency, accountability, and speed of execution. This solution ensures that every approval request is handled consistently, routed to the right person, and tracked properly — with minimal manual intervention.

    By integrating Dataverse, Outlook, and Microsoft 365 services, you can build an end-to-end approval system that adapts to your business needs. Whether it’s sending conditional notifications or handling various approval outcomes smartly, this flow empowers organizations to operate more efficiently and make faster, data-driven decisions.

  • Automating IT Support Requests with Microsoft Power Automate

    Automating IT Support Requests with Microsoft Power Automate

    Introduction:

    Managing IT support requests manually can be time-consuming and prone to delays. In this blog, we’ll walk you through how to build a simple yet powerful IT support automation flow using Microsoft Power Automate and Microsoft Forms. From capturing support tickets via forms to automatically creating Planner tasks, sending acknowledgment emails, and updating task details, this workflow streamlines the entire process. Whether you’re an IT manager or a Power Platform enthusiast, this guide will help you boost productivity and ensure no support request falls through the cracks.

    IT support task flow:

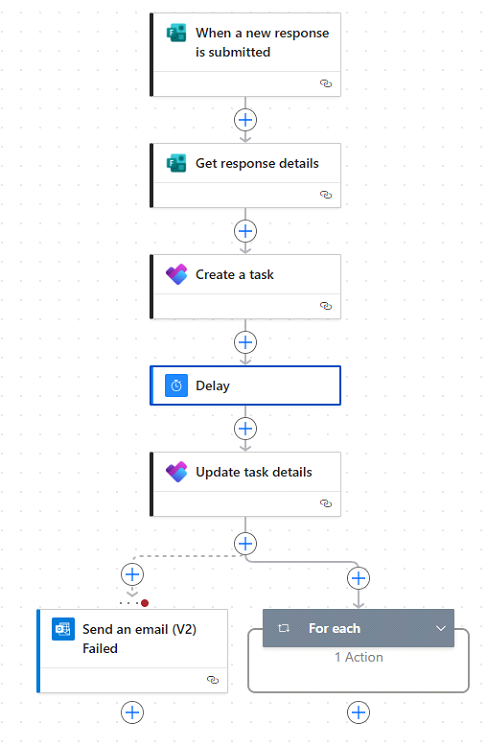
    This is a complete IT support automation flow using power automation. Which I am going to explain step by step in this blog –

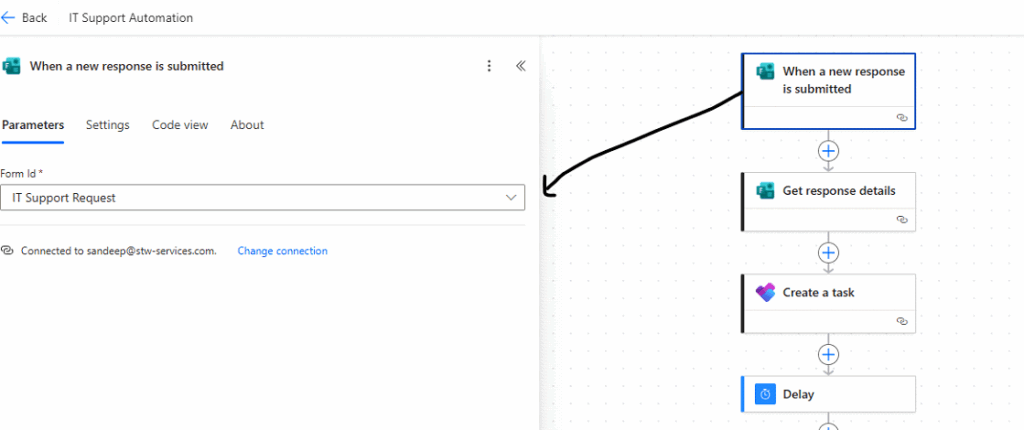
    Step 1: Get response from Support form

    This step initiates the flow whenever a user submits a response to the Microsoft Form titled “IT Support Request“. It captures the submission event and passes the response data to the next steps in the flow.

    It is connected to the next action, where form response details are retrieved. Then we will have one more action, “Get response details” to collect the response form submitted so we can use it later.

    Step 2: Create a task in planner

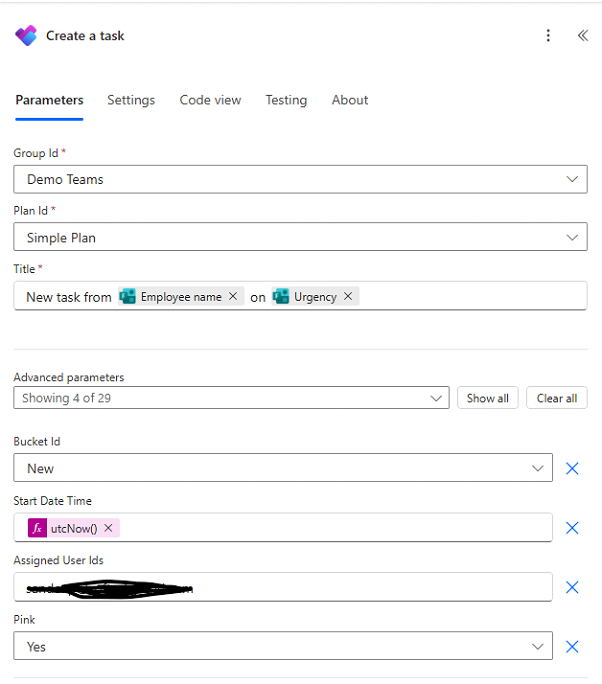
    The “Create a task” step in your Power Automate flow is using Microsoft Planner to automatically generate a task when a new IT support request is submitted. Here’s a breakdown of each setting:

    Main Parameters:

    • Group Id:
      Demo Teams
      ⦁ This is the Microsoft 365 Group where the Planner is located.
    • Plan Id:
      Simple Plan
      ⦁ Refers to the specific Planner plan under the “Demo Teams” group where the task will be created.
    • Title:
      New task from [Employee name] on [Urgency]
      ⦁ A dynamic title is created using values from the form response. This makes it easy to identify who submitted the task and how urgent it is.

    Step 3: Deploy action

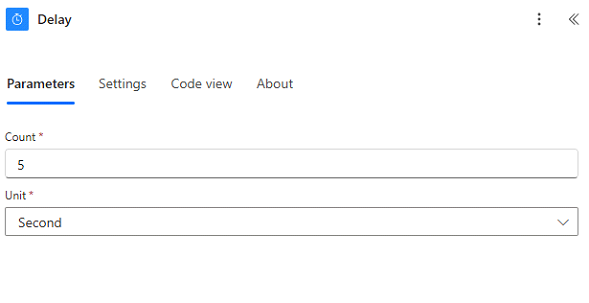
    You need to wait for backend systems to update. You’re avoiding API throttling or race conditions. You’re ensuring sequential timing between task creation and follow-up actions (like sending notifications).

    In this flow, it’s likely used to give Planner a few seconds to register the newly created task before proceeding to the next step.

    Step 4: Update Task

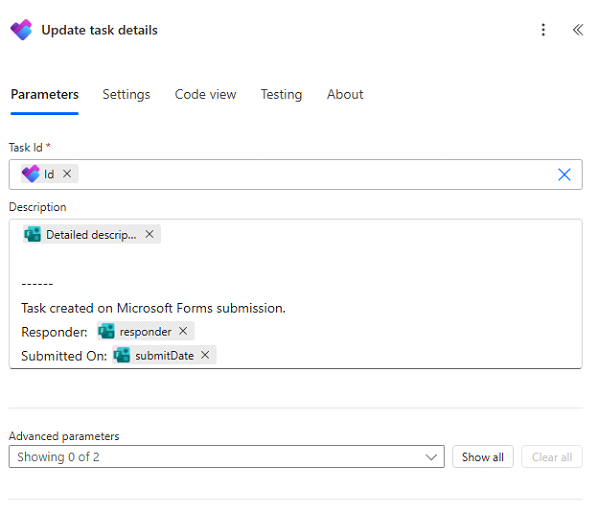
    This step adds useful information to the task, such as:

    • What the request is about (Detailed description)
    • Who submitted the form (responder)
    • When it was submitted (submitDate)

    This ensures that the assigned user has all relevant details for resolving the support request efficiently, directly within the Planner task.

    Let me know if you want to also include form answers or links in the description!

    Step 5: Update assignee or employee based on task creation status via email

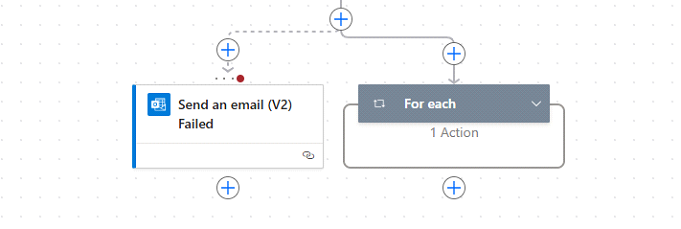
    Send an email (V2) – success

    This step attempts to send an email using Outlook (Office 365). This action will iterate over a list all assignees and then send email to them.

    Send an email (V2) – Failed

    The red dot indicates that this action failed during execution.

    Conclusion:

    By integrating Microsoft Forms, Planner, and Outlook through Power Automate, we’ve created a seamless and efficient IT support process that reduces manual work, ensures timely task assignment, and improves overall response time. With just a few steps, from capturing form responses to creating tasks and sending notifications, your IT team can stay organized and responsive. This low-code solution is not only easy to implement but also scalable to fit the evolving needs of your organization. Start automating today and let your team focus on solving problems, not managing tickets.

  • How to Schedule a Recurring Teams Message for Internal Status Updates Using Power Automate

    How to Schedule a Recurring Teams Message for Internal Status Updates Using Power Automate

    Keeping your internal teams updated consistently is essential. Whether it’s about project status, weekly goals, compliance reminders, or team motivation messages, manual follow-ups can be inefficient and inconsistent.

    Let’s walk through a practical business case using Microsoft Power Automate and Microsoft Teams, where we schedule a recurring message that gets posted in a group chat at a fixed time every few weeks. The example is simple but powerful and can be easily adapted for real-world usage across different departments like HR, IT, or Project Management.

    Step 1: Set Up Recurrence Trigger

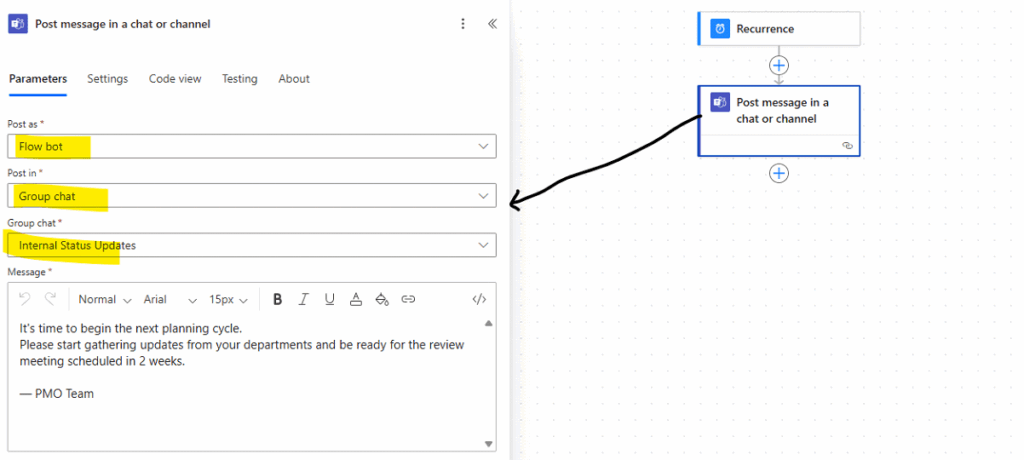
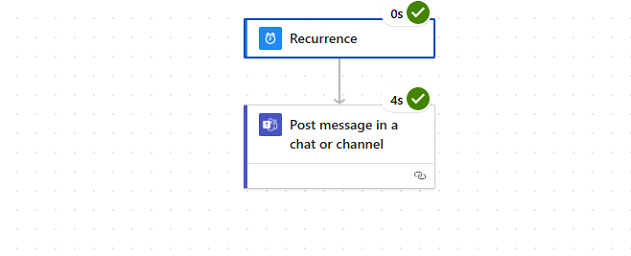
    The first step in your flow is a Recurrence trigger. And fill out parameters like this image.

    This tells Power Automate how often the flow should run.

    • Interval: 2
    • Frequency: Week
    • Day: Monday
    • Time: 10:00 AM
    • Time zone: (UTC+05:30) Chennai, Kolkata, Mumbai, New Delhi

    This configuration means that every 2 weeks, at 10:00 AM IST on a Monday, the flow will initiate. It’s ideal for scheduling periodic events like strategy reminders, reviews, or compliance messages.

    Step 2: Post a Message in Teams

    Next, we add the “Post message in a chat or channel” action to send the message to Microsoft Teams.

    Here’s how it’s configured:

    • Post as: Flow bot
    • Post in: Group chat
    • Group chat name: Internal Status Updates
    • Message: “Recurring message”

    In a real scenario, your message might be something like:

    Reminder:

    It’s time to begin the next planning cycle.
    Please start gathering updates from your departments and be ready for the review meeting scheduled in 2 weeks.

    PMO Team

    This message is sent automatically, no manual intervention required. It appears to team members as if posted by the Flow Bot, ensuring visibility and formality.

    Testing

    Let’s test using manual and see flow is working or not, and it worked.

    We got a message in Microsoft Teams.

    Conclusion

    Automating recurring messages in Microsoft Teams using Power Automate can streamline your internal communication and remove unnecessary manual effort. Whether you’re sending reminders, alerts, or morale boosters, flows like these can improve accountability and consistency across your organization.

    If you’d like to set up a similar flow or customize it for your department, feel free to reach out, we can help you design and deploy the right automation for your business needs.

  • How to Automatically Notify in Outlook When a Job Queue Fails in Business Central

    How to Automatically Notify in Outlook When a Job Queue Fails in Business Central

    Introduction:

    Managing job queues in Dynamics 365 Business Central can be seamless, until one fails. Job queue failures can impact automated processes, reporting tasks, and system integrations. The earlier you’re notified, the faster you can act.

    In this blog, we’ll walk you through a Power Automate flow that automatically sends an email alert via Outlook when a job queue failure occurs in Business Central. This proactive approach minimizes downtime and ensures that the right people are informed instantly.

    Step by Step Setup

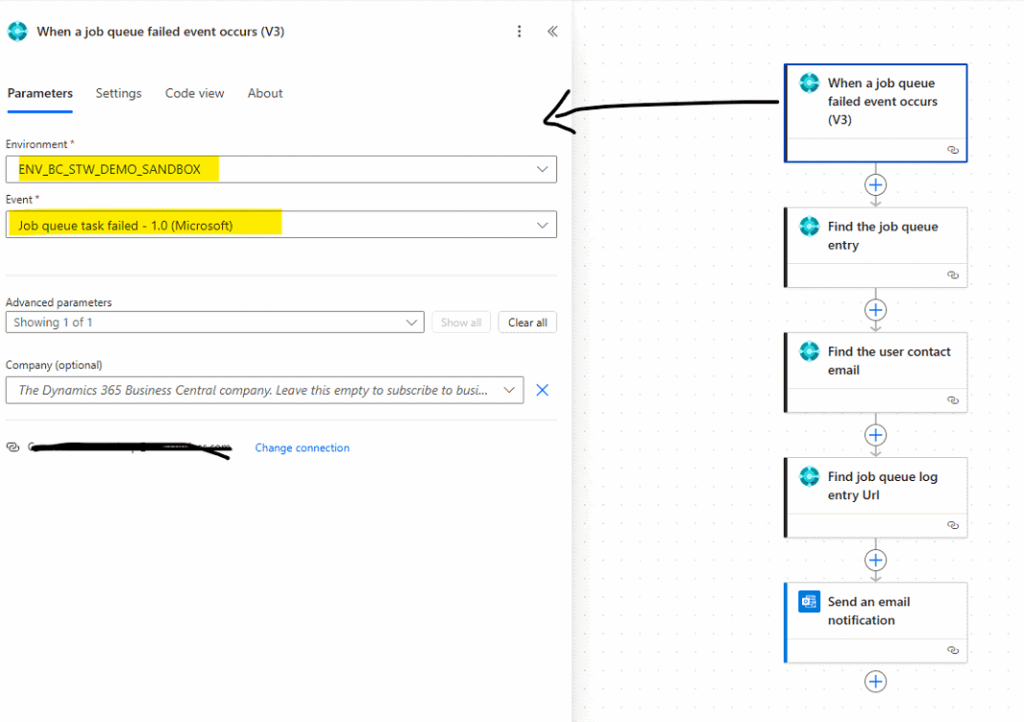
    Step 1: Trigger: When a Job Queue Failed Event Occurs (V3)

    The Power Automate flow starts with the trigger “When a job queue failed event occurs (V3)”. This step listens for failure events within Business Central’s job queue system. It uses the Business Central connector to hook into the system and monitor the status of scheduled jobs. The moment a failure is logged, the flow is triggered automatically.

    Parameters Section

    1. Environment: This dropdown lets you choose the Business Central environment where the job queues are running. In this case, the selected environment is ENV_BC_STW_DEMO_SANDBOX. That means the trigger will only listen for failures occurring in the sandbox environment of your Business Central system.
    2. Event: This specifies the type of event the trigger should listen for. Here, it’s set to Job queue task failed – 1.0 (Microsoft), which means it will fire only when a scheduled job queue task fails.
    3. Advanced Parameters: This section is usually collapsed by default but may include filters or additional settings. In this case, it’s showing 1 option but doesn’t need to be adjusted unless you’re filtering further.
    4. Company (optional): You can optionally specify the name of the Business Central company (e.g., “CRONUS India Ltd.”) if your environment has multiple companies. Leaving this field blank means it will trigger on any company within the selected environment.

    Step 2 – Action: Find the Job Queue Entry

    Once the failure is detected, this action fetches the corresponding job queue entry, pulling relevant metadata such as job name, status, and related IDs.

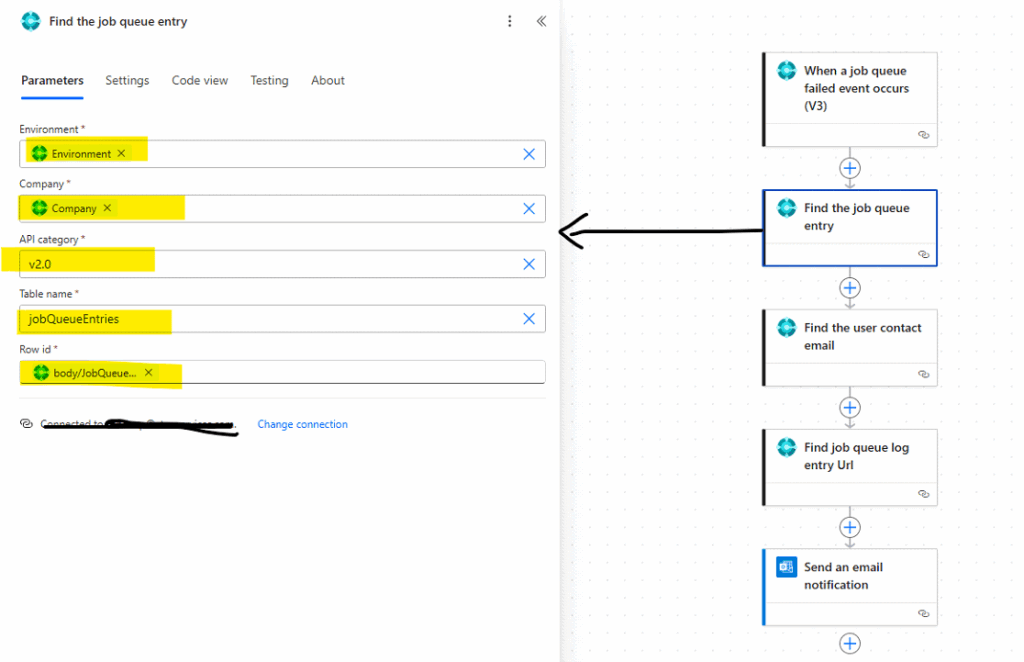
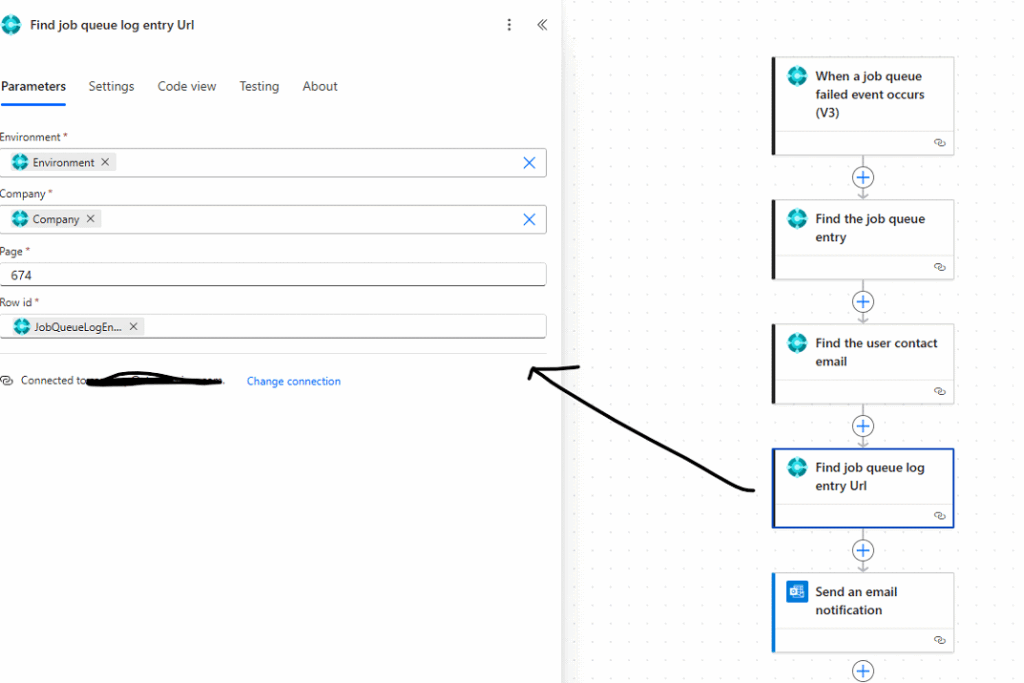
    This screen shows the configuration for the “Find the job queue entry” step in your Power Automate flow. This step comes right after the trigger “When a job queue failed event occurs (V3)” and is responsible for fetching detailed information about the failed job queue entry from Dynamics 365 Business Central.

    Parameters:

    1. Environment This field specifies the Business Central environment where the job queue failure occurred. It is dynamically filled using the value from the trigger, so the action will execute in the same environment where the job failure was detected. In your case, it appears to be something like ENV_BC_STW_DEMO_SANDBOX.
    2. Company This is the name of the Business Central company (like CRONUS India Ltd.) where the job is registered. Again, this value is pulled dynamically from the trigger output to ensure the flow uses the correct company context.
    3. API Category This specifies the version of the Business Central API you’re using. It is set to v2.0, which is the most commonly used and stable API version as of now.
    4. Table Name This tells Power Automate which Business Central API table to query. It’s set to jobQueueEntries, which corresponds to the list of job queue tasks defined in your Business Central environment. This is where all job-related data—like job name, status, and frequency—resides.
    5. Row ID This is a dynamic expression—most likely something like body(‘JobQueueFailedTrigger’)?[‘JobQueueEntryId’] – that uniquely identifies the job queue entry that failed. Power Automate will use this ID to pull just the record for the failed job queue, rather than fetching the whole table.

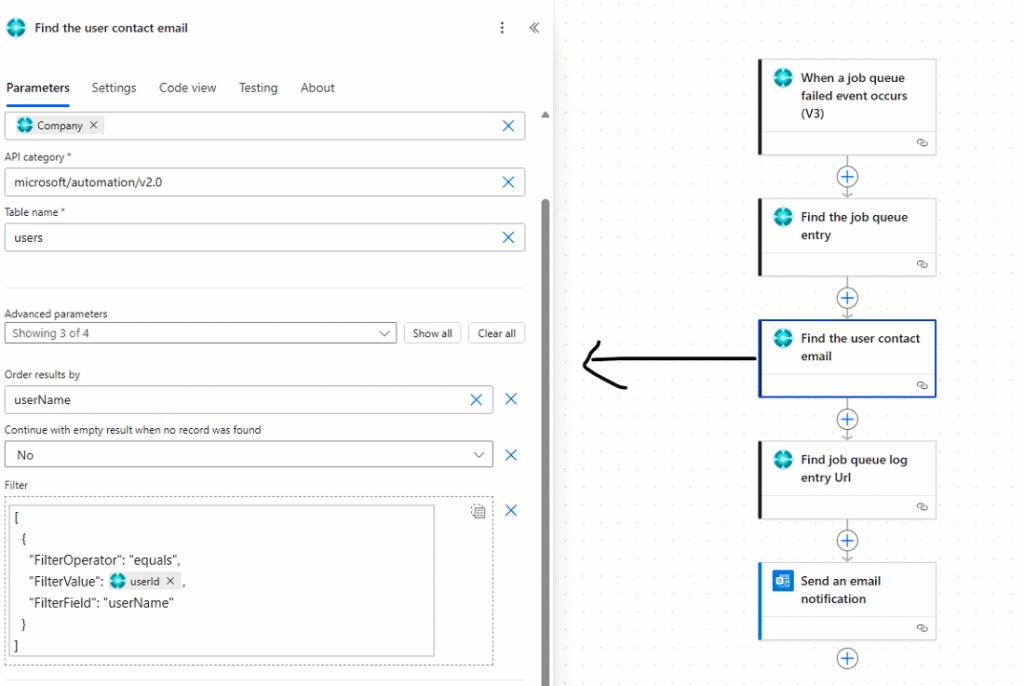
    Step 3 – Action: Find the User Contact Email

    After identifying the failed job, the flow proceeds to “Find the user contact email”. This action locates the email address of the user who is responsible for the job. By doing so, we can ensure that the notification is sent directly to the person who can take the necessary corrective action, instead of broadcasting alerts to an entire team.

    Step 4 – Action: Find Job Queue Log Entry URL

    We extract the URL to the job queue’s log entry in Business Central. This allows the recipient to click the link and investigate the error immediately, saving time and guesswork.

    Step 5 – Action: Send an Email Notification

    Finally, we send a professional email with the following contents:

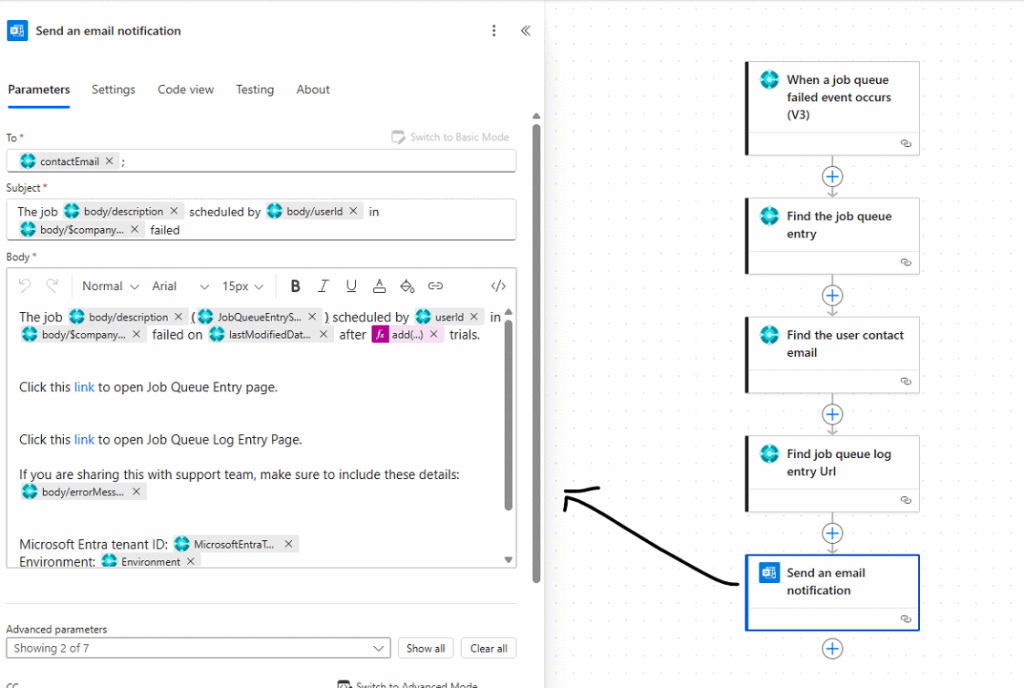
    This screen shows the configuration for the “Send an email notification” action in your Power Automate flow. This is the final step of your flow, and it’s responsible for notifying the relevant user via Outlook when a job queue fails in Dynamics 365 Business Central.

    Let’s walk through the setup in detail:

    To (Recipient Email)

    The To field is set to contactEmail, which was retrieved earlier in the flow using the action “Find the user contact email”. This ensures the email is sent directly to the user who scheduled or owns the failed job queue task.

    Subject Line

    The subject dynamically constructs a descriptive subject for the email. It reads something like:

    “The job [Description] scheduled by [User] in [Company] failed”

    Here’s how it’s composed:

    body/description: The name or description of the job from the failed queue entry.

    body/userId: The user who scheduled or owns the job.

    body/$company: The company in which the job was set up.

    This makes it easy for the recipient to quickly understand what the email is about without opening the message.

    Email Body

    The body of the email provides a clear and actionable summary of the failure:

    Failure Details

    The first paragraph provides a detailed sentence like:

    “The job [Description] scheduled by [User ID] in [Company] failed on [Date] after [X] trials.”

    JobQueueEntrySystemId, userId, company, lastModifiedDateTime, and trial count (calculated via an expression) all help describe exactly what went wrong.

    Quick Links

    Two links are provided:

    Job Queue Entry page – Takes the user to the record of the job queue task.

    Job Queue Log Entry page – Takes the user directly to the error log entry for deeper troubleshooting.

    These links are helpful for navigating directly to the source of the issue in Business Central.

    Support Tip

    There’s a helpful note for users who might want to escalate this issue:

    “If you are sharing this with the support team, make sure to include these details: [Error Message]”

    This error message is dynamically pulled from the job queue log and will help support teams diagnose the problem faster.

    Technical Context

    At the bottom, it adds:

    Microsoft Entra Tenant ID

    Environment

    These identifiers are particularly helpful in multi-environment or multi-tenant scenarios, allowing the IT team to know exactly where the failure occurred.

    Advanced Parameters

    There are more options available under advanced parameters, but only 2 of 7 are currently shown. You could use these to set CC/BCC addresses, importance, attachments, or custom headers if needed.

    Conclusion:

    This Power Automate flow is simple but powerful. It bridges the gap between Business Central job queue monitoring and proactive team communication. With minimal effort, you can ensure that failures don’t go unnoticed—and that your team stays informed and empowered to act.

  • Automate Excel Online (Business) using Power Automate

    Automate Excel Online (Business) using Power Automate

    Introduction

    Excel isn’t just a spreadsheet tool anymore—when combined with Power Automate, it becomes a powerful engine for automation. Whether you’re managing leads, tracking inventory, or generating reports, Power Automate’s Excel Online (Business) connector enables you to interact with Excel files stored in OneDrive or SharePoint seamlessly.

    In this blog, we’ll walk through all available Excel Online (Business) actions and explain how and when to use them.

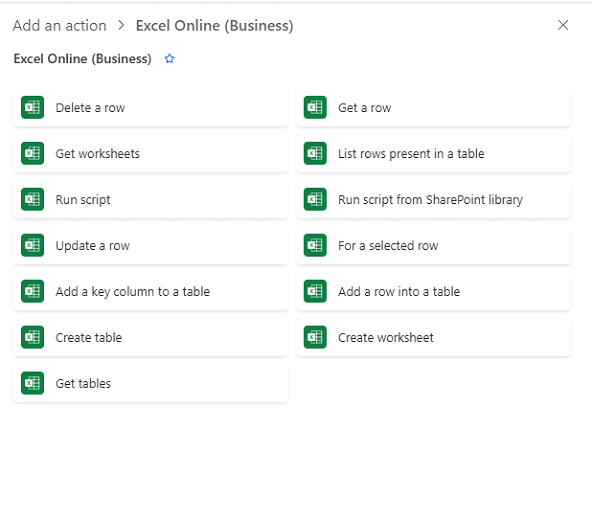
    Overview –

    The list of available actions under the “Excel Online (Business)” connector in Microsoft Power Automate. These actions allow users to automate interactions with Excel files stored in OneDrive for Business or SharePoint. The actions are grouped into functional categories:

    Data Operations

    • Get a row – Retrieve data from a specific row using a key.
    • List rows present in a table – Retrieve all rows from a table
    • Add a row into a table – Insert new data into an Excel table.
    • Update a row – Modify data in a specific row.
    • Delete a row – Remove a specific row from a table.

    Structure & Table Management

    • Get worksheets – Get a list of worksheet names from a workbook.
    • Get tables – List all tables in a worksheet.
    • Create table – Convert a cell range into a structured table.
    • Create worksheet – Add a new worksheet to an existing Excel file.
    • Add a key column to a table – Add a unique identifier column to support row-level operations.

    Scripting & Automation

    • Run script – Execute an Office Script in the Excel workbook.
    • Run script from SharePoint library – Run a script from an Excel file stored in SharePoint.
    • For a selected row – Trigger a manual flow by selecting a row directly in Excel.

    These actions are essential for building robust, no-code Excel automation workflows that handle tasks such as reporting, approvals, data entry, and data syncing across systems.

    How to use them:

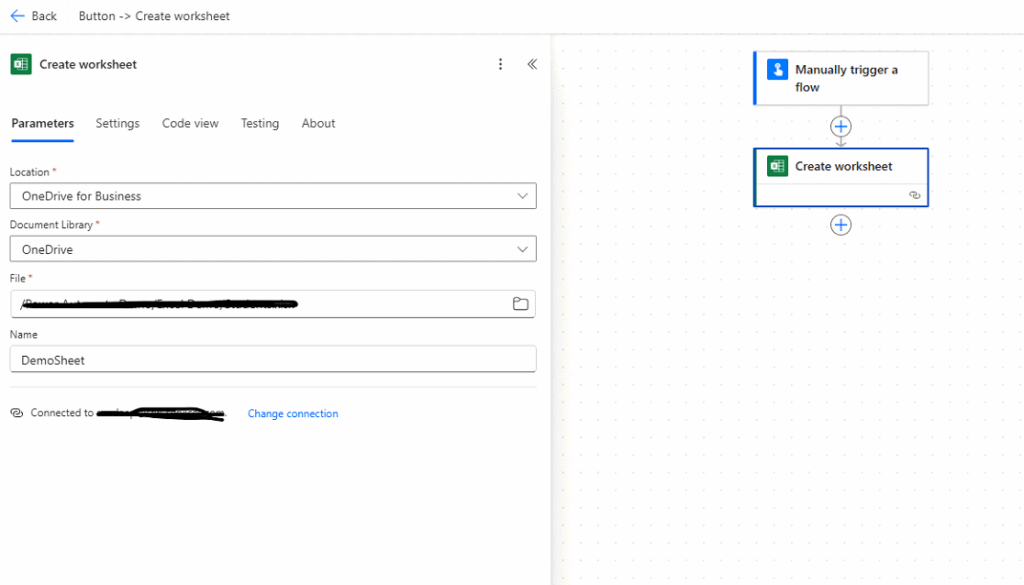
    To use these actions, certain details are required. I will demonstrate this using the “Create worksheet” action as an example

    Trigger:

    The flow begins with a Manually trigger a flow step, meaning the user must run it manually (e.g., via a button in Power Automate).

    Action – Create worksheet:

    This is the main action being demonstrated. Here’s how its parameters are configured:

    FieldDescription
    LocationSet to OneDrive for Business, indicating where the Excel file is stored.
    Document LibrarySelected as OneDrive, which is the default document library for personal files.
    FileThe path to the existing Excel file where the new sheet will be added. (The path is blurred for privacy.)
    NameThe new worksheet will be named DemoSheet.

    Conclusion

    The Excel Online (Business) connector in Power Automate offers a wide range of actions to automate and manage your Excel files stored in OneDrive or SharePoint. Whether you’re updating rows, creating worksheets, or running scripts, each action requires specific inputs like file location, table name, or worksheet name. By understanding how to configure these actions, like we demonstrated with the Create worksheet example, you can build powerful, code-free workflows that save time and boost productivity. Start small, experiment, and soon you’ll be automating Excel tasks with ease.

  • What Happens If You Keep Using Dynamics NAV After 2025?

    What Happens If You Keep Using Dynamics NAV After 2025?

    Imagine driving a car that’s no longer serviced by the manufacturer. No spare parts, no safety upgrades, no technical support. Every kilometer you drive is a risk.

    This is exactly what happens when businesses continue to use Microsoft Dynamics NAV beyond 2025.

    Dynamics NAV has been a loyal companion for many companies, especially in the manufacturing, trading, and services industries. It offered flexibility, control, and customization that helped businesses grow steadily for years. However, technology doesn’t stand still—and neither should your business.

    Microsoft officially ended mainstream support for NAV years ago. By 2025, even the extended support for many versions will stop completely.

    The big question is, what happens if you still stick with it?

    The Silent Risks That Grow Every Day

    Without active support, Dynamics NAV becomes a ticking time bomb. Businesses will no longer receive security updates, leaving critical financial and operational data vulnerable to cyberattacks. In today’s connected world, one breach can cripple a business financially and reputationally.

    Take, for example, a mid-sized trading company in Mumbai. They continued using NAV 2015 without upgrades. In early 2023, they suffered a ransomware attack through an unpatched security loophole. Recovery costs, customer loss, and downtime ended up costing them over ₹1.2 crore — a cost far higher than an ERP upgrade would have been.

    Moreover, regulations are constantly evolving. In India alone, updates to GST e-invoicing, TDS rules, and compliance reporting standards have been rapid and frequent. Without regular system updates, your ERP can’t stay compliant, exposing you to penalties, audits, and heavy fines. One CFO shared that their team spent over 120 man-hours per month just manually adjusting compliance entries because their ERP couldn’t handle updated tax regulations automatically.

    Losing the Race: Competitors Will Overtake You

    While you struggle with manual workarounds, slow reporting, and error-prone integrations, your competitors are embracing automation, AI-driven forecasting, mobile access, and real-time dashboards.

    They are cutting costs, improving customer service, and making decisions at the speed of light.

    A manufacturer in Pune decided to move from NAV 2016 to Business Central SaaS in late 2022. In just six months, they reported:

    • 20% faster order-to-cash cycles
    • 15% reduction in operational costs
    • Real-time inventory visibility across three locations
    • Mobile approvals for purchase orders and dispatches

    Their CEO mentioned:

    “Earlier, I used to wait for the weekly report to understand my sales and inventory. Now, it’s on my phone, real-time. That’s the difference Business Central has made.”

    Meanwhile, a peer company sticking to NAV continues to operate with last week’s numbers — making decisions based on assumptions, not reality.

    Technical Challenges Will Multiply

    Technology is moving towards connected ecosystems. You cannot run isolated systems anymore. Integrating NAV with new tools like Power BI, Microsoft Teams, payment gateways, CRM software, and modern supply chain platforms is becoming more complex and expensive each year.

    In one case, a Bangalore-based distributor wanted to integrate their old NAV system with a new e-commerce platform. After months of struggle and ₹8 lakh spent on custom connectors and manual reconciliation, they abandoned the project and eventually migrated to Business Central — saving both time and future frustration.

    Without modernization, every future innovation will cost you more, take longer, and deliver less value.

    The Hidden Costs of Sticking with NAV

    Many businesses hold back on upgrading thinking, “Why spend when it’s still working?” But the real costs are hidden:

    • Increased IT maintenance and downtime
    • Higher cybersecurity insurance premiums
    • Loss of employees frustrated with outdated systems
    • Customer dissatisfaction due to delayed service
    • Missed business opportunities due to lack of real-time data

    Over time, the “cost of inaction” becomes far greater than the “cost of migration.”

    A Smarter Path: Transitioning to Business Central

    Microsoft’s vision for the future is clear. Dynamics 365 Business Central is the natural successor to NAV — modern, cloud-first, continuously updated, and seamlessly integrated with Microsoft’s ecosystem.

    Migration doesn’t mean you lose your data, processes, or expertise. It’s about upgrading your engine while keeping your core intact.

    Companies that migrated report:

    • 25–30% operational efficiency gains
    • Reduced dependency on IT support
    • Easier compliance management
    • Happier, more productive employees

    And the best part?

    Business Central grows with you — whether you open a new plant, add an e-commerce channel, or expand globally.

    Conclusion: Staying on NAV Post-2025 Is Like Sailing Without a Compass

    If your business still runs on Dynamics NAV, think hard about your next steps.
    Post-2025, it’s not just about missing a few features — it’s about risking your entire operational stability.

    You owe it to your business, your team, and your customers to move to a system that’s ready for the future.

    Because in today’s competitive world, being slightly slow is the same as being left behind.

    Upgrade your systems before your competition upgrades their position.

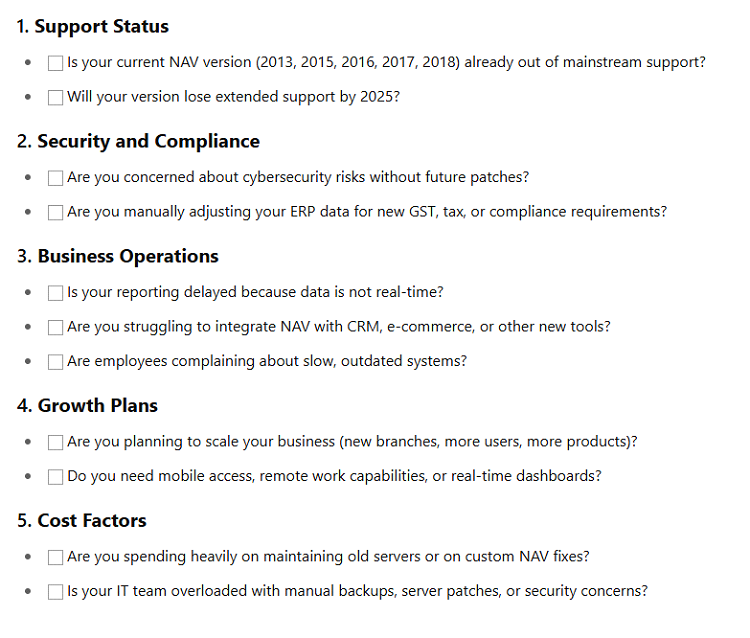
    Checklist

    Your Scorecard:

    Number of CheckmarksRecommendation
    8–10Immediate action required: Plan migration now.
    5–7Strongly recommended to migrate within 6–12 months.
    0–4Prepare a roadmap; migration needed soon.

    Ready to Migrate Smoothly?

    We specialize in helping businesses like yours move from Dynamics NAV to Business Central with minimal disruption and maximum benefits.

    • Data migration and integrity assurance
    • Customization re-alignment
    • User training and post-go-live support

    Let’s future-proof your business — and set you up for the next decade of growth.