Category: Sharepoint

  • From Excel to Efficiency: How a Florida Construction Giant Transformed Operations with Microsoft Project Operations

    From Excel to Efficiency: How a Florida Construction Giant Transformed Operations with Microsoft Project Operations

    Introduction

    In the construction industry, where timelines are tight and coordination is everything, having the right tools to manage operations can make or break a project. For years, one of Florida’s leading construction companies managed their entire business on Microsoft Excel. While it worked on the surface, it was far from ideal.

    Excel was their go-to tool for tracking tasks, budgets, timelines, and resources. But as the business grew, so did the chaos. Teams were often working on outdated files, key updates got lost in email threads, and collaboration across departments felt like pulling teeth.

    Everything changed when they introduced Microsoft Teams to streamline communication—and realized what it felt like to have everything in one place. That “aha” moment set them on a journey that ultimately led to Microsoft Project Operations.

    The Problem with Excel

    Let’s face it—Excel is a powerful tool, but it’s not built for managing large, dynamic construction projects. The Florida-based company faced a number of challenges using spreadsheets:

    • Multiple Versions: Teams were constantly sending Excel files back and forth, never quite sure who had the most updated version.
    • Manual Errors: Simple mistakes in formulas or data entry led to inaccurate forecasts and scheduling issues.
    • Zero Real-Time Visibility: Leadership had no easy way to see the real-time status of projects across locations.
    • Poor Collaboration: With no centralized platform, field teams and office staff were often out of sync.

    Despite all this, the company made it work—until they saw what modern tools could really do.

    Why Change—Even When Owners Resist?

    It’s common in the construction industry for owners or senior leaders to resist change. After all, if projects are still being delivered and revenue is coming in, why fix what isn’t “broken”?

    But here’s the reality: what works today may not scale tomorrow. In this case, the leadership initially questioned the need to move away from Excel. But once they experienced the power of Microsoft Teams—even for just communication—they realized the inefficiencies that had been accepted as “normal” for years.

    Change can be uncomfortable, especially when it means learning new systems. But in a world where time, coordination, and visibility are critical, embracing digital tools like Microsoft Project Operations is no longer optional—it’s a competitive advantage.

    The Shift to Microsoft Ecosystem

    It started small. By introducing Microsoft Teams, communication instantly improved. Staff could chat, share documents, and collaborate live instead of sifting through email chains and scattered files.

    Encouraged by the results, the leadership team asked: What else can Microsoft do to help us work better?

    That’s when they discovered Microsoft Project Operations—a comprehensive project management platform designed for service-based and project-driven businesses. Once they dove in, the benefits were immediate and transformative.

    The New Workflow

    Today, the company manages its entire project lifecycle using Microsoft Teams, Power Automate, and Project Operations. Here’s how it changed the game:

    • Task Automation: Repetitive tasks are now handled through automated workflows.
    • Centralized Dashboards: All project data—from budgets to timelines—is visible in real time.
    • Resource Management: Assigning teams, tracking availability, and managing workloads is now effortless.
    • Improved Communication: Field workers and office staff are fully aligned through integrated updates and file sharing.
    • Faster Decision Making: With real-time reports and forecasting tools, the leadership team can make quicker, smarter decisions.

    Conclusion

    Switching from Excel to Microsoft Project Operations wasn’t just a software upgrade—it was a strategic transformation. The Florida construction company now runs its business more efficiently, with better visibility, stronger collaboration, and fewer manual errors.

    Digital change isn’t always easy—but it’s necessary. For owners who hesitate, the value lies not just in technology—but in the time saved, the mistakes avoided, and the profits protected. When teams spend less time managing chaos, they spend more time building success.

    If your construction business is still stuck in spreadsheets, it’s time to rethink the tools you use to build your future. Microsoft Project Operations may be the missing piece in your path to growth.
  • Automate Reimbursement Approvals with Microsoft Forms, Power Automate & Excel

    Automate Reimbursement Approvals with Microsoft Forms, Power Automate & Excel

    Introduction

    Managing employee reimbursements manually? You’re not alone. Many finance teams still rely on email threads, spreadsheet juggling, and back-and-forth approvals that waste valuable time and increase the risk of errors.

    But what if you could automate the entire reimbursement approval process—from collecting claims to logging approved entries in Excel—without writing a single line of code?

    In this blog, we’ll walk you through a practical, step-by-step solution using Microsoft Forms, Power Automate, and Excel Online. By the end, you’ll have a fully automated system where employees submit claims through a form, finance receives approval requests instantly, and approved claims are automatically logged into a centralized Excel file for processing.

    Let’s make your finance workflow faster, smoother, and error-free.

    Prerequisites

    You’ll need a Microsoft 365 account and access to the following:

    • Microsoft Forms
    • Power Automate
    • OneDrive or SharePoint
    • Excel Online
    • An Excel sheet with a table
    • A Microsoft Form for collecting reimbursement requests

    Step-by-Step Guide

    First things first, head over to Microsoft Power Automate. You’ll find hundreds of ready-to-use templates there—we’ll use one of them to build our reimbursement approval flow.

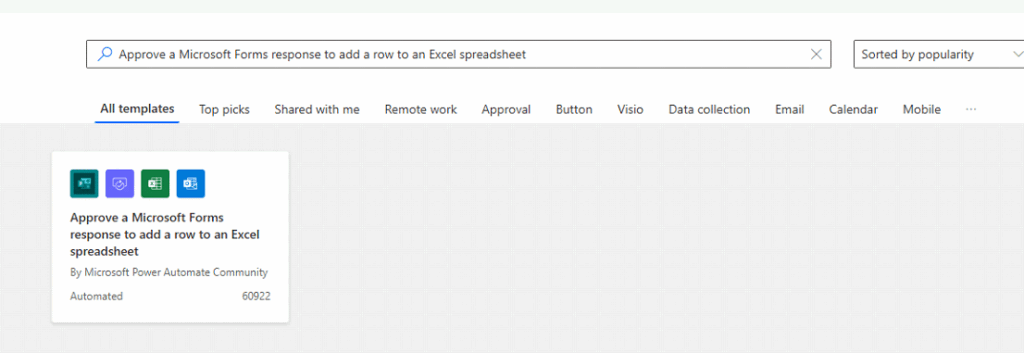
    Search for this template:

    “Approve a Microsoft Forms response to add a row to an Excel spreadsheet”

    Search this template you will get result-

    But before using this template, let’s prepare the Microsoft Form and Excel sheet required to set up this flow.

    To go https://forms.office.com/ and click on create new form and add these fields to create a form use title it: “Reimbursement Claim Form” or what ever depends on your business need.

    Add the following fields (example):

    • Full Name
    • Department
    • Expense Type
    • Amount
    • Date of Expense
    • Comments
    • Status (Approved/Rejected)
    • Approval Date

    Select the range and click Insert → Table. Name the table as ClaimsTable.

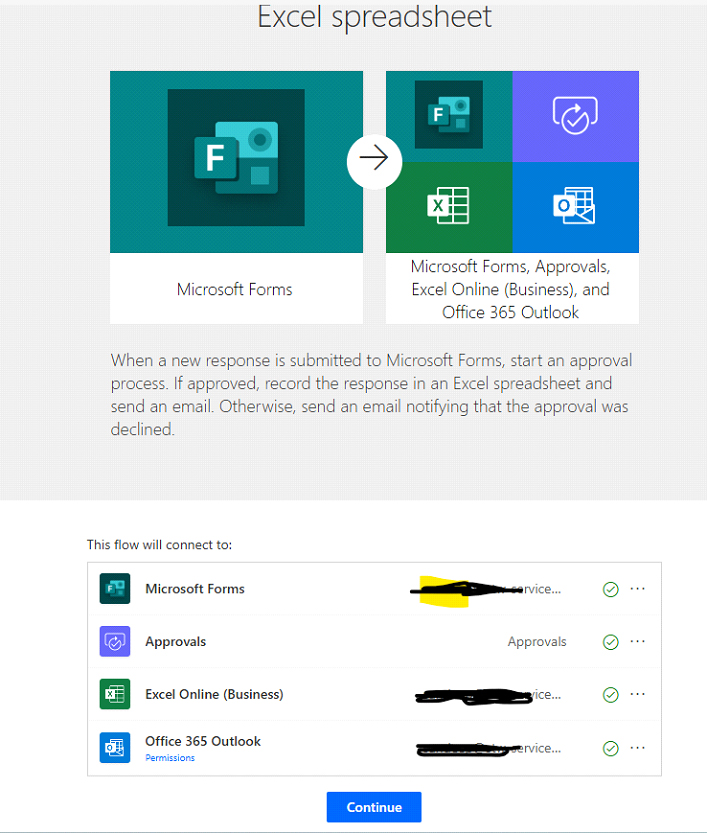
    Now go back to template and select template make sure all app connection or okay like this.

    Check the connection for Microsoft Form, approval, Excel online, and Office 365 Outlook. If all connections are okay, click on continue or fix the connection issue using your Microsoft login.

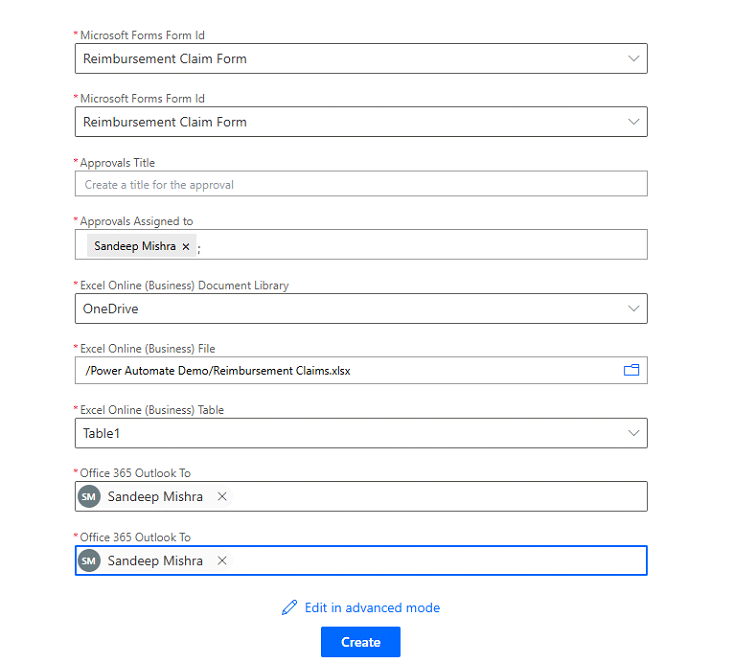
    Once you click on continue, it requires all details to be filled in in the next step. Fill details like form ID, Excel path and table, also the person who will approve/ disapprove the request, like given example:

    Once filled click on continue and your flow will be read.

    Testing:

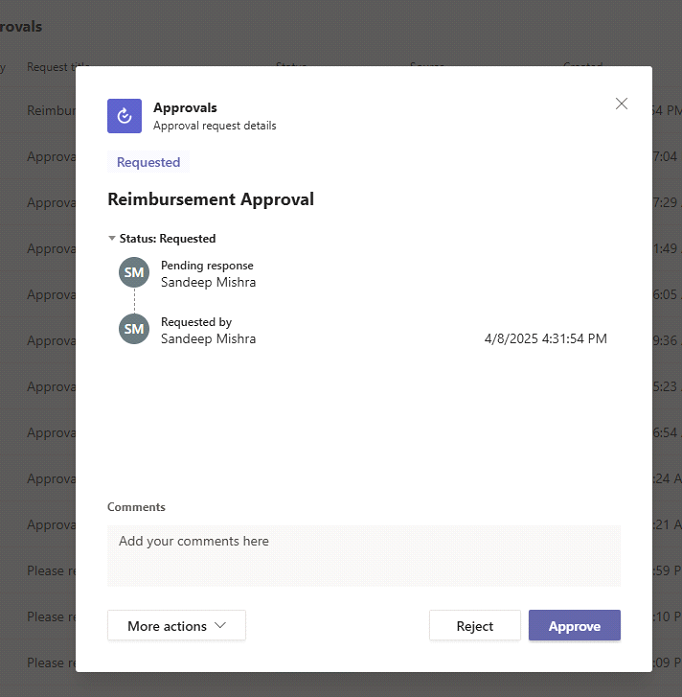
    Click on Test in the top right-side bar and fill out the Microsoft form and submit it. You can see an approval/disapproval request in Microsoft Teams like this:

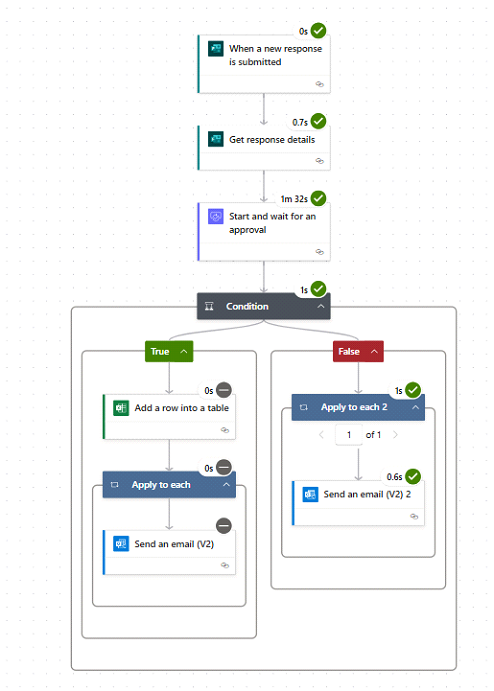
    Your action will run accordingly. Wow, the flow is running fine.

    Conclusion

    With just a few simple tools—Microsoft Forms, Power Automate, and Excel Online—you can completely transform how your finance team handles reimbursement claims. What once required manual emails, approvals, and spreadsheet updates can now be streamlined into an automated, error-free workflow.

    Not only does this save valuable time, but it also improves transparency, speeds up approvals, and ensures that no request falls through the cracks.

    Ready to go further? You can enhance this setup by integrating notifications in Microsoft Teams, tracking metrics in Power BI, or adding file uploads for receipts. The possibilities with Power Platform are endless!

    Start small, automate one process, and you’ll quickly see the impact across your entire organization.

  • 10 Tools to Improve WFH Productivity for IT Professionals

    10 Tools to Improve WFH Productivity for IT Professionals

    WFH or Work from Home is the new normal and all thanks go to the outbreak of the COVID-19 pandemic. All of a sudden, it put a halt on the ever-moving world and forced us to stay indoors. While it was for our own good, it has some negative sides as well. For instance: enterprises and businesses of all sorts having a tough to maintain the before WFH productivity.

    For working professionals, it was daunting and tedious than before as they have to maintain the pace with limited resources. As we all going to work from home for a little longer, it’s high time to figure out a solution. With limited productivity and tedious working hours, no one is going to thrive for long.

    Here is a list of top 10 tools that are helping developers, designers, and many other IT professionals to perform par excellently without draining out themselves.

    Tools for Team Communication

    Work from home means working without your equipped team by your side. Here are tools to consider that make sure that your teammates are only out of sight, not out of mind.

    #1- Slack

    It’s hard to beat Slack when it comes to team communication and collaboration. As it was built by remote workers itself, it has addressed the challenges of remote communication very well. Cumbersome email exchanges, arranging meetings, information exchange, instant messaging, video calling, and many other kinds of communication has been simplified a lot with this tool. Honestly speaking, it’s the need of the hour for everyone, not by IT professionals.

    #2- Spark

    One of the most loved email productivity tools, Spark makes e-communication effortless. You are allowed to snooze emails, send smart emails, and send reminders for others. It has made email communication easy and professionals. Emails can be customized as per the need of the hour. In fact, one can put access restrictions on email to make sure no unauthorized professional is reading

    #3- Zoom

    Zoom doesn’t need any introduction. After almost two years of work from home, everyone is familiar with this app. It’s a cloud-based video conferencing tool simplifying group messaging and simple online meetings. At a time, more than 100 interactive participants and 10,000 view-only attendees can be a part of a meeting which makes it stand out from others.

    Tools for Better Focus

    The main hurdle that IT developers and designers are facing, while working from home, is the lack of concentration and focus. Because of this, they end up spending 3-4hours on a jib which can be done within an hour or so. With school closed and kids around, it’s impossible to have focus. Gladly, below mentioned tools are here to help.

    #4- Serene

    With features like block distractions, power sessions, day planner, to-do list, focus muscle, phone silencer, and focus music, Serene ensures that you are focused and can have unwavering concentration. There is a free trial offered for 14 days. After that, only $4 per month need to spend to attain full focus. It’s all worth it.

    #5- Forest

    The phone is the biggest distraction and Forest ensures that you don’t overuse it while working. We tend to check WhatsApp and Instagram during work hours and don’t realize that already an hour is passed by. With Forest, this isn’t going to happen.

    Tools for Time Management

    Juggling between household chores and office deadlines is tough and takes a toll on one’s mental peace. Have a look at the below-mentioned tools below that can save you from this hassle.

    #6- RescueTime

    As the name suggests, this tool is here to save time. It’s been around since 2007 but never was not loved as it is now. WFH model has made this tool popular. It’s a very powerful time tracking and distraction blocking software working perfectly fine on platforms like Mac, Windows, Chrome, iOS, and Android devices.

    #7- Focus@Will

    Supported by world-famed neuroscientists, this app is here to help in creating sustainable work from the home scenario with less focus on useless things. The in-built timer and tracker make time tracking possible. There are multiple focus modes to better time utility.

    Tools for Better Productivity

    For developers and designers, working from home is tedious as resources are limited. They can’t access the advanced technology just like they used in the office. Still, some tools are going to improve productivity.

    #8- Proto.io

    Unleash your productivity in full capacity with Proto.io as this tool offers a wide range of the instrument to convert hand-drawn style into digital format. This is for designers especially. It comes with an in-built sketch and Photoshop mode to utilize different instruments. The final configuration can be measured as well with its help.

    #9- Process Street

    Founded in 2014, this one is going to help in reducing the repetitiveness involved in business tasks and checklists. Track business project processes, reducing mistakes, and designing scalable solutions are possible with the help of this tool.

    The best part of using this app is that the navigation can be done through keyboard shortcuts. One is allowed to ass images, videos, and any other document in the project whenever and wherever needed. There is a 14-day free trial offered. After then, three subscription choices are there.

    #10- Asana

    Don’t get too involved in project management. Use Asana and enjoy effortless project management. It offers a wide range of features and facilities for jobs like task management, calendar, time tracking, data sharing, and online collaboration. Up to 15 people can collaborate effortlessly with the help of this tool. The wide range of integration ensures that tasks are done quickly and effortlessly. Multiple paid versions are offered for effortless. It’s worth the try.

    The Final Say

    Work from home is going to stay here and going to give hard time. To make sure you don’t lose your sanity during the process, use the above-mentioned tools. From focus to time utility, these tools are going to help at every front. Thousands of professionals have already taken their help. When are you trying them out?

  • User permission in Sharepoint 2013

    User Permission In Sharepoint 2013 – Permission level is always confusing for SharePoint beginners. By this article, I am going to make it easier.

    Our first step is to add users in SharePoint site and there are couples of ways you can do this. Users can be added using – Settings menu >> Site settings >> People and groups:

    sharepoint 2013

    By default “softechword members” group is selected. But we are not going to add user’s members so select “Softechword visitors” group. You can select “New” to add users in visitor group. Popup appears. Search user by name and add in group.

    Capture2

    As we do not allow external access of SharePoint site so any user which you want to add must have workspace username and password. If your requirement to delete a user from a group, select user which you want to delete from items and click on action >> Remove users from Group. Same actions you can use for add owners and other group users.

    The next question is how we can check group permission. To understand this go back to site settings >> site permissions. You can find all available groups are listed over there. More custom groups can be added with site permission accordingly. You can see in ribbon check permission button to check user permission. It will show user permission levels for SharePoint site.

    Capture3

    Using Grant Permissions button uses to grant permissions level or direct permissions to a particular user. There is one important ribbon button “Site Collection Administrators”. “Site Collection Administrators” has full control over all site lists/ libraries/ documents etc. So “Site Collection Administrators” has access to everything in SharePoint. So if you want to add more user as site collection administrator, you can add using “Site Collection Administrators”.

    Capture4

    Next one is “Permission level”. A permission level is basically what you can assign to a group or what you can assign to a User.

    Capture5

    In other word you can say a permission level is collection of small permissions. Here by you can add/modify permission level. It is not recommended to modify any default permission level. But you can add new permission level using available small permissions. There are three blocks of small permissions of SharePoint are List permissions, Site permissions and Personal permissions. Easier way to create a permission level is just copy a default permission level and customizes it as per your required new permission level.

    Capture6
    Capture7

    Next topic is to set unique permission to a document library. So click on document and select library tab and click on shared with.

    You can see list of users to whom this document is shared with. Here by you can also invite more users for view or edit documents.

    Go library settings >> Permissions for this document library.

    Capture8

    At the top yellow line warning says “this library inherits permissions form it parents”. But we want to set unique permission for this document library and do not to share with everyone. Let’s do that. From ribbon menu, click on “Stop Inheriting Permissions” to stop inheriting permission from site.

    Capture9

    First you need to remove all existing associated permission groups for this library. Select all and click “Remove User Permissions” from ribbon. After removing you can check user permissions using “Check permission” to verify which user has permission for this document library. So to assign new permission, click on “Grant Permissions” from ribbon and search user to assign.

    Capture10

    You can grant direct permission to users. As unique permission is granted to user, no other user can see document library even if this library is added on home page.

    New step is to grant permissions to only few folders or documents within document library. So let’s do that. Go back to document library and click “Library Settings” from ribbon. First of all you need to delete unique permission to reset permissions for document library.

    Capture11

    As you deleted unique permissions, it once again inherits from parents. And all permission levels will be back in list. Now go back to document library.

    And click on three ellipse and scroll down to “Shared with”.

    Capture13

    You can click on “advanced” and now you again see yellow warning “this document inherits permissions form parent”. We don’t want parent permissions for this document so stop inheriting permission and remove all listed groups over there like we did previously while we were assigning unique permissions. So select “Stop inheriting permission” from ribbon, selects all listed permission group and click “Remove User Permissions” from ribbon. Now click “Grant Permissions” from ribbon and use same process as we did previously to grand permission to a selected user. Now only selected user can see folder in document list. Let’s check that. Go on Document >> Library Settings >> Permissions for this library.

    Capture14

    In yellow warning you can see “Some items in this list may have unique permissions which are not controlled from this page. This library inherits permissions from its parents”. To see which items has unique permission click on “Show these items”

    Capture15

    It means that this library inherits permissions from parent. But some of items in this library do not.  Click on manage permission. You can see which user has full control over ADMINFOLDER.

    So we learnt how to create permissions group, assign unique permissions to document library/ sites, and assign unique permission to a particular document/folder or item in library. Same processes you can use to assign permission to any SharePoint object.

    That’s it. I can share in this article regarding SharePoint Permissions level. Hope it helps you. Thanks.

  • Connect SharePoint Online using SharePoint Designer 2013

    download designer_1
    Error message.

    Connect SharePoint Online using – As a beginner SharePoint developer, you may face problem while connecting SharePoint Online using SharePoint Designer. In this post, I am going to share some steps which will make your life easier.
    Download SharePoint designer using SharePoint Online, and install on your local machine.


    In case of on premises SharePoint server, SharePoint designer uses to open sites directly. But in case of SharePoint Online, we might get message “You do not have permission to open this website in SharePoint Designer.”

    Above screens are examples which you will face while connecting to SharePoint Online server.

    Here are some settings we need to do before we connect to SharePoint Online.

    Step 1:  Default scripting capability settings are set to “Prevent users from running custom script on personal site/self-service created sites”. Because of this, custom script will be blocked in site and also for some web parts like, content editor (CEWP) & script editor web part (SEWP). This setting is essential for running all web parts properly/ or adding scripts using SharePoint Designer.

    Navigate to Office  365> Admin  >  Admin Center  > SharePoint  > Settings .

    Custom Script _3
    SharePoint MS_2

    Open SharePoint Online Admin Center, and allow these settings.

    Step 2: Download SharePoint Online Management Shell, and install on same machine where SharePoint designer is already installed.
    Note: SharePoint Online Management Shell is a tool that contains a Windows PowerShell Module to manage your SharePoint Online subscription in the Office 365.
    Step 3: Run SharePoint Management Shell, and execute these commands-

    Connect-SPOService -Url https://contoso-admin.sharepoint.com -credential admin@contoso.com

    -Url : Pass Sharepoint Online site url.
    -Credential : Admin user Name/ Password(It will prompt screen for enter password).
    Following link you can visit for reference:
    https://technet.microsoft.com/en-us/library/fp161392.aspx
    https://technet.microsoft.com/en-us/library/fp161372.aspx

    If command does not return any error, execute next one:

    WindowPower Shell

    Set-SPOSite -Identity https://.sharepoint.com -DenyAddAndCustomizePages $false

    You have to make sure scripting setting in the admin matches what you set using SharePoint Online PowerShell or the site collection setting, may be overridden again in next day cycle (24 hours).
    Hope you like this article.
    Thanks.

  • Configure alternate access for mappings in SharePoint 2013 : Part 1

    Configure Alternate Access For Mappings – In this article you will learn how to configure alternate access mappings in SharePoint 2013. Each of  web application can be associate with a collection of mappings between internal and public URLs. Both  the URLs internal and public consist of the protocol and domain portions of the full URL.

    A public URL is what users can access the SharePoint site, and that URL is what appears in the links on the pages. Internal URLs is in the URL requests that sent to the SharePoint site. Many internal URLs can be associated with a single public URL it means we can use many internal URL’s for single public URL.

    Each web application supports five collections of mappings per URL. The five collections correspond to five zones (default, intranet, extranet, Internet, and custom). When the web application receives a request for an internal URL in a particular zone, links on the pages returned to the user have the public URL for that zone.

    How To Manage alternate access mappings

    1. On the SharePoint Central Administration website, click on System Settings And then.
    2. On System Settings page, in the Farm Management section, click  on Configure alternate access mappings.

    Adding an internal URL for mapping

    1. On the Alternate Access Mappings page, click to  Add Internal URLs.
    2. In the mapping collection you want to change is not specified, then choose one. In the Alternate Access Mapping Collection section, on the Alternate Access Mapping Collection menu, click on Change alternate access mapping collection.
    3. On the Select an Alternate Access Mapping Collection page, click a mapping collection.
    4. In the Add internal URL section, in the URL protocol, host and port box, type the new internal URL (www.example.com)
    5. In the Zone list, click the zone for the internal URL.
    6. Click Save.

    Edit and delete internal URL for mapping

    1. On the Alternate Access Mappings page, click the internal URL that you want to edit or delete.
    2. In the Edit internal URL section, change the URL in the URL protocol, host and port box.
    3. In the Zone list, click the zone for the internal URL.
    4. Do one of the following:
      • Click Save to save your changes.
      • Click Cancel to discard your changes and return to the Alternate Access Mappings page.
    5. Click Delete to delete the internal URL.

    Edit public URLs for mapping

    1. On the Alternate Access Mappings page, click Edit Public URLs.
    2. If the mapping collection that you want to change is not specified, then choose one. In the Alternate Access Mapping Collection section, on the Alternate Access Mapping Collection menu, click Change alternate access mapping collection.
    3. On the Select an Alternate Access Mapping Collection page, click a mapping collection.
    4. In the Public URLs section, you can add new URLs or edit existing URLs in any of the following text boxes:
      • Default
      • Intranet
      • Extranet
      • Internet
      • Custom
    5. Click Save.

    Map an external resource url

    You can also define mappings for resources outside intranet applications. You must supply a unique name for URL, The initial URL, and a zone for that URL. The URL you request must be unique to the farm.

    1. On the Alternate Access Mappings page, click to Map to External Resource.
    2. Next click on Create External Resource Mapping page, in the Resource Name box, type a unique name.
    3. In the URL protocol, host and port box, type the initial URL.(www.example.com)
    4. Click Save.