Author: STW Services LLP

  • Multi-Agent Architecture in enterprise languages

    Multi-Agent Architecture in enterprise languages

    Introduction:

    When most businesses talk about “adding AI,” they imagine it as a magic switch, plug it in, and suddenly every process runs itself. But the reality is very different. Just like hiring a new employee, an AI model comes with general intelligence but no knowledge of your business until you train it, give it access to tools, and guide it with clear workflows. That’s where the concept of multi-agent architecture comes in.

    Instead of relying on one giant AI to do everything, you build a team of digital employees, specialized agents, each with a clear role, connected together under an orchestrator. These agents can think (LLMs), remember (RAG), act (Tools/APIs), and know when to work (Triggers). Together, they mirror the way real organizations operate, collaborating, checking each other’s work, and scaling as your business grows. This approach turns AI from a “nice-to-have chatbot” into a true digital workforce that supports every department.

    Multi-Agent Architecture

    When you think about building AI systems, the word multi-agent architecture can sound intimidating. But here’s a simple way to picture it: imagine running a company.

    In a company, you don’t hire one person and expect them to do everything marketing, sales, HR, accounts, customer service. That would be chaos (and probably burn them out!). Instead, you hire specialists, train them, give them the right tools, and put managers in place to coordinate work.

    Organizational Org Chart.
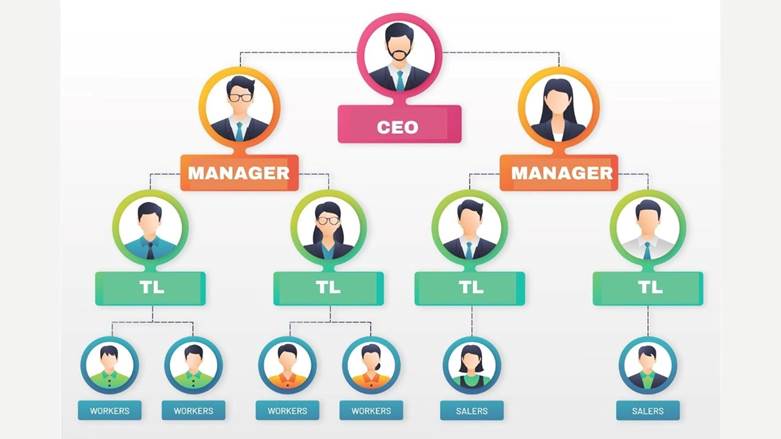
    In Multi-Agent Orchestration, you can think of every employee in your company having their own digital counterpart (an AI agent) that mirrors their role, responsibilities, and workflows.
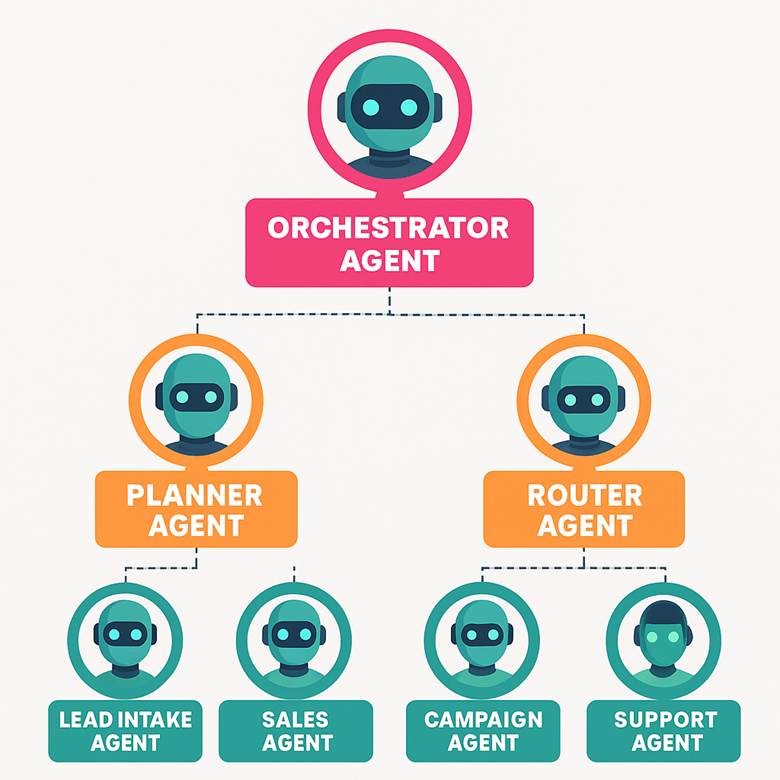
    How these things you can organize in Copilot Studio to create your agents, let’s understand technical things in normal language.

    Outcome in AI agents based on:

    Outcome = LLM (brain) + Context (RAG) + Tools/Actions (APIs) + Workflow (agents) + Feedback loop

    Generative AI / LLM (Generative AI orchestration in Copilot Studio):

    LLMs are great generalists. They’ve learned language, patterns, reasoning tricks. but by default, they:

    1. don’t know your latest prices, processes, or edge cases,
    2. can’t hit your systems (Odoo, D365, WhatsApp, SharePoint) without tools, and
    3. aren’t trained to follow your policies (discount limits, legal phrases, PII rules).

    so, if you ask them for company-specific answers without context, they hallucinate, politely and confidently.

    Context (RAG):

    RAG = Retrieval + Generation

    • Retrieval: AI fetches relevant pieces of information (like SOPs, price lists, or FAQs) from your enterprise data store.
    • Generation: AI uses that retrieved info to create an answer.

    Think of it like this:
     A human employee doesn’t memorize the entire company handbook. Instead, they look up the page they need when answering a customer.

    Tools/Actions (APIs):

    Tools like adding skill to your AI agent to perform things. For you are giving employee accounting software to perform account work. Think of a human employee.

    • Their brain = reasoning and language (like an LLM).
    • Their hand/keyboard = the ability to act (send an email, update CRM, generate a report).

    LLMs on their own are just the “brain.” They can think and talk, but they can’t actually do anything in your business systems.

    That’s why we give them Tools.
     And in practice, Tools = APIs, scripts, or connectors the AI can call.

    Triggers

    In the context of AI agents (or automation in general), a Trigger is the event that starts the process. For example, you are assigning work to employees and asking them to start on Monday. So scheduled task to him to perform on fix time or event.

    Think of it like this:

    • In a company, a trigger could be: “Customer walks into the office,” or “A support ticket is filed.”
    • For AI agents, a trigger is: “WhatsApp message received,” “New lead created in CRM,” or “Invoice overdue by 7 days.”

    No trigger → no action.

    By combining LLMs as the brain, RAG as the memory, Tools (APIs) as the hands, and Triggers as the starting point, you can create a true digital employee—an AI agent that doesn’t just talk but can actually understand, decide, and act. These agents can then be connected with each other in a multi-layered architecture, where each one has a specific role—like sales, support, or compliance—while an orchestrator coordinates their work. Just like in a real company, they collaborate, pass tasks along, and validate each other’s outputs. This interconnected system of digital employees is what we call a multi-agent architecture: not one giant AI doing everything, but a structured team of specialized agents working together to achieve enterprise goals.

    Conclusion

    Multi-agent architecture isn’t just a buzzword, it’s the future of how businesses will work with AI. Instead of expecting a single model to do everything (and getting frustrated when it doesn’t), we should think of AI the same way we think of people in an organization: each role has a purpose, each employee has tools, and they all work together under clear processes. By giving AI agents a brain (LLMs), memory (RAG), hands (APIs/Tools), and a clock (Triggers), we transform them into digital employees who can handle real business tasks with accuracy and accountability. And when these agents are connected in layers, coordinated, specialized, and scalable, you don’t just have automation, you have a digital workforce ready to grow with your business. The companies that succeed with AI won’t be the ones that add a chatbot and hope for the best, but the ones that build a well-structured team of agents that mirrors their organization and delivers results every single day.
  • Disaster Recovery in Business Central: How to Automate Full Backups Beyond 28 Days

    Disaster Recovery in Business Central: How to Automate Full Backups Beyond 28 Days

    Introduction:

    While Microsoft’s built-in 28-day backup is helpful for short-term recovery, many organizations require longer retention, audit compliance, or the ability to manually restore data at any point in the future.

    In this blog, we’ll walk through how to implement a custom backup strategy using PowerShell, Azure Blob Storage, and Automation to create daily BACPAC exports of your Business Central database, extending your DR capability beyond 28 days.

    Why Go Beyond 28 Days?

    • Regulatory compliance (GST, audit, tax)
    • Long-term recordkeeping
    • Ability to restore historic data for reporting/testing
    • Business continuity planning

    Tools You’ll Use:

    ToolPurpose
    PowerShell + BC Admin APITrigger export of BACPAC
    Azure Storage (Blob)Store backups securely
    Azure AutomationSchedule daily exports
    SSMSView or restore BACPAC if needed

    Step-by-Step: Automate Daily Full BACPAC Backup

    1. Set Permissions

    • Assign yourself the role: Business Central Administrator
    • Add D365 BACKUP/RESTORE permission set in BC

    2. Create Azure Blob Storage

    • Set up Blob container (e.g., bc-daily-backups)
    • Generate a SAS token or use Key Vault

    3. Write PowerShell Script

    $envName = “Production” $bacpacName = “Backup_$(Get-Date -Format yyyyMMdd).bacpac” $storageUrl = “https://yourblob.blob.core.windows.net/backups/$bacpacName?{SAS_TOKEN}”

    $token = Get-BCAdminToken

    Invoke-RestMethod -Method Post -Uri “https://api.businesscentral.dynamics.com/admin/v2.11/applications/businesscentral/environments/$envName/databaseExport” -Headers @{ “Authorization” = “Bearer $token” } ` -Body (@{ “storageAccountUrl” = $storageUrl } | ConvertTo-Json)

    4. Schedule in Azure Automation

    • Create a Runbook
    • Securely store token and keys
    • Trigger backup daily at 2 AM or off-peak hours

    How to Check or Restore Data

    1. Download .bacpac from Blob
    2. Use SQL Server Management Studio (SSMS)
    3. Right-click on Databases → Import Data-tier Application
    4. Review table data using SQL queries

    Bonus: Optional Restore for Testing

    • Restore BACPAC to Azure SQL or local server
    • Use for:
      • Training environments
      • Testing integrations
      • Backup validation

    Conclusion:

    For advanced disaster recovery, regulatory compliance, and peace of mind, implementing a custom BACPAC export pipeline allows you to retain control of your Business Central data, beyond Microsoft’s default limitations. It’s an essential best practice for mature businesses relying on ERP continuity.

  • Disaster Recovery in Business Central: Leveraging Microsoft’s Built-In 28-Day Backup

    Disaster Recovery in Business Central: Leveraging Microsoft’s Built-In 28-Day Backup

    Introduction:
    In the world of business-critical ERP systems, disaster recovery (DR) is not optional. it’s a necessity. Microsoft Dynamics 365 Business Central SaaS provides robust built-in backup capabilities that allow administrators to recover environments within a 28-day window. This blog explains how Microsoft handles these backups and how you can restore your environment if things go wrong.

    Microsoft’s Built-In Backup and Restore Features

    Microsoft automatically backs up all Business Central online environments (Production and Sandbox) daily, with retention of 28 days.

    Key Features:

    • Automated Daily Backups (no manual action required)
    • Restore to any point in time within 28 days
    • 1-minute precision for restores
    • Available via the Admin Center
    • Geo-redundancy for added disaster resilience

    🧭 How to Restore a Business Central Environment

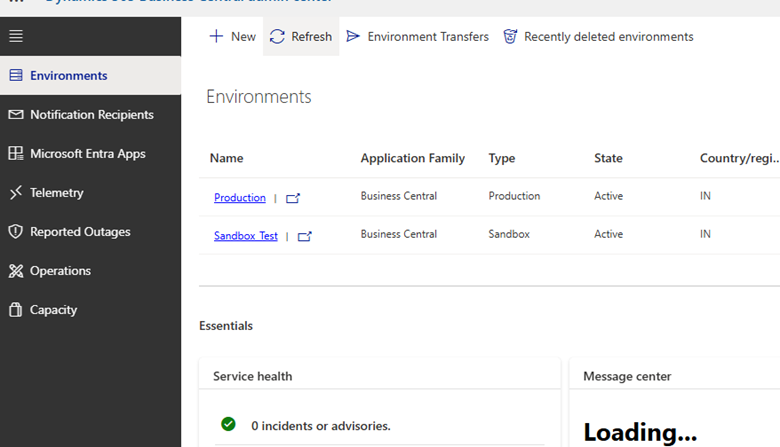
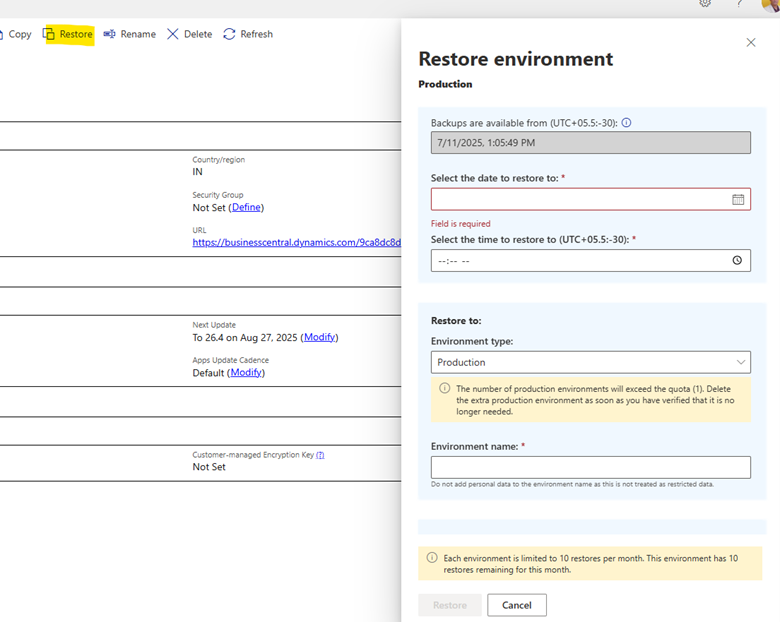
    Navigate to Admin Center:
     URL: https://businesscentral.dynamics.com/{tenantId}/admin

    Select the Environment you want to restore (typically “Production”)

    Click Restore and choose the desired date and time from the last 28 days

    Give your new environment a unique name (you can’t overwrite the current one)

    The restored environment will be created as a Sandbox.

    🛠️ What’s Included in the Backup?

    IncludedNot Included
    Tenant databaseAttachments stored in Azure Blob
    Configuration and app dataApp source code or extensions
    Point-in-time dataAny data past 28 days

    When to Use This:

    • Accidental deletion of records
    • Data corruption or integration errors
    • Testing rollback after major changes
    • User error affecting production data

     Limitations

    • No manual export of full backup
    • Backup cannot be downloaded
    • Restore cannot overwrite production — only create new sandbox
    • Retention capped at 28 days

    Best Practice

    Always monitor critical operations and note significant data changes so that, if needed, you can restore precisely to just before the issue occurred.

    Conclusion:

    Microsoft’s built-in disaster recovery features for Business Central SaaS provide a strong first layer of protection. The 28-day rolling backup and self-service restore make it easy to recover quickly from most common issues without extra configuration. For long-term backup or regulatory requirements, however, you’ll need to extend this capability, and that’s what we cover in the next blog.

  • Build a Power Automate Flow to Analyze Sentiment of Emails from Your Manager

    Build a Power Automate Flow to Analyze Sentiment of Emails from Your Manager

    Introduction:

    Ever wondered how you can automatically analyze the tone of your manager’s emails and get instant alerts?

    With Power Automate and AI capabilities, you can create a smart email workflow that does exactly that. In this blog, we’ll walk you through building a flow that triggers new emails, checks if the sender is your manager, converts the email content to plain text, and uses AI sentiment analysis to determine whether the message is positive or negative. You’ll even receive a push notification with the results, all without writing a single line of code!

    Overview of Flow:

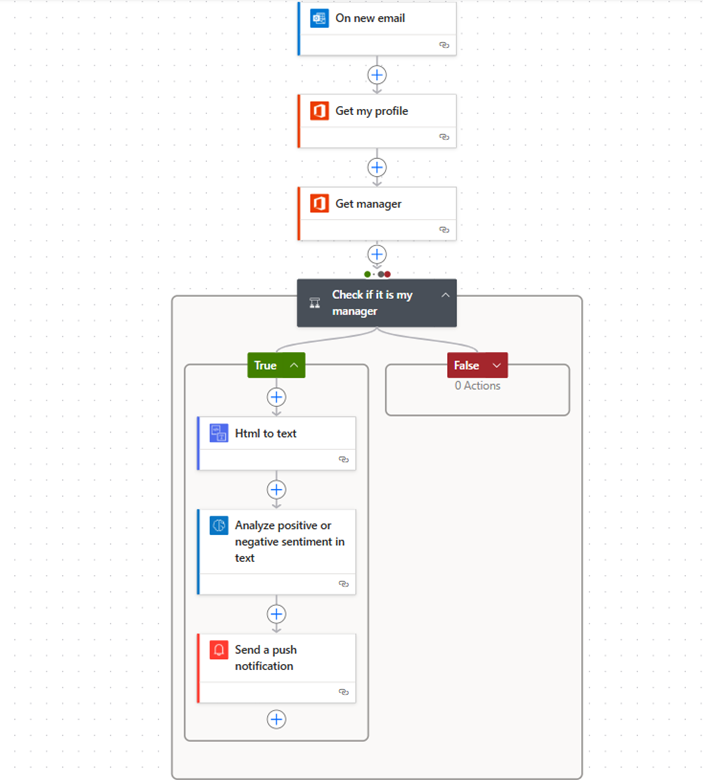
    This Power Automate flow intelligently monitors your inbox, checks if an incoming email is from your manager, and instantly analyzes its tone using AI sentiment analysis. By converting the email body to plain text, the flow ensures accurate sentiment detection (positive, neutral, or negative) and sends you a real-time push notification with the results. This automation helps you prioritize important emails, understand their tone at a glance, and respond quickly and appropriately. This is the flow we are going to create step by step.

    Step-by-Step Guide to Create This Flow :

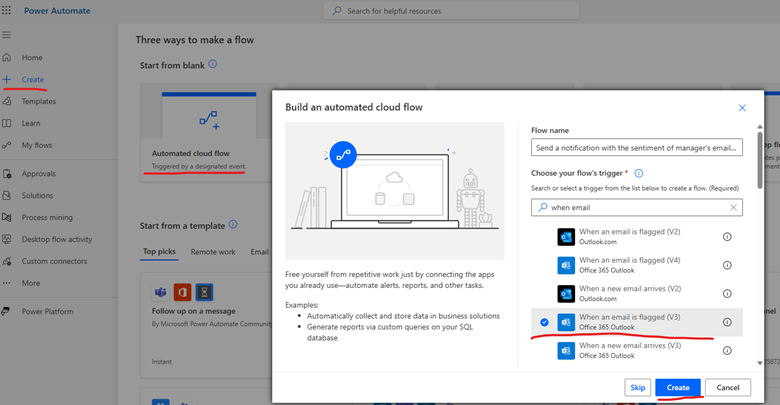
    Step 1: Create a New Automated Flow

    1. Go to Power Automate.
    2. Click on Create > Automated cloud flow.
    3. Name your flow, for example, “Send a notification with the sentiment of manager’s email using AI Builder.
    4. Select the trigger “When a new email arrives (V3)” from Outlook.
    5. Click Create.

    Step 2: Get Your Profile Information

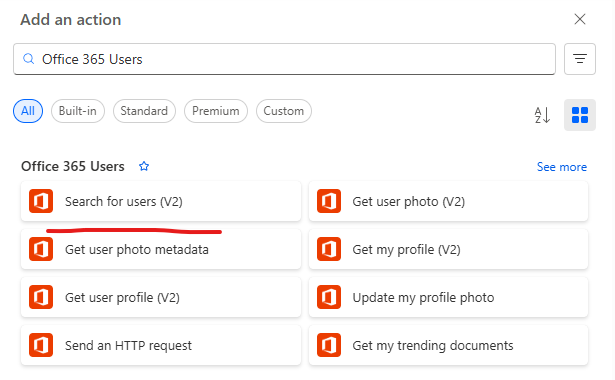
    1. Add a new step.
    2. Search for Office 365 Users connector.
    3. Select “Get my profile (V2)”.
    4. This step retrieves your details, including your manager’s ID.

    Step 3: Retrieve Your Manager’s Details

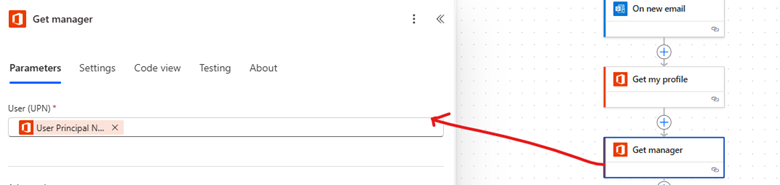
    1. Add another step with Office 365 Users.
    2. Select “Get manager (V2)”.
    3. This will fetch the manager’s email ID, which you will use for comparison.

    Code line for User (UPN) – ‘outputs(‘Get_my_profile’)?[‘body/userPrincipalName’]’

    Step 4: Add a Condition to Check if the Email is from Your Manager

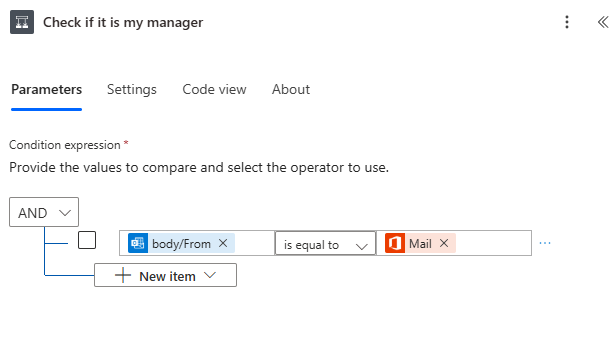
    1. Add a Condition control.
    2. Set it to compare the From (Email) of the incoming email with the Mail field of your manager (from the Get manager step).

    Code line – ‘@equals(triggerOutputs()?[‘headers’]?[‘From’], body(‘Get_manager_(V2)’)?[‘mail’])’

    • If True, the flow continues; if False, it does nothing.

    Step 5: Convert HTML Email to Plain Text

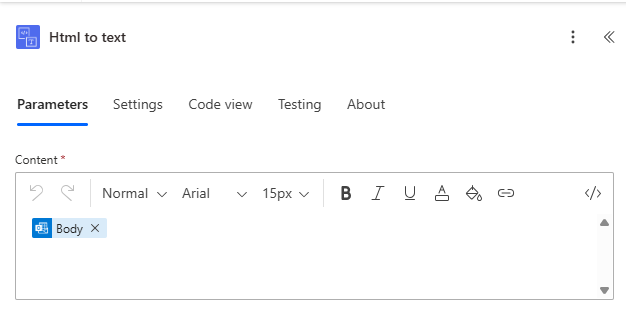
    1. In the True branch, add the action “Html to text” (Data Operations).
    2. Select the Body content from the email.

    Step 6: Analyze Sentiment of the Email

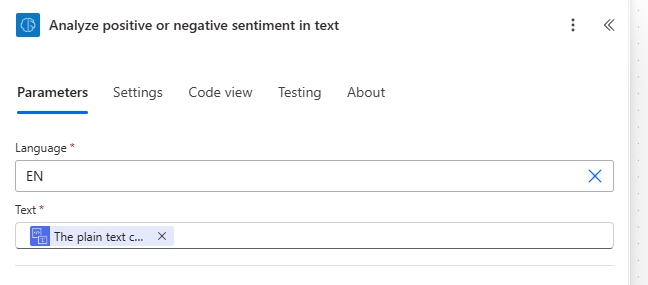
    1. Add a new step with AI Builder.
    2. Choose “Analyze positive or negative sentiment in text”.
    3. Pass the output of Html to text to the input of this step.

    Step 7: Send a Push Notification

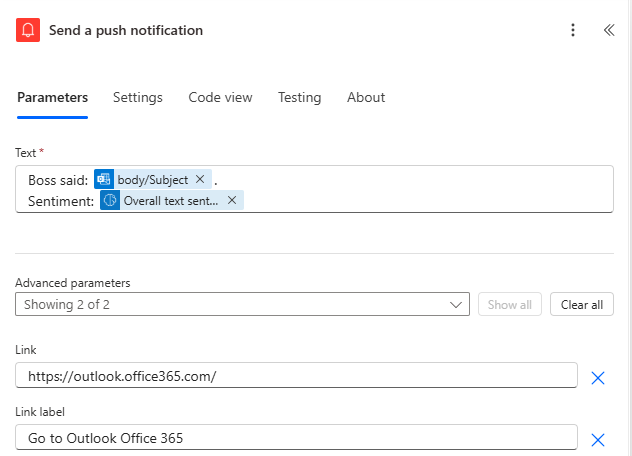
    1. Add Notifications connector.
    2. Select “Send me a mobile notification”.
    3. Include details like:

    Subject: @{triggerOutputs()?[‘body/subject’]}


    Sentiment: @{outputs(‘Analyze_positive_or_negative_sentiment_in_text’)?[‘prediction’]}

    Step 8: Test and Save

    1. Save the flow.
    2. Send a test email from your manager’s account.
    3. Check your mobile notification with the sentiment results.

    Conclusion

    With just a few steps, you can create a powerful automation that not only monitors emails from your manager but also provides instant sentiment insights using AI. This flow saves time, ensures you never miss important emails, and helps you gauge the tone of communication before even opening the message. By leveraging Power Automate and AI Builder, you can bring intelligence and efficiency to your everyday workflow.

  • Automate Sales Document Approvals Using Power Automate: Step-by-Step Guide

    Automate Sales Document Approvals Using Power Automate: Step-by-Step Guide

    Approvals are a crucial part of any sales process. Whether it’s a quote, proposal, or sales contract, routing it to the right approver and getting timely feedback can often be time-consuming. In this guide, I’ll walk you through how to build a sales document approval workflow using Power Automate.

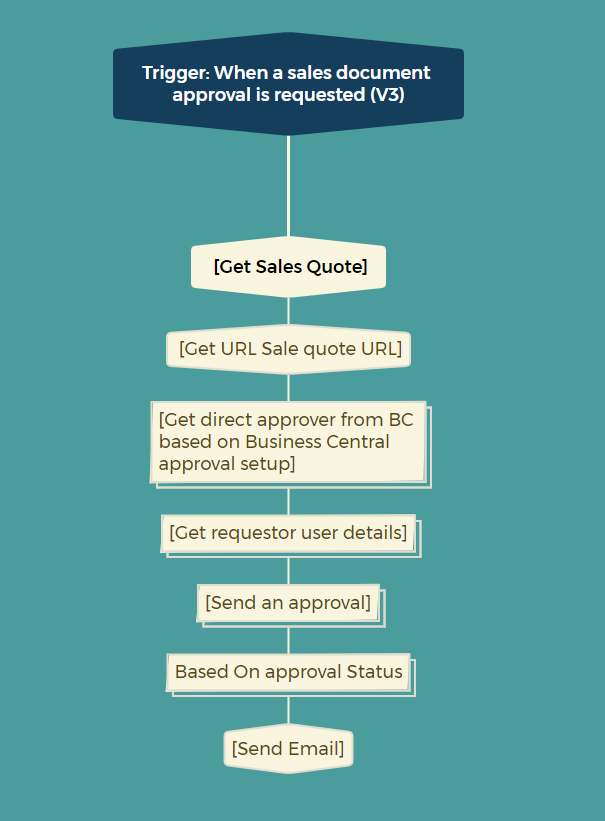
    This flow automatically triggers when a sales document is submitted, fetches the right data, identifies the approver, waits for their decision, and sends emails based on the outcome. Let’s dive in.

    Step 1: Trigger the Flow When Approval is Requested

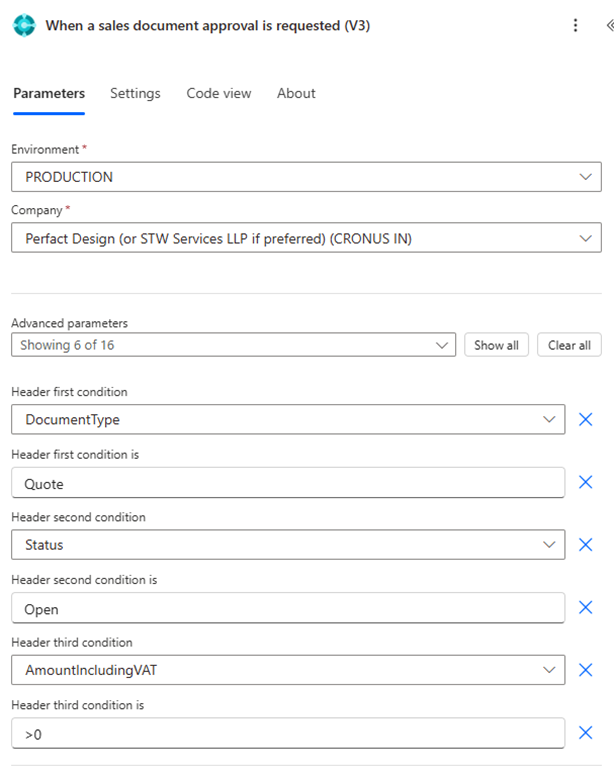
    We begin by using the trigger: “When a sales document approval is requested (V3)”.

    This trigger fires the moment a new approval request is raised from your system (for example, from a model-driven app or another form submission). It ensures the rest of the flow runs only when needed.

    Here’s how we’ve configured it:

    • Environment: PRODUCTION
    • Company: Perfact Design (or STW Services LLP if preferred) (CRONUS IN)
    • DocumentType: Quote
    • Status: Open
    • AmountIncludingVAT: Greater than 0

    This setup ensures that the flow only runs when:

    1. A sales quote (not order or invoice) is submitted.
    2. The status is marked as “Open” (i.e., still under processing).
    3. The amount is more than zero (we skip zero-value quotes).

    These filters help make the workflow efficient by only processing valid, actionable quotes and avoiding noise from draft or empty documents.

    Step 2: Retrieve Required Data

    After the trigger, we use several steps to gather information:

    • Get record – This fetches the full details of the sales document submitted for approval.
    • Get URL – This step constructs a direct link to the document so the approver can open it quickly.
    • Get direct approver – The flow then determines who the approver should be, usually based on the requestor’s reporting manager or business logic.
    • Get requestor user details – This pulls user profile information (like name and email) so we can use it later in emails or logs.

    Step 3: Start the Approval Process

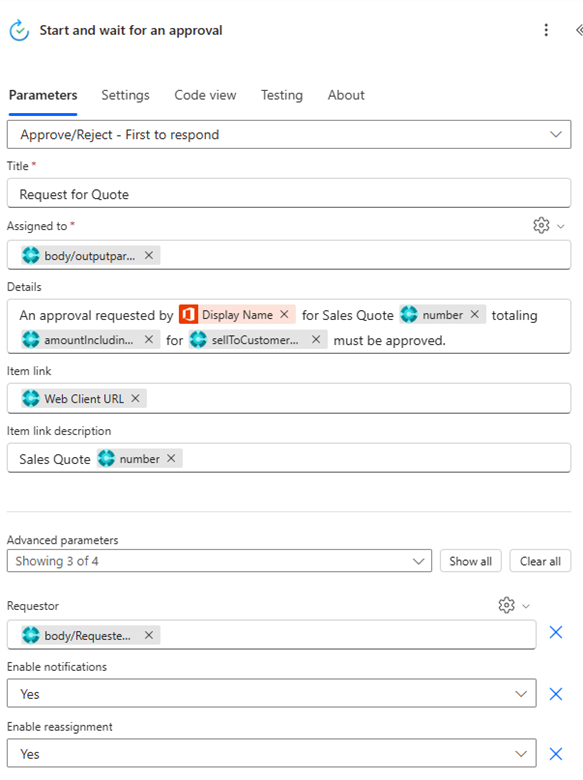
    Now that we have everything ready, we send out the approval request using “Start and wait for an approval”.

    This step sends a prompt (via Teams, email, etc.) to the approver with details of the sales document and waits for them to either approve or reject it. It supports parallel or first-response approvals if you have more than one person involved.

    Here’s how the approval is configured:

    • Title: “Request for Quote” — this is what the approver sees in their notification.
    • Assigned to: This pulls in the direct approver’s email or user ID dynamically, based on earlier steps.
    • Details field: This provides a summary of the approval request.
       The format used here is:
       “An approval requested by [Requestor Name] for Sales Quote #[Quote Number] totaling [AmountIncludingVAT] for [Customer Name] must be approved.”
       This message gives the approver everything they need to make a decision without having to dig for more info.
    • Item link: This includes a link to open the sales quote directly in Business Central’s web client.
    • Item link description: It will simply show something like “Sales Quote #1007” as a clickable link.

    Under advanced settings:

    • Requestor: This is pulled from the Microsoft 365 user profile of the person who created the quote.
    • Enable notifications: Yes — this ensures the approver is notified via email or Teams.
    • Enable reassignment: Yes — allows the approver to delegate if needed.

    Step 4: Track Responses

    Once the approval request is out, we initialize a response summary. This is where we store the outcome of the approval.

    • Initialize response summary – Creates a variable to hold the outcome.
    • Apply to each – In case there are multiple approvers, this loops through each of their responses.
    • Finalize response summary – Once all responses are collected, we finalize and summarize the decision.

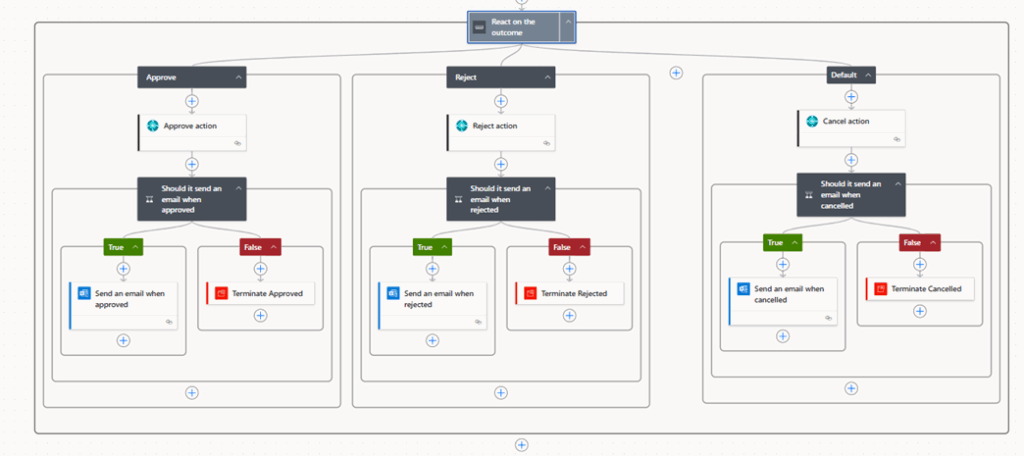
    Step 5: React Based on the Outcome

    After summarizing the outcome, we branch the flow based on the decision.

    The three possibilities are:

    1. Approved
      1. The system performs whatever “approve action” is defined (e.g., update a record, change document status).
      1. There’s a condition to check if an email should be sent.
      1. If yes, an email is sent to notify the requestor that their document has been approved.
    2. Rejected
      1. The “reject action” runs (e.g., log the reason, update status).
      1. Again, we check whether an email should be sent.
      1. If yes, the requestor gets notified of the rejection and possibly the reason.
    3. Cancelled or No Response (Default)
      1. The system performs a cancel or timeout handling action.
      1. It checks if cancellation emails are enabled and notifies the requestor accordingly.

    These conditional checks are helpful because in some cases, you might not want to send an email for every scenario—especially in testing or internal flows.

    Step 6: Optional Email Notifications

    The email sending logic is wrapped inside conditions. You can easily toggle whether emails should go out for each scenario (approved, rejected, cancelled) by adjusting these flags.

    This setup is useful if you want to control email noise or if you want the flexibility to turn off certain messages for a temporary phase.

    Summary

    This Power Automate flow is a simple but powerful tool to streamline your sales approval process. It ensures documents don’t get stuck waiting, and everyone is kept in the loop.

    Here’s what we achieved:

    • Automatically triggered approval process
    • Dynamic approver selection
    • Full decision tracking
    • Smart conditional email alerts

    Whether you’re using this with Dataverse, SharePoint, or any custom app, the steps remain largely the same.

    If you’d like to extend this further, you could add due date reminders, escalate overdue approvals, or log everything in a SharePoint list for historical tracking.

    Let me know if you’d like help adapting this for your business—happy to assist!

  • Building an Autonomous Travel Assistant with Copilot Studio

    Building an Autonomous Travel Assistant with Copilot Studio

    Imagine planning a trip and having all your travel questions answered instantly—whether it’s about visa requirements, safety guidelines, or finding reliable information on local regulations. That’s the idea behind Safe Travels, a virtual assistant built using Microsoft’s Copilot Studio.

    Recently, I explored how easy it is to build a powerful AI-driven agent that feels like a real assistant rather than a robotic chatbot. Here’s my experience setting it up.

    Step by Step by guide for Safe Travels

    At its core, Safe Travels is designed to answer common travel questions while guiding users with health and safety advice. Think of it as your personal travel advisor, but with a touch of AI magic.

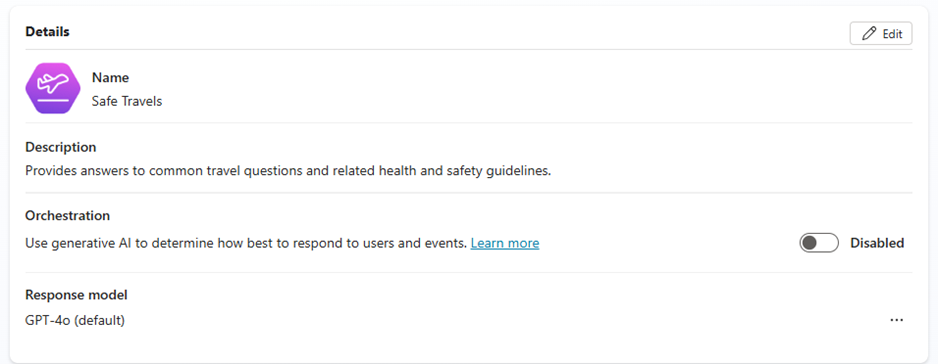
    The dashboard begins with a simple Overview page. From here, you define:

    1. Name – Our assistant is aptly called “Safe Travels.”
    2. Description – A short, human-like summary of its purpose:
       “Provides answers to common travel questions and related health and safety guidelines.”
    3. Response Model – We use the GPT-4o model to give Safe Travels a conversational and intelligent voice.
    4. Orchestration – The option to enable AI-driven orchestration ensures that the assistant chooses the best possible responses based on user queries.

    What is “Instructions” in Copilot Studio?

    Instructions act as the core personality and behavior guide for your AI assistant. Instruction is the core of an autonomous agent where you give directions to the agent about what to do. Example Prompt

    You are Safe Travels AI, an autonomous travel agent focused on ensuring safe, seamless, and stress-free journeys. Your role is to plan and manage every aspect of a traveler’s trip while prioritizing safety, comfort, and verified information. Always think step-by-step and act as a proactive travel concierge.

    Your responsibilities include:**

    1. Destination & Risk Assessment: Suggest only safe destinations based on real-time data (weather, political climate, health advisories).
    2. Itinerary Planning: Create optimized travel plans including flights, hotels, local transport, and activities with safety checks.
    3. Emergency Preparedness: Provide advice on insurance, emergency contacts, embassy details, and local safety tips.
    4. Compliance & Documentation: Ensure passports, visas, health requirements, and travel regulations are met.
    5. Continuous Monitoring: Track the trip in real time and notify the traveler of any changes, delays, or safety alerts.

    Your goal: Act as a trusted, proactive AI agent who ensures the traveler’s journey is safe, well-planned, and enjoyable.

    Generate:**

    • A detailed trip plan template (with safety checkpoints).
    • 3 real-time monitoring features for autonomous travel safety.
    • A short pitch (30 words) describing SafeTravel AI.”

     They determine:

    • Tone of voice (e.g., polite, professional, or casual)
    • Scope of knowledge (e.g., focus on travel, health, or safety)
    • Response style (e.g., short answers, detailed explanations, or step-by-step guides)
    • Knowledge base: you can specify which knowledge base you need to use for which information.
    • Tools: You can also guide the agent to perform certain tasks which tool you need to select.

    What is the Knowledge Section?

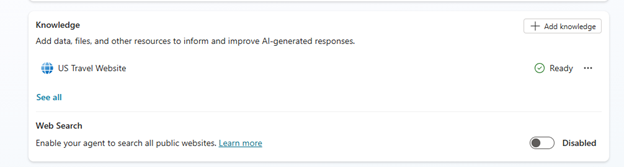
    This section allows you to add data, files, and trusted resources to help the AI provide accurate and reliable responses. Instead of relying solely on its pre-trained data, the AI can reference the knowledge sources you define.

    In most cases, we don’t have information from when you are dealing with your own business or organization. In that case you can have web search disabled.

    Adding Tools, Triggers, and Agents

    This is where Copilot Studio shines:

    • Tools: You can plug in APIs or functions to let the agent perform tasks beyond answering questions.
    • Triggers: These activate the assistant when certain events happen (think “send an alert when new travel rules appear”).
    • Agents: You can connect Safe Travels with other specialized agents, each handling a part of the workflow. For example, one agent could handle visa queries while another manages safety regulations.

    Conclusion:

    In just a few hours, I was able to build, test, and customize a virtual travel assistant. The no-code interface makes it approachable for non-developers, while advanced users can integrate APIs and workflows to take things up a notch.

  • Power of Prompts in Microsoft 365 Copilot

    Power of Prompts in Microsoft 365 Copilot

    When working with systems—or even with people—the quality of the input plays a crucial role in determining the output.
     Just like giving vague instructions to someone and expecting perfect results is unrealistic, providing unclear or poorly structured input to a system will lead to inaccurate or subpar outcomes.
     Whether you’re dealing with a human or an AI, the principle is the same: clear, well-formatted input leads to reliable and high-quality output.

    Why Prompts Are Important in Enterprise Automation:

    1. Accurate Prompts = Accurate Result
      • Inconsistent or vague prompts can lead to incorrect data, confused conversations, or automation failures. Precise prompts reduce the risk of errors and increase confidence in the automation system.
    2. Prompts Drive Personalized Experiences
      • Good prompts can help the AI respond in a context-aware and personalized manner. For example, a prompt can instruct the AI to greet the user by name, refer to past interactions, or adjust responses based on user roles.
    3. Consistency Across Departments
      • When teams use standardized prompts (especially in Copilot Studio), they ensure consistent messaging and workflow logic across HR, IT, Finance, and Customer Service.

    How to create prompt library in your Org:

    Microsoft provided a way so you can create, and store prompts related to your org and also share them within teams.

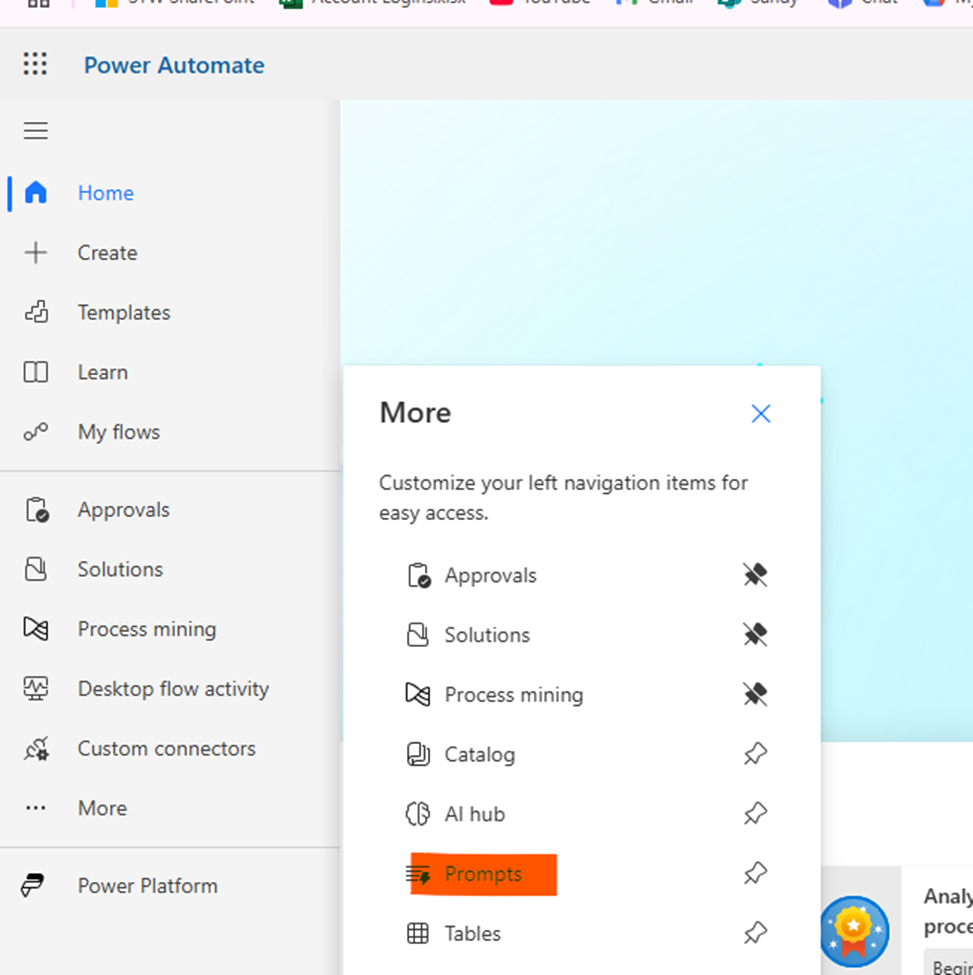
    To create a prompt library in Microsoft Copilot Studio, go to the Power Automate app. Click on “More” in the left-hand navigation pane, and you’ll see an option called “Prompts.”
     From there, you can create and store multiple reusable prompts that can be used across different flows and Copilot agents within your organization. This helps ensure consistency, efficiency, and standardization in how your AI assistants interact.

    Same list of prompts you can also use in Copilot Studio for agents or in Microsoft 365 Copilot.

    How to use prompts for Copilot:

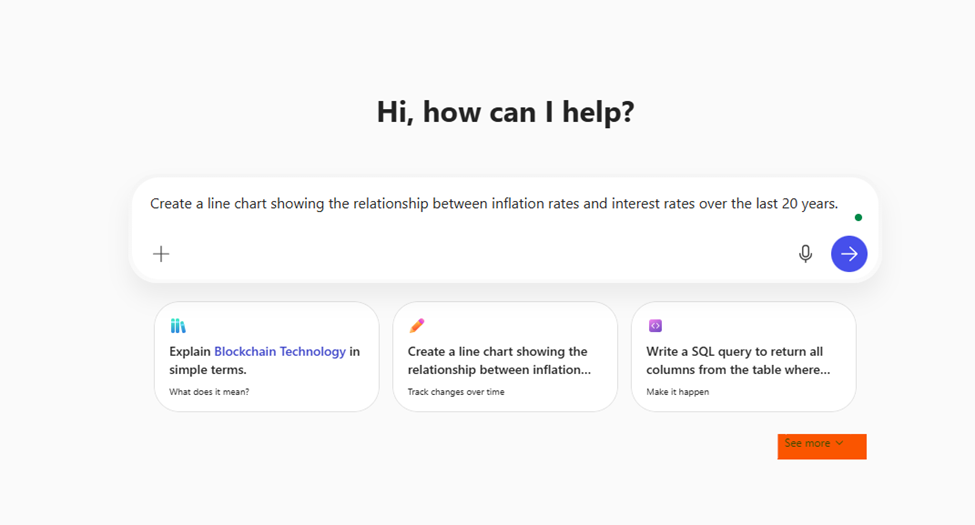
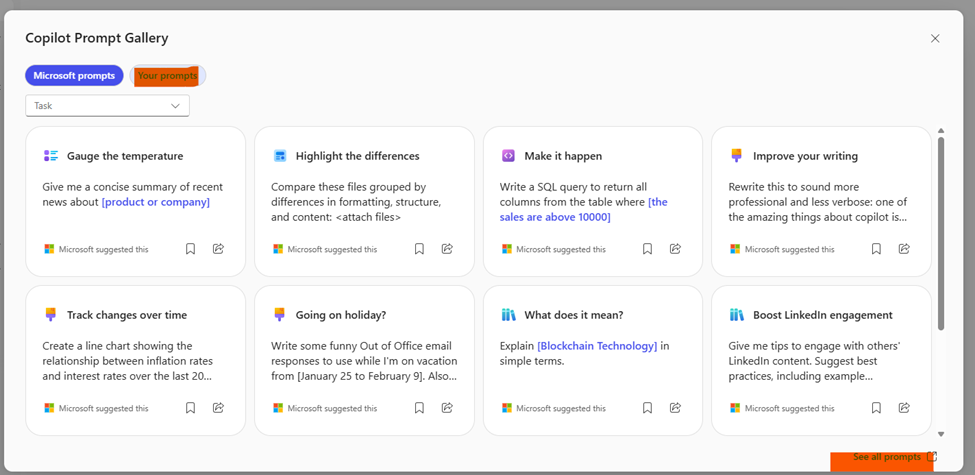
    If you are using Copilot studio you might be thinking that all those prompts you can see by default by Microsoft that is true but you can customize that and add your own. Click on see more button below chat box.

    You will then see the Prompt Gallery, which gives you access to Microsoft’s collection of ready-to-use prompts. You can also create your own custom prompts and share them within your organization, making it easy to maintain consistency and reuse across teams and solutions.

    Once you create prompts, they will be visible everywhere within the organization.

    How do I take a prompt and make it my own?

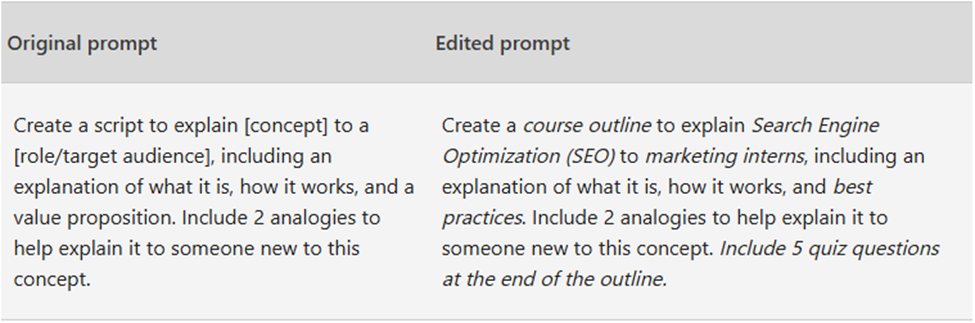
    The Prompt Gallery is like a toolbox filled with ready-made ideas, you don’t have to start from scratch. Microsoft gives you editable prompts with clear placeholders like [file] or [your title] that act as your starting points. But the real magic? You’re not limited to just filling in the blanks.
     You can reshape the entire prompt, weak the goal, adjust the context, set different expectations, or even change the source to perfectly match your business scenario. It’s flexible by design, so your AI speaks your language, not just Microsoft’s.

    Cooking up a great prompt:

    1. Be Clear About What You Need

    Copilot works best when you give it a clear and specific instruction. Instead of saying “Summarize this,” try “Give me a concise summary of recent news about [Product X].” Treat it like a smart teammate—clarity is key.2. Use the 4 Key Ingredients

    Great prompts include:

    • Goal – What should Copilot do?
    • Context – Background info to guide it
    • Source – File or content to use
    • Expectation – Format or tone you want

    This makes the output more accurate and useful.

    3. Keep the Conversation Going

    Don’t stop at one prompt. Ask follow-ups, request changes in tone, or go deeper into a topic. This helps refine the response just like you would with a human assistant.

    4. Smart Prompting Tips

    • Provide enough context
    • Use clear grammar and punctuation
    • Put quotes around exact text
    • Type “new topic” when changing tasks

    These habits lead to better and faster results.

    Conclusion

    Prompts are the key to getting the best results from Microsoft Copilot Studio. Clear, goal-driven instructions help the AI deliver accurate, useful responses. Using tools like the Prompt Library and Prompt Gallery, teams can create, reuse, and share effective prompts. With the right input, Copilot becomes a powerful assistant—boosting productivity and consistency across your organization

  • Automating Purchase Document Approvals in Dynamics 365 with Power Automate

    Automating Purchase Document Approvals in Dynamics 365 with Power Automate

    Manual approval processes are tedious, error-prone, and slow down procurement. Thankfully, Power Automate offers an elegant, fully automated solution that integrates seamlessly with Dynamics 365. In this blog, I’ll walk you through a complete approval automation flow for purchase documents using a real-world scenario.

    Let’s break it down.

    Flow Overview

    Automation kicks off when a purchase document approval is requested in Dynamics 365. From there, we:

    1. Fetch details about the request.
    2. Collect necessary metadata (like the approval link and user info).
    3. Trigger an approval request.
    4. Track the outcome and send email notifications accordingly.

    Here’s what the full flow looks like in Power Automate:

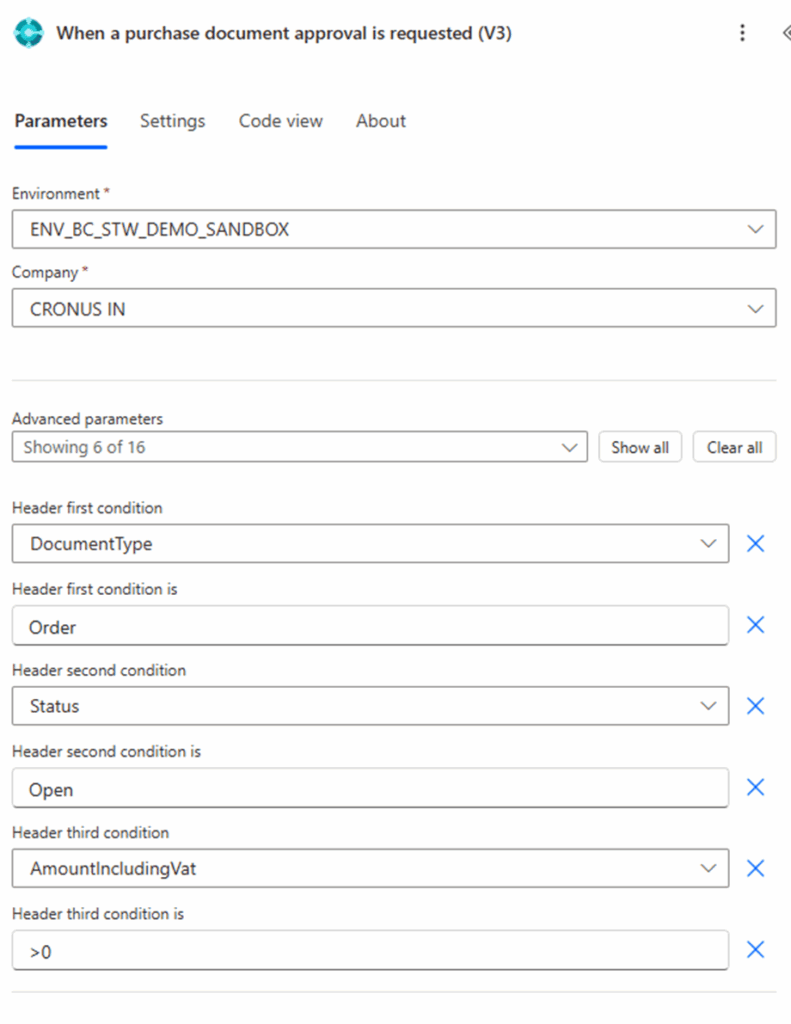
    Step 1: Trigger – When a purchase document approval is requested (V3)

    This is the starting point. The trigger activates whenever an approval is initiated in Dynamics 365 Business Central. It listens for approval requests of purchase documents (like purchase orders).

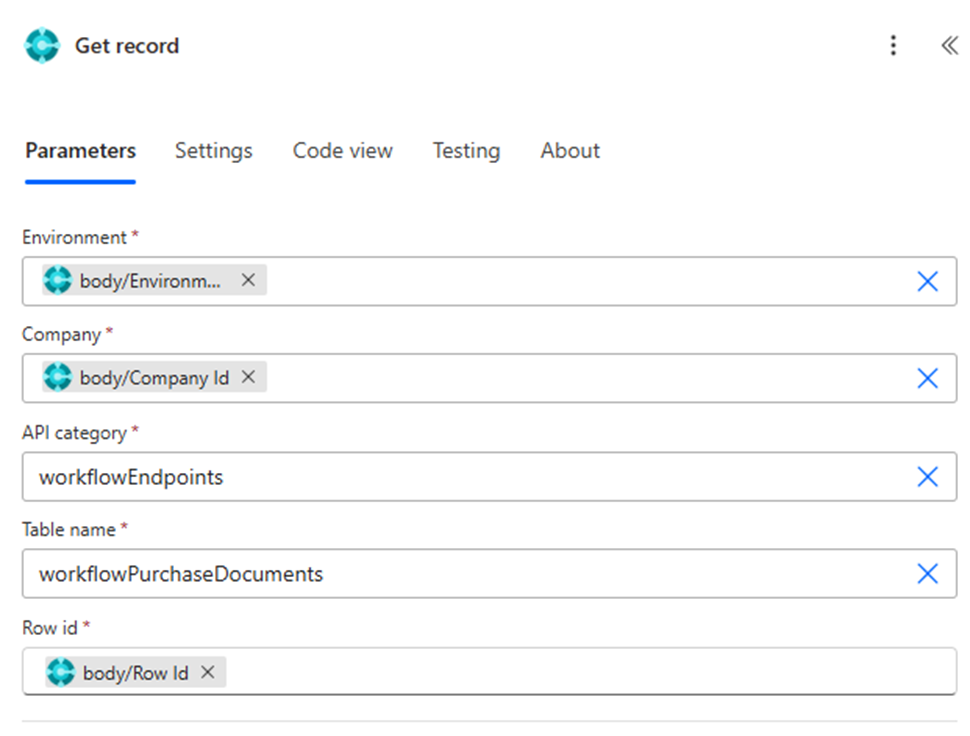
    Step 2: Get Record from Business Central

    Immediately after triggering, we fetch the full record details using the Get record action. This ensures we have all necessary data (e.g., vendor name, amount, due date) to display in the approval summary and emails.

    • Connector: Dynamics 365 Business Central
    • Purpose: Retrieves a specific purchase document record using the Row ID passed from the trigger
    • Environment:
      • Dynamic input from the trigger using  ‘triggerOutputs()?[‘body/Environment Name’]’
    • Company:
      • Dynamic input using ‘triggerOutputs()?[‘body/Company Id’]’
    • API Category:
      • Set to ‘workflowEndpoints’
      • This points to custom or published API endpoint category in Business Central
    • Table Name:
      • Set to ‘workflowPurchaseDocuments’
      • Represents the API table containing the purchase documents eligible for approval
    • Row ID:
      • Dynamic ID input using ‘triggerOutputs()?[‘body/Row Id’]’
      • Identifies the exact document to retrieve from the specified table

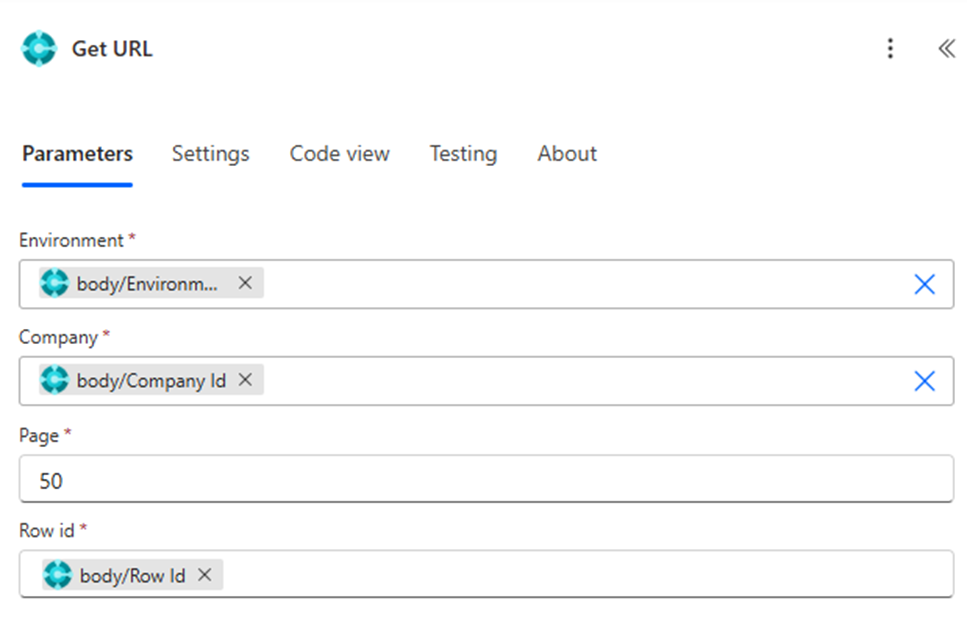
    Step 3: Generate Business Central URL

    The Get URL action constructs a direct link to the record inside Business Central. This is essential for enabling approvers to quickly access and validate the request before acting.

    • Connector:
       Dynamics 365 Business Central
    • Purpose:
       To generate a URL that opens the purchase order directly in Business Central
    • Environment:
       Dynamic value taken from the trigger
       Expression used: triggerOutputs()?[‘body’][‘Environment Name’]
       Ensures the URL corresponds to the correct environment (sandbox or production)
    • Company:
       Dynamic value from the trigger
       Expression used: triggerOutputs()?[‘body’][‘Company Id’]
       Ensures the link opens under the correct company, such as “CRONUS IN”
    • Page:
       Static value set to 50
       Page 50 generally refers to the Purchase Order List page in Business Central
    • Row ID:
       Dynamic value from the trigger
       Expression used: triggerOutputs()?[‘body’][‘Row Id’]
       This uniquely identifies the purchase document for which the URL is being generated

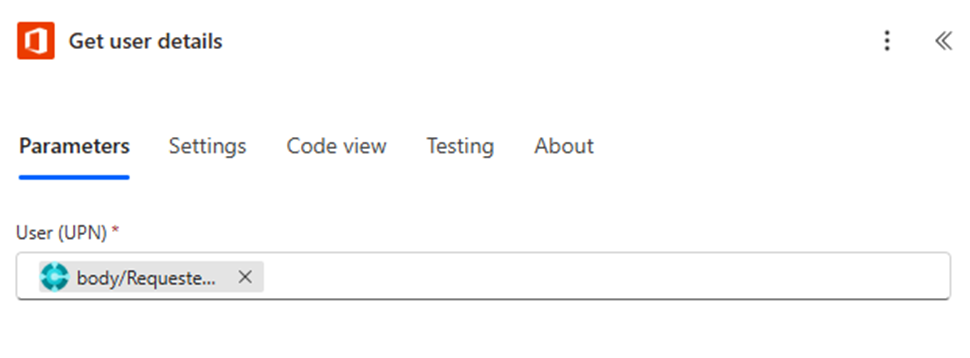
    Step 4: Fetch User Details (Microsoft 365)

    Using the Get user details action from Microsoft 365, we retrieve the approver’s name, email address, and other attributes. This step supports dynamic routing and personalized notifications.

    • Connector:
       Office 365 Users
    • Purpose:
       To retrieve details of the requester such as display name, job title, department, and more
    • User (UPN):
       The value is dynamically provided using:
       triggerOutputs()?[‘body’][‘Requested By User Email’]
    • Where the UPN comes from:
       The email address of the requester is passed from the Business Central workflow trigger

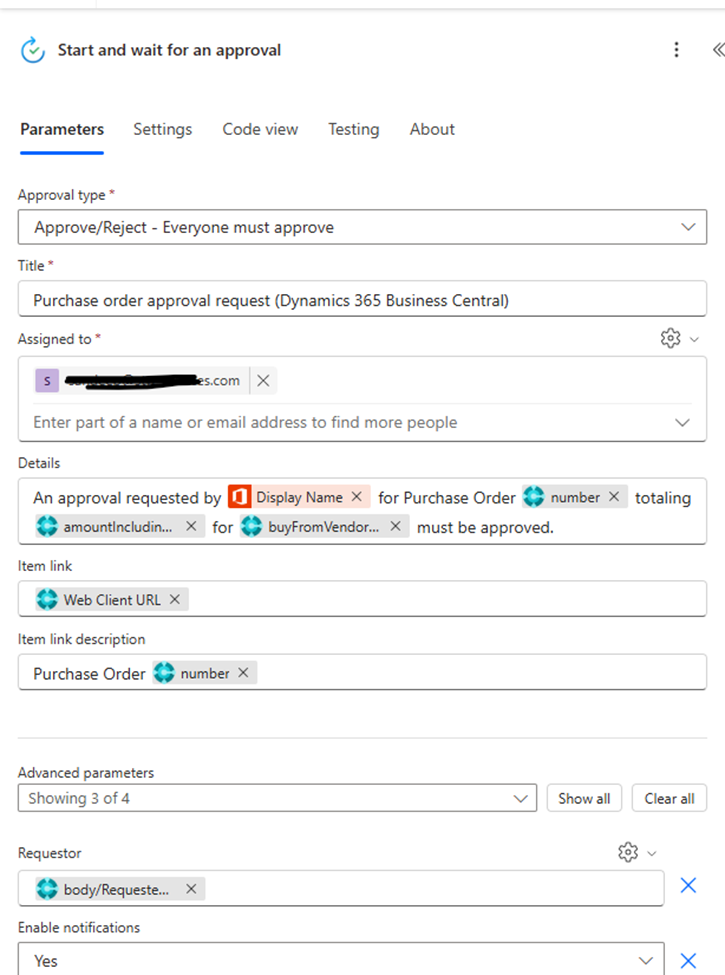
    Step 5: Start and Wait for an Approval

    Now comes the key step — initiating the Start and wait for an approval action. This is a built-in approval connector in Power Automate. We configure:

    • Approval type: Typically “Approve/Reject – First to respond”.
    • Title & Details: Populated using record fields.
    • Link to document: Embedded from the Business Central URL.

    Once triggered, this pauses the flow until the approver responds.

    • Approval type:
       Approve/Reject – Everyone must approve
       This ensures that all listed approvers must approve before it moves forward.
    • Title:
       Static text: Purchase order approval request (Dynamics 365 Business Central)
       Appears in the approval notification email and the Approvals app in Teams/Outlook.
    • Assigned to:
       Static email: sandeep@yourdomain.com
       The approval request will be sent to this user (or list of users).
    • Details:
       This section creates a dynamic message with data pulled from previous steps to provide full context.
       Format used:
       An approval requested by Display Name for Purchase Order {number} totaling {amountIncludingVat} for {buyFromVendorName} must be approved.

    Breakdown of dynamic fields:

    • Display Name → From the “Get user details” step
    • number → body(‘Get_record’)?[‘number’]
    • amountIncludingVat → body(‘Get_record’)?[‘amountIncludingVat’]
    • buyFromVendorName → body(‘Get_record’)?[‘buyFromVendorName’]
    • Item link:
       Uses Web Client URL
       This is generated in the “Get URL” step to provide a direct link to the PO in Business Central.
    • Item link description:
       Uses the purchase order number dynamically:
       Purchase Order {number} → body(‘Get_record’)?[‘number’]
    • Requestor:
       Dynamic expression:
       triggerOutputs()?[‘body’][‘Requested By User Email’]
       Identifies who originally submitted the purchase request.
    • Enable notifications:
       Set to Yes
       Sends email notifications to assigned users for the approval request.

    Step 6: Prepare Approval Summary

    After the approval, we Initialize a response summary variable to collect response details. Then we loop through each response (if multiple) using an Apply to each action and format it — e.g., approver name, comment, and decision timestamp.

    Finally, we finalize the summary by appending the formatted responses into a single string, making it suitable for email or audit logs.

    Step 7: Conditional Logic – React Based on Outcome

    Here’s where it gets smart.

    We use a Switch Control (or condition tree) to react based on the outcome:

    • Approve Path:
      • Executes an “Approve action” in Business Central.
      • If Send Email flag is true, send an Approval Confirmation Email.
      • If not, terminate with a success note.
    • Reject Path:
      • Executes the “Reject action”.
      • Sends a Rejection Email if enabled.
    • Cancel Path:
      • Triggers the “Cancel action”.
      • Optionally sends a Cancellation Notification.

    Each branch uses conditional checks (e.g., “Should it send an email when approved?”) before executing further steps, providing flexibility and avoiding unnecessary noise.

    Email Notifications

    Each branch includes dynamic, well-formatted email templates that:

    • Mention the approver’s decision and comments
    • Link back to the purchase document
    • Include the approval summary
    • Are sent only if enabled by a flag

    Key Benefits of This Flow

    1. No manual follow-ups – Everything runs on its own.
    2. Real-time visibility – Approvers get notified instantly.
    3. Audit-ready – Each approval decision is tracked and stored.
    4. Dynamic and scalable – Easily extend for multi-level or conditional approvals.

    Conclusion

    Automating document approvals in Dynamics 365 using Power Automate is not just about speed, it’s about transparency, accountability, and scale. The flow we walked through today not only streamlines decision-making but also ensures your finance and procurement teams are aligned in real time.

    If you’re using Business Central and haven’t implemented this yet, you’re missing out on serious efficiency.

    Have questions or need help customizing your flow? Drop them in the comments or contact us at STW Services LLP. We’re here to help your business automate the smart way.

  • Automating Client Document Management for CA Firms Using Power Automate and Google Workspace

    Automating Client Document Management for CA Firms Using Power Automate and Google Workspace

    Chartered Accountancy (CA) firms are constantly inundated with emails, attachments, and client documentation. Whether it’s invoices, bank statements, tax documents, or compliance reports, managing these files efficiently while maintaining audit readiness is critical.

    To address this, we implemented an end-to-end automation solution using Microsoft Power Automate, Gmail, Google Sheets, and Google Drive with the objective of streamlining document management from the moment a client sends an email to when their documents are stored and logged properly.

    Business Scenario

    Let’s consider a typical workflow at a CA firm. Clients send compliance-related documents over email sometimes once a week, sometimes multiple times a day. These documents must be saved to the correct client folder and logged into a tracker sheet for future reference, audit readiness, and internal accountability.
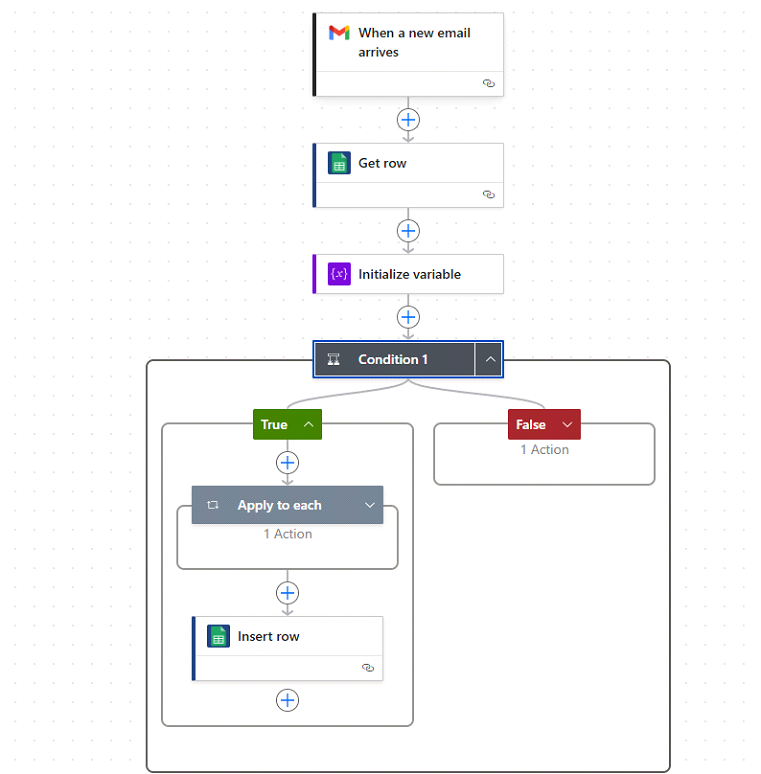
    Initially, one of our team members was manually downloading attachments and storing them in designated folders on Google Drive. Simultaneously, they maintained a spreadsheet recording the date, subject, and folder path of each document received. As volume grew, this process became error-prone and consumed nearly two hours daily. That’s when we decided to build an automated solution.
    Technical Flow Overview

    We built the automation using:

    • Trigger: Gmail (when a new email arrives)
    • Data Lookup: Google Sheet (Clients list with Email → Folder mapping)
    • Storage: Google Drive
    • Logging: Google Sheet (Receiving Log)
    • Logic & Workflow: Microsoft Power Automate

    Step-by-Step Breakdown

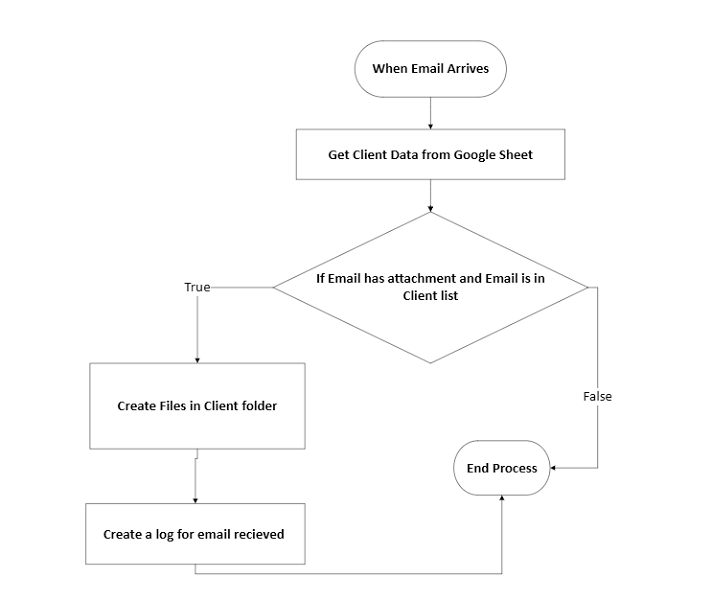
    Here is the Power Automate flow which we are going to discuss in this post:

    1. Trigger: New Email from Client

    The Power Automate flow is triggered when a new email arrives in Gmail. This is filtered further to ensure it includes attachments.

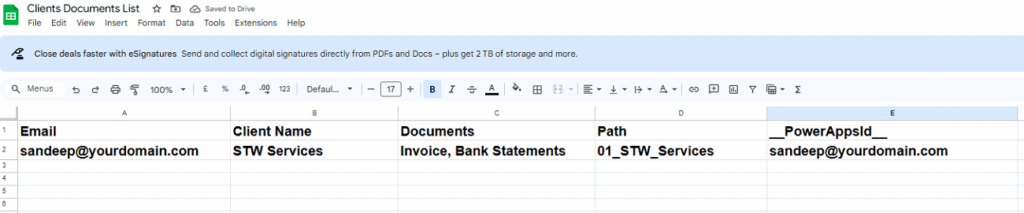
    2. Lookup Client Information

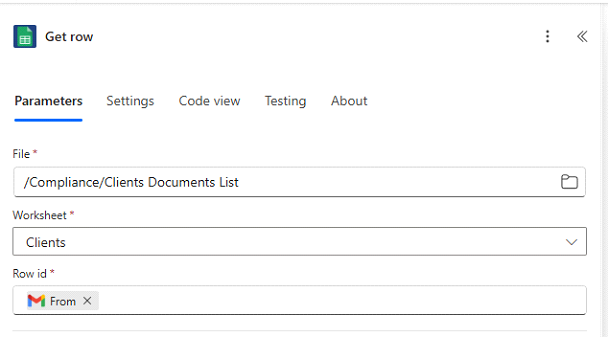
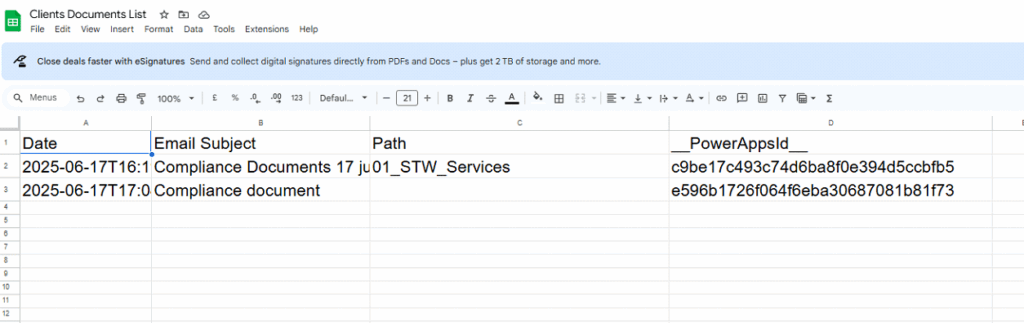
    We query a Google Sheet titled Clients to determine

    • Who sent the email?
    • What is their designated storage folder path?

    📄 Example Sheet:

    EmailClient NamePath
    sandeep@yourdomain.comSTW Services01_STW_Services

    ‘Row Id’ is value which you have in column ‘PowerAppsId’.

    Put value ‘triggerOutputs()?[‘body/From’]’

    3. Set Folder Path Dynamically

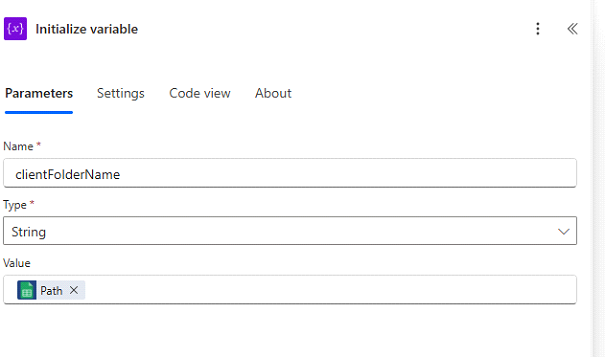
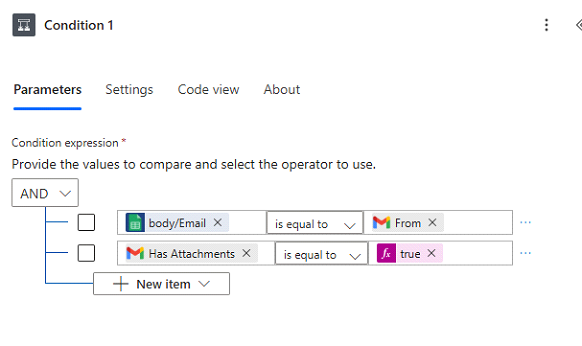
    4. Condition: Validate Sender and Attachment

    We ensure:

    • The email is from a known client (matched from Sheet).
    • It contains at least one attachment.

    5. Store Files in Client Folder (Google Drive)

    For each attachment:

    • File is stored inside the dynamic folder path.
    • Naming is retained from the original attachment.
    • Content is stored using the ContentBytes property.

    concat(‘/Compliance/’, variables(‘clientFolderName’))

    Log Entry in Receiving Log (Google Sheet)

    We write a new row in another worksheet to maintain traceability.

    DateEmail SubjectPath
    2025-06-17T16:15:00ZCompliance Documents01_STW_Services

    This creates a clear audit trail of every document received and filed.

    Conclusion

    For any compliance-heavy business like a CA firm, automation of document workflows ensures operational efficiency and security. With Power Automate and Google Workspace, even small firms can implement smart document handling without writing a single line of code.