Author: STW Services LLP

  • How to install Magento 2 – beginner’s guide (Windows)

    How to install Magento 2 – beginner’s guide (Windows)

    Install Magento 2 – beginner’s guide – Before continuing, make sure you have all the prerequisites, required for running Magento 2, below are system requirements

    System requirements:
    1. Apache Version: 2.2 or 2.4
    2. PHP version: 5.5.x, where x is 22 or greater
    3. MySQL Version : 5.6.x and upper


    Installation
    1. First and easiest way is to download the Magento installation package from official Magento site https://www.magentocommerce.com/download (Install from archive file – In this installation Magento core code is stored under /vendor directory and updating is possible through Magento admin.)

    See below screenshot

    2. Create one folder and Unzip in and put it under C:\xampp\htdocs\FOLDER_NAME
    3. Create a MySQL Database for Magento2 form phpmyadmin.
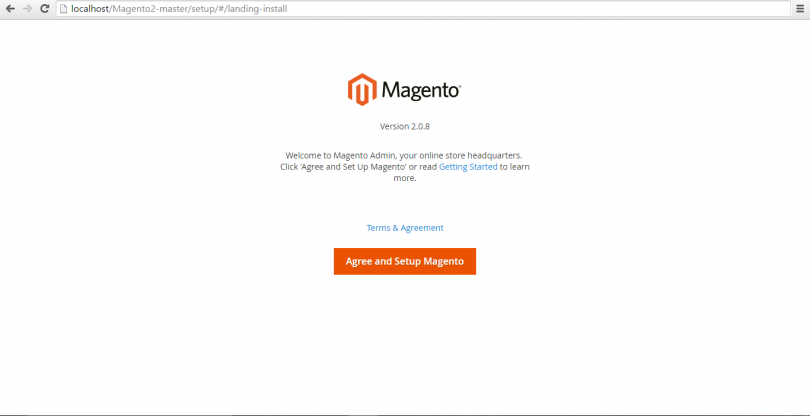
    4. Go through the Magento installation process, below is the first screen

    Click on button Agree and Setup Magento

    Click to start Readiness Check button to move forword

    If all the requirements are ok then it’ll show tick mark for that, click on Next button

    Here add all the fields properly as mentioned, host, Database Username and password, database name, Table prefix, etc

    and continue with the next button.

    In this step it’ll ask for your store’s admin url.


    5. After successful installation you will get this page
    6. Your frontend will look like this

    7. Your backend will look like this

  • Installation of Magento 2 on Ubuntu 16.04 LTS

    Installation of Magento 2 on Ubuntu 16.04 LTS

    Installation of Magento 2 on Ubuntu 16.04 LTS – I am writing this article for absolute beginner with deeper explanation of all steps which are required to install and configure Magento 2.0 on Ubuntu OS.
    Let’s start:
    a) Install Apache2, PHP, MySQL Server, composer and required packages for Magento 2.0.       Using command:

    1. $ sudo apt-get install apache2 php libapache2-mod-php mysql-server php-mysql php- dom php-simplexml php-curl php-intl php-xsl php-mbstring php-zip php-xml composer
    1. $ sudo a2enmod rewrite

    b) After successfully installation of these packages, make changes in the apache2.conf file     and AllowOverride all for Directory permission.

    1. $ cd /etc/apache
    2. $ Sudo nano apache2.conf

    Changes from

    Options Indexes FollowSymLinks
    AllowOverride none
    Require all granted

    To

    Options Indexes FollowSymLinks
    AllowOverride all
    Require all granted

    c) Use ^x (Ctrl + X) to exit from edit file screen. After making change in Config file, you need     to restart Apache. Use this command:

    1. $ sudo systemctl restart apache2.service

    d) Next step to install Magento 2 in var/www/html document using these commands:

    1. cd /var/ww/html/
    2. git clone https://github.com/magento/magento2.git
    3. cd magento2
    4. composer install

    e) You might face problem while installing Composer in Magneto 2 directory, like some of          PHP extensions are missing. Don’t be panic in this case and install missing extensions.

    Using commands like-

    1. $ Sudo apt-get install php-exnteionname (like php-gd)

    After installing all missing PHP extensions, change current directory to Magento 2 and            install composer:

    1. $ cd /var/www/html/magento2
    2. $ composer install

    f) Following messages come on screen:
    Loading composer repositories with package information
    Installing dependencies (including require-dev) from lock file

    – Installing magento/magento-composer-installer (0.1.6)
    Downloading: 100%

    – Installing braintree/braintree_php (2.39.0)
    Downloading: 100%

    – Installing justinrainbow/json-schema (1.6.1)
    Downloading: 100%

    – Installing symfony/console (v2.6.13)
    Downloading: 100%

    – Installing symfony/process (v2.8.4)
    Downloading: 100%

    ………………………………………………………………………………………….
    ………………………………………………………………………………………….

    – Installing composer/composer (1.0.0-alpha10)
    Downloading: 100%

    – Installing magento/composer (1.0.2)
    Authentication required (repo.magento.com):

    Username:
    Password:

      If composer prompts for authentication.

      Login to Login here https://www.magentocommerce.com/ and use public key as    Username and private key as Password.

    Installation of Magento 2 on Ubuntu 16.04 LTS

    g) Next step is to change directories permission to

    1. $ sudo chmod -R 777 /var/www/html/magento2/
    2. $ sudo chmod -R 777 /var/www/html/magento2/var/
    3. $ sudo chmod -R 777 /var/www/html/magento2/pub/

    Now we move to Mysql. To create Mysql database for magento 2 installation.

    Use Following command:
    $ sudo mysql –u root -p
    Enter Sudo password and now you are ready to execute Sql queries using mysql prompt.      Enter the following commands in the order to create a database instance named     magento2 with user name magento2
    h) Create database magento2;
    GRANT ALL ON magento.* TO magento2@localhost IDENTIFIED BY ‘magento2’;
    Database magento2 is created and all permissions are granted to magent2@localhost         user with password magento2.
    To check you can use:

    1. $ sudo mysql –u magento2 -p

    Enter password magento2 and use sql query:

    1. Mysql > show database;

    Use exit to come out from mysql prompt.

    Now you are ready for final step to install magento2.

        Open http://localhost/magento2/setup/

    Magento Installation

    If you face any permission issue, grant permission to Magento 2 root directory-

    1. $ sudo chmod -R 777 /var/www/html/magento2/

    When you get green check for file permission check, click next till installation finish.
    You can browse magento 2 using
         http://localhost/magento2/
         or
         http://{ipaddress}/magento2/

    At this stage, we are completed with Magento 2 installation on Ubuntu 16.04 LTS. Hope it       helps you!

  • User permission in Sharepoint 2013

    User Permission In Sharepoint 2013 – Permission level is always confusing for SharePoint beginners. By this article, I am going to make it easier.

    Our first step is to add users in SharePoint site and there are couples of ways you can do this. Users can be added using – Settings menu >> Site settings >> People and groups:

    sharepoint 2013

    By default “softechword members” group is selected. But we are not going to add user’s members so select “Softechword visitors” group. You can select “New” to add users in visitor group. Popup appears. Search user by name and add in group.

    Capture2

    As we do not allow external access of SharePoint site so any user which you want to add must have workspace username and password. If your requirement to delete a user from a group, select user which you want to delete from items and click on action >> Remove users from Group. Same actions you can use for add owners and other group users.

    The next question is how we can check group permission. To understand this go back to site settings >> site permissions. You can find all available groups are listed over there. More custom groups can be added with site permission accordingly. You can see in ribbon check permission button to check user permission. It will show user permission levels for SharePoint site.

    Capture3

    Using Grant Permissions button uses to grant permissions level or direct permissions to a particular user. There is one important ribbon button “Site Collection Administrators”. “Site Collection Administrators” has full control over all site lists/ libraries/ documents etc. So “Site Collection Administrators” has access to everything in SharePoint. So if you want to add more user as site collection administrator, you can add using “Site Collection Administrators”.

    Capture4

    Next one is “Permission level”. A permission level is basically what you can assign to a group or what you can assign to a User.

    Capture5

    In other word you can say a permission level is collection of small permissions. Here by you can add/modify permission level. It is not recommended to modify any default permission level. But you can add new permission level using available small permissions. There are three blocks of small permissions of SharePoint are List permissions, Site permissions and Personal permissions. Easier way to create a permission level is just copy a default permission level and customizes it as per your required new permission level.

    Capture6
    Capture7

    Next topic is to set unique permission to a document library. So click on document and select library tab and click on shared with.

    You can see list of users to whom this document is shared with. Here by you can also invite more users for view or edit documents.

    Go library settings >> Permissions for this document library.

    Capture8

    At the top yellow line warning says “this library inherits permissions form it parents”. But we want to set unique permission for this document library and do not to share with everyone. Let’s do that. From ribbon menu, click on “Stop Inheriting Permissions” to stop inheriting permission from site.

    Capture9

    First you need to remove all existing associated permission groups for this library. Select all and click “Remove User Permissions” from ribbon. After removing you can check user permissions using “Check permission” to verify which user has permission for this document library. So to assign new permission, click on “Grant Permissions” from ribbon and search user to assign.

    Capture10

    You can grant direct permission to users. As unique permission is granted to user, no other user can see document library even if this library is added on home page.

    New step is to grant permissions to only few folders or documents within document library. So let’s do that. Go back to document library and click “Library Settings” from ribbon. First of all you need to delete unique permission to reset permissions for document library.

    Capture11

    As you deleted unique permissions, it once again inherits from parents. And all permission levels will be back in list. Now go back to document library.

    And click on three ellipse and scroll down to “Shared with”.

    Capture13

    You can click on “advanced” and now you again see yellow warning “this document inherits permissions form parent”. We don’t want parent permissions for this document so stop inheriting permission and remove all listed groups over there like we did previously while we were assigning unique permissions. So select “Stop inheriting permission” from ribbon, selects all listed permission group and click “Remove User Permissions” from ribbon. Now click “Grant Permissions” from ribbon and use same process as we did previously to grand permission to a selected user. Now only selected user can see folder in document list. Let’s check that. Go on Document >> Library Settings >> Permissions for this library.

    Capture14

    In yellow warning you can see “Some items in this list may have unique permissions which are not controlled from this page. This library inherits permissions from its parents”. To see which items has unique permission click on “Show these items”

    Capture15

    It means that this library inherits permissions from parent. But some of items in this library do not.  Click on manage permission. You can see which user has full control over ADMINFOLDER.

    So we learnt how to create permissions group, assign unique permissions to document library/ sites, and assign unique permission to a particular document/folder or item in library. Same processes you can use to assign permission to any SharePoint object.

    That’s it. I can share in this article regarding SharePoint Permissions level. Hope it helps you. Thanks.

  • Dynamics CRM 2016 – Custom plugin development using CRM Development Tool Kit

    Dynamics CRM 2016 – Custom plugin development – This time we are going through a process of building a custom plug-in for Microsoft Dynamics CRM and its deployment on development server.  I assume that you already downloaded and setup Development Tool Kit. And make sure CRM templates are imported in Visual Studio.

    Start with creating a solution using Dynamics CRM. Navigate to Settings >> Customization >> Solution. Create a new Solution “AccountPlugin” and choose any name based on project and company requirement. In case, you are going to develop plugin for any existing solution skip this steps.

    PluginSolution

    Save CRM solution and publish.

    PublishSolution_2

    In Visual Studio, Create new project using Dynamics CRM 2013 Package template. If templates are not available, make sure that you already imported development tool kit templates in Visual Studio.

    Dynamics CRM package is selected instead of Dynamics CRM 2013 plugin because it will make our process easy for plugin registration and deployment using tool kit.

    ConnectionTOCRM_3

    You will be asked to connect CRM live before Visual Studio setup package solution. CRM connection screen pops up. You can also open it from Tool >> CRM connection.

    Connection To CRM

    Fill out required details and connect development Dynamics CRM server.

    URL: CRM URL.

    User Name: Domain Administrator

    Password:   Domain Administrator Password

    Browse all organizations and select appropriate organization and solution to hook plugin.

    ConnectionTOCRM_3

    After a successful connection with CRM server, CRM package solution will be created in Visual Studio. Next step is to add a CRM plugin library project in solution. More plug-in projects can be added in one solution.

    add plugin solution

    Now Visual Studio solution is set up and ready for plugin development. Some important file and DLLs are added in projects which are required. Let me elaborate important of these files.

    RegisterFile.crmregistration is xml file contains details of all added plugins and workflows and register those in Dynamics CRM when package is deployed. Its auto created file using CRM Development Tool Kit.

    Microsoft.Crm.Sdk.Proxy and Microsoft.Xrm.Sdk are two very important DLLs referenced in plugin project. These DLLs contain core classes of Microsoft dynamics CRM which are used for plugin operations.

    Next step is to create strong name key for plugin project. Right click on project and select properties and create new Strong Name key (SNK). SNK is system oriented and when you move this development code on another machine, SNK needs to create again.

    SNLKey_11

    Open CRM explorer from View>>CRM explorer and expend entities. Right click on Account entity and select create plugin. It’s popping up Create Plug-in window.

    Let’s go through Create Plug-in form attributes. First one “Project” is default set to “AccountPlugin” as it’s related to a single plugin project, in case we have more than one plugin projects. It will be enabled for selection.

    Next is “Primary entity” is about to entity for which plugin is being created and it “Account” entity.

    Next one is “Message” is about to CRM action, it’s associated with.

    AccountActionMessage_7

    Next important attribute is “Pipeline Stage” and it’s specifying execution time of plugin. In this example, we created “PostAccountcreate” plugin. So Pipeline Stage is to determine on which stage of “PostAccountCreate”, this plug-in will fire.

    PluginPipelineStage_8

    Next one is “Class” to specify class name for plug-in. Next important attribute is “Execution order” to specify order of plugin execution. In case of many plugins are associated with an action stage, it will be used to determine the execution order of this plug-in. Click Ok and plugin will be created.

    After successful creation of “AccountPlugin”. Open “RegisterFile.crmregister” file and a new code line is added in xml for created “AccountPlugin” plugin.

    Account Plugin Registration_9

    “PostAccountCreate” class is added in plug-in project, where custom code will be written for operations required under this plugin. “ExecutePostAccountCreate” method is responsible for plugin operations.

    Sample code lines for update Account entity Name attribute:

    protected void ExecutePostAccountCreate(LocalPluginContext localContext)

    {

    if (localContext == null)

    {

    throw new ArgumentNullException(“localContext”);

    }

    // TODO: Implement your custom Plug-in business logic.

    IPluginExecutionContext Context = localContext.PluginExecutionContext;

    IOrganizationService service = localContext.OrganizationService;

    ITracingService trace = localContext.TracingService;

    Entity entity = null;

    EntityReference parentCustomerIdAttribRef = null;

    // If we have a target

    if (Context.InputParameters.Contains(“Target”) && Context.InputParameters[“Target”] is Entity)

    {

    // Obtain the target entity

    entity = (Entity)Context.InputParameters[“Target”];

    // Only perform this code if this is a create

    if (Context.MessageName != “Update”) { return; }

    // Only perform this code for a certain entity

    if (Context.PrimaryEntityName != “account”) { return; }

    // Only perform this code if this column is included in the collection of attributes

    else { return; }

    }

    else { return; }

    try

    {

    // update entity attribute with attribute value

    entity.Attributes[“name”] = “John”;

    //Update account entity

    service.Update(entity);

    }

    }

    catch (FaultException<OrganizationServiceFault> e)

    { trace.Trace(string.Format(“Exception: {0}”, e.ToString())); }

    catch (Exception ex)

    { trace.Trace(string.Format(“Exception: {0}”, ex.ToString())); }

    }

    }

    Sample code lines use to update Account attribute name value as John. So after an account is created in CRM, account name attribute is updated as “john”.

    At the end build project and right click on package and select deploy.

    Deploy_10
  • Connect SharePoint Online using SharePoint Designer 2013

    download designer_1
    Error message.

    Connect SharePoint Online using – As a beginner SharePoint developer, you may face problem while connecting SharePoint Online using SharePoint Designer. In this post, I am going to share some steps which will make your life easier.
    Download SharePoint designer using SharePoint Online, and install on your local machine.


    In case of on premises SharePoint server, SharePoint designer uses to open sites directly. But in case of SharePoint Online, we might get message “You do not have permission to open this website in SharePoint Designer.”

    Above screens are examples which you will face while connecting to SharePoint Online server.

    Here are some settings we need to do before we connect to SharePoint Online.

    Step 1:  Default scripting capability settings are set to “Prevent users from running custom script on personal site/self-service created sites”. Because of this, custom script will be blocked in site and also for some web parts like, content editor (CEWP) & script editor web part (SEWP). This setting is essential for running all web parts properly/ or adding scripts using SharePoint Designer.

    Navigate to Office  365> Admin  >  Admin Center  > SharePoint  > Settings .

    Custom Script _3
    SharePoint MS_2

    Open SharePoint Online Admin Center, and allow these settings.

    Step 2: Download SharePoint Online Management Shell, and install on same machine where SharePoint designer is already installed.
    Note: SharePoint Online Management Shell is a tool that contains a Windows PowerShell Module to manage your SharePoint Online subscription in the Office 365.
    Step 3: Run SharePoint Management Shell, and execute these commands-

    Connect-SPOService -Url https://contoso-admin.sharepoint.com -credential admin@contoso.com

    -Url : Pass Sharepoint Online site url.
    -Credential : Admin user Name/ Password(It will prompt screen for enter password).
    Following link you can visit for reference:
    https://technet.microsoft.com/en-us/library/fp161392.aspx
    https://technet.microsoft.com/en-us/library/fp161372.aspx

    If command does not return any error, execute next one:

    WindowPower Shell

    Set-SPOSite -Identity https://.sharepoint.com -DenyAddAndCustomizePages $false

    You have to make sure scripting setting in the admin matches what you set using SharePoint Online PowerShell or the site collection setting, may be overridden again in next day cycle (24 hours).
    Hope you like this article.
    Thanks.

  • DotNetNuke CSS Precedence

    DotNetNuke CSS Precedence – DotNetNuke skinning isn’t easy exactly how CSS files from the framework get loaded at runtime. You need to spend time for fine tuning the details such as typography, padding, margin, and so on. There is secret of understanding DotNetNuke CSS precedence.

    There are many CSS files being loaded on a page when a user lands on your site. Depending on how your site is configured (how many modules you have on a page, etc), there can be several CSS files the user must download and it can definitely affect performance. In HTML development it’s a good practice to separate content and design. The CSS styles that make up the actual design are defined in separate files called stylesheets.DotNetNuke loads several style sheets for a page. For every level of DotNetNuke there is a style sheets that could be loaded / used.

    Hierarchy of CSS in DotNetNuke:

    • Module.css
    • Default.css
    • Skin.css
    • NewSkin.css
    • Container.css
    • NewContainer.css
    • Portal.css

    FRAMEWORK STYLESHEET:

    This file that contains basic framework CSS, gets loaded for every portal (Site) in your installation of DotNetNuke.This is the only stylesheet that always gets loaded.

    File Location:

    /Portals/Default/Default.css

    PORTAL / SITE STYLESHEET:

    This file is specific to a portal.
    By default it does not contain any CSS, but it can be edited by a site admin from within DNN to overrule CSS in the skins. (Mostly used for small tweaks).

    File Location: /Portals/”PortalFolder/Portal.css

    Points to Ponder:

    If you remove this file from the portal folder it does not get loaded through the file manager. This is the file you edit if you use the stylesheet editor on the Site Settings page. It is there to allow an admin to overwrite CSS defined in one of the other stylesheets.Currently there is no possibility to edit the other stylesheets from the admin interface.

    SKIN PACKAGE RELATED STYLESHEETS:

    These style sheets only get loaded if they exist in the skin package.
    (if you don’t add them to the skin package, there won’t be a link in the head of the page)
    STYLESHEETS FOR ALL SKINS:

    Style sheet that contains CSS for all the skins in a package. If a Skin.css file exists in the package it will load for every skin in the package.
    Location:
    /Portals/~Default/Skins/”NewSkin”/Skin.css
    or
    /Portals/”PortalFolder”/Skins/”NewSkin”/Skin.css
    STYLESHEET FOR A SPECIFIC SKIN:

    Style sheet with the same name as a skin file (.ascx).It is used to overwrite styles from Skin.css for that specific skin variation.

    Location:
    /Portals/~Default/Skins/”NewSkin”/”SkinName”.css
    or
    /Portals/”PortalFolder”/Skins/”NewSkin”/”SkinName”.css
    STYLESHEET FOR ALL CONTAINERS:

    Style sheet that contains CSS for all the Containers in a package. If a Container.css file exists in the package it will load for every container used from the package.
    Location:
    /Portals/~Default/Containers/NewContainer/Container.css
    or
    /Portals/”PortalFolder”/Containers/NewContainer/Container.css

    STYLESHEET FOR A SPECIFIC CONTAINER:

    Style sheet with the same name as a container file (.ascx).It is used to overwrite styles from Container.css for that specific container variation.
    Location:
    /Portals/~Default/Containers/ NewContainer /”ContainerName”.css
    or
    /Portals/”PortalFolder”/Containers/ NewContainer /”ContainerName”.css
    STYLESHEETS FOR MODULES:

    Some modules come with a style sheet with some basic CSS to make sure the module renders ok.
    If a module on the page has a Module.css file it will get loaded.
    Obviously only the Style sheets of modules on the page are loaded.

    Location:
    /DestopModules/”ModuleName”/Module.css

  • Configure alternate access for mappings in SharePoint 2013 : Part 1

    Configure Alternate Access For Mappings – In this article you will learn how to configure alternate access mappings in SharePoint 2013. Each of  web application can be associate with a collection of mappings between internal and public URLs. Both  the URLs internal and public consist of the protocol and domain portions of the full URL.

    A public URL is what users can access the SharePoint site, and that URL is what appears in the links on the pages. Internal URLs is in the URL requests that sent to the SharePoint site. Many internal URLs can be associated with a single public URL it means we can use many internal URL’s for single public URL.

    Each web application supports five collections of mappings per URL. The five collections correspond to five zones (default, intranet, extranet, Internet, and custom). When the web application receives a request for an internal URL in a particular zone, links on the pages returned to the user have the public URL for that zone.

    How To Manage alternate access mappings

    1. On the SharePoint Central Administration website, click on System Settings And then.
    2. On System Settings page, in the Farm Management section, click  on Configure alternate access mappings.

    Adding an internal URL for mapping

    1. On the Alternate Access Mappings page, click to  Add Internal URLs.
    2. In the mapping collection you want to change is not specified, then choose one. In the Alternate Access Mapping Collection section, on the Alternate Access Mapping Collection menu, click on Change alternate access mapping collection.
    3. On the Select an Alternate Access Mapping Collection page, click a mapping collection.
    4. In the Add internal URL section, in the URL protocol, host and port box, type the new internal URL (www.example.com)
    5. In the Zone list, click the zone for the internal URL.
    6. Click Save.

    Edit and delete internal URL for mapping

    1. On the Alternate Access Mappings page, click the internal URL that you want to edit or delete.
    2. In the Edit internal URL section, change the URL in the URL protocol, host and port box.
    3. In the Zone list, click the zone for the internal URL.
    4. Do one of the following:
      • Click Save to save your changes.
      • Click Cancel to discard your changes and return to the Alternate Access Mappings page.
    5. Click Delete to delete the internal URL.

    Edit public URLs for mapping

    1. On the Alternate Access Mappings page, click Edit Public URLs.
    2. If the mapping collection that you want to change is not specified, then choose one. In the Alternate Access Mapping Collection section, on the Alternate Access Mapping Collection menu, click Change alternate access mapping collection.
    3. On the Select an Alternate Access Mapping Collection page, click a mapping collection.
    4. In the Public URLs section, you can add new URLs or edit existing URLs in any of the following text boxes:
      • Default
      • Intranet
      • Extranet
      • Internet
      • Custom
    5. Click Save.

    Map an external resource url

    You can also define mappings for resources outside intranet applications. You must supply a unique name for URL, The initial URL, and a zone for that URL. The URL you request must be unique to the farm.

    1. On the Alternate Access Mappings page, click to Map to External Resource.
    2. Next click on Create External Resource Mapping page, in the Resource Name box, type a unique name.
    3. In the URL protocol, host and port box, type the initial URL.(www.example.com)
    4. Click Save.
  • What’s the Difference between Zen Cart & Magento?

    What’s the Difference between Zen Cart & Magento?- Zen Cart & Magento are both open source products but each comes with features that make it preferable over the other. It is only by looking at the features of each that you can make a decision on the best for your e-commerce platform.

    Magento

    This is a perfect platform for companies in search of a professional online appearance. It accommodates standard add-ons to enhance the experience of your users. Here are some of the features to expect.

    • Incredible flexibility when dealing with pricing and coupons
    • An impressively advanced filter function that allows you to achieve numerous categories
    • An admin function that allows you to add, remove and edit orders
    • An incredible number of modules
    • Does not require advanced coding skills
    • An impressive template system

    Zen Cart

    This is the perfect option for beginners because of the coding aspect. It is preferred by shop owners who wish to handle coding on their own. The features to expect include

    • A comprehensive package of features to enable online sales
    • Perfect for beginner coding
    • Its footprints are light which increases accessibility on a shared environment
    • Very user friendly
    • An active development teams means that you get new and exciting products on regular basis
  • Kentico Deployment on Azure

    Kentico Deployment on Azure – 1 Deployment

    1.1 Kentico Deployment on Azure

    1.1.1 Azure Support

    On the Scale page of the Azure Management Portal, you can manually scale your application or you can set parameters to automatically scale it.

    A. Manually scale an application running Web Roles or Worker Roles

    On the Scale page, you can manually increase or decrease the number of running instances in a cloud service.

    1. In the Management Portal, click Cloud Services, and then click the name of the cloud service to open the dashboard.

    2. Click Scale. Automatic scaling is disabled by default for all roles, which means that you can manually change the number of instances that are used by your application.

    1

    3. Each role in the cloud service has a slider for changing the number of instances to use. To add a role instance, drag the bar right. To remove an instance, drag the bar left.

    2

    You can only increase the number of instances that are used if the appropriate number of cores are available to support the instances. The colors of the slider represent the used and available cores in your subscription:

    o Blue represents the cores that are used by the selected role
    o Dark grey represents the cores that are used by all roles and Virtual Machines in the subscription
    o Light grey represents the cores that are available to use for scaling
    o Pink represents a change made that has not been saved

    4. Click Save. Role instances will be added or removed based on your selections.

    B. Automatically scale an application running Web Roles, Worker Roles, or Virtual Machines

    On the Scale page, you can configure your cloud service to automatically increase or decrease the number of instances or Virtual Machines that are used by your application. You can configure scaling based on the following parameters:

    • Average CPU usage – If the average percentage of CPU usage goes above or below specified thresholds, role instances are created or deleted, or Virtual Machines are are turned on or turned off from an availability set.
    • Queue messages – If the number of messages in a queue goes above or below a specified threshold, role instances are created or deleted, or Virtual Machines are are turned on or turned off from an availability set.

    C. Average CPU usage

    1. In the Management Portal, click Cloud Services, and then click the name of the cloud service to open the dashboard.
    2. Click Scale.
    3. Scroll to the section for the role or availability set, and then click CPU. This enables automatic scaling of your application based on the average percentage of CPU resources that it uses.

    3

    4. Each role or availability set has a slider for changing the number of instances that can be used. To set the maximum number of instances that can be used, drag the bar on the right to the right. To set the minimum number of instances that can be used, drag the bar on the left to the left.

    Note: On the Scale page, Instance represents either a role instance or an instance of a Virtual Machine.

    4

    The maximum number of instances is limited by the cores that are available in the subscription. The colors of the slider represent the used and available cores in your subscription:

    o Blue represents the maximum number of cores that the role can use.
    o Dark grey represents the cores that are used by all roles and Virtual Machines in the subscription. When this value overlaps the cores used by the role, the color turns to dark blue.
    o Light grey represents the cores that are available to use for scaling.
    o Pink represents a change has been made that has not been saved.

    5. A slider is used for specifying the range of average percentage of CPU usage. When the average percentage of CPU usage goes above the maximum setting, more role instances are created or Virtual Machines are turned on. When the average percentage of CPU usage goes below the minimum setting, role instances are deleted or Virtual Machines are turned off. To set the maximum average CPU percentage, drag the bar on the right to the right. To set the minimum average CPU percentage, drag the bar on the left to the left.

    5

    6. You can specify the number of instances to add or turn on each time your application is scaled up. To increase the number of instances that are created or turned on when your application is scaled up, drag the bar right. To decrease the number, drag the bar left.

    6

    7. Set the number of minutes to wait between the last scaling action and the next scale-up action. The last scaling action can be either scale-up or scale-down.

    7

    All instances are included when calculating the average percentage of CPU usage and the average is based on use over the previous hour. Depending on the number of instances that your application is using, it can take longer than the specified wait time for the scale action to occur if the wait time is set very low. The minimum time between scaling actions is five minutes. Scaling actions cannot occur if any of the instances are in a transitioning state.

    8. You can also specify the number of instances to delete or turn off when your application is scaled down. To increase the number of instances that are deleted or turned off when your application is scaled down, drag the bar right. To decrease the number, drag the bar left.

    8

    If your application can have sudden increases in CPU usage, you must make sure that you have a sufficient minimum number of instances to handle them.

    9. Set the number of minutes to wait between the last scaling action and the next scale-down action. The last scaling action can be either scale-up or scale-down.

    9

    10. Click Save. The scaling action can take up to five minutes to finish.

    D. Queue messages

    1. In the Management Portal, click Cloud Services, and then click the name of the cloud service to open the dashboard.
    2. Click Scale.
    3. Scroll to the section for the role or availability set, and then click Queue. This enables automatic scaling of your application based on a target number of queue messages.

    10

    4. Each role or availability set in the cloud service has a slider for changing the number of instances that can be used. To set the maximum number of instances that can be used, drag the bar on the right to the right. To set the minimum number of instances that can be used, drag the bar on the left to the left.

    11

    Note: On the Scale page, Instance represents either a role instance or an instance of a Virtual Machine.

    The maximum number of instances is limited by the cores that are available in the subscription. The colors of the slider represent the used and available cores in your subscription:

    o Blue represents the maximum number of cores that the role can use.
    o Dark grey represents the cores that are used by all roles and Virtual Machines in the subscription. When this value overlaps the cores used by the role, the color turns to dark blue.
    o Light grey represents the cores that are available to use for scaling.
    o Pink represents a change has been made that has not been saved.

    5. Select the storage account that is associated with the queue that you want to use.

    12

    6. Select the queue.

    13

    7. Specify the number of messages that you expect each instance to support. Instances will scale based on the total number of messages divided by the target number of messages per machine.

    14

    8. You can specify the number of instances to add or turn on each time your application is scaled up. To increase the number of instances that are added or turned on when your application is scaled up, drag the bar right. To decrease the number, drag the bar left.

    15

    9. Set the number of minutes to wait between the last scaling action and the next scale-up action. The last scaling action can be either scale-up or scale-down.

    16

    The minimum time between scaling actions is five minutes. Scaling actions cannot occur if any of the instances are in a transitioning state.

    10. You can also specify the number of instances to delete or not use when your application is scaled down. A slider is used to specify the scaling increment. To increase the number of instances that are deleted or not used when your application is scaled down, drag the bar right. To decrease the number, drag the bar left.

    17

    11. Set the number of minutes to wait between the last scaling action and the next scale-down action. The last scaling action can be either scale-up or scale-down.

    18

    12. Click Save. The scaling action can take up to five minutes to finish.

    E. Scale linked resources

    Often when you scale a role, it’s beneficial to scale the database that the application is using also. If you link the database to the cloud service, you change the SQL Database edition and resize the database on the Scale page.

    1. In the Management Portal, click Cloud Services, and then click the name of the cloud service to open the dashboard.
    2. Click Scale.
    3. In the Linked Resources section, select the edition to use for the database.

    19

    4. Select the size of the database.
    5. Click Save to update the linked resources.

    F. Schedule the scaling of your application

    You can schedule automatic scaling of your application by configuring schedules for different times. The following options are available to you for automatic scaling:

    1. No schedule – This is the default option and enables your application to be automatically scaled the same way at all times.
    2. Day and night – This option enables you to specify scaling for specific times of day and night.

    Note: Schedules are currently not available for applications that use Virtual Machines.

    1. In the Management Portal, click Cloud Services, and then click the name of the cloud service to open the dashboard.
    2. Click Scale.
    3. On the Scale page, click set up schedule times.

    20

    4. Select the type of scaling schedule that you want to set up.
    5. Specify the times that the day starts and ends and set the time zone. For day and night scheduling, the times represent the start and end of the day with the remaining time representing night.
    6. Click the check mark at the bottom of the page to save the schedules.
    7. After you save the schedules, they will appear in the list. You can select the time schedule that you want to use and then modify your scale settings. The scale settings will only apply during the schedule that you selected. You can edit the schedules by clicking set up schedule times.

    G. Kentico Website Scalability and Performance

    Kentico performs extremely well on a very standard hardware configuration. Still, if you need more power and scaling up (adding more CPU and memory) isn’t enough; you can easily scale out and deploy Kentico in a webfarm. Kentico runs in a standard Windows Server web farm environment and it has built-in mechanisms for automatic synchronization of files and in-memory objects across servers. Based on our performance tests, adding a second web server doubles the overall performance.

    If the database server becomes a bottleneck, Kentico supports SQL Server Merge Replication which means you can also scale out your database servers. It means you can achieve virtually unlimited scalability with Kentico.

    Advanced Caching Options

    Kentico comes with granular cache settings that allow you to configure cache for files, web parts and pages. The full-page caching represents the most powerful option as it stores pages in memory and serves them without touching database or disk.

    1.1.2 How to deploy the core to Azure

    Deploying cloud service and kentico website over azure is very simple. You can follow following simple steps for deploying cloud service.

    1. Using Visual Studio 2012, Open Azure.Server solution. In the Server.DataAgents.Azure project, right click and select Publish

    21

    In a few seconds the Publish Web wizard appears. The wizard creates a new publish profile that contains settings such as the web site URL that Visual Studio needs in order to deploy your project to Azure. The profile is automatically saved so that later when you make changes to the project you can easily redeploy the project to the same site.

    2. Click Publish

    ^B369DD4B62C647AFA9197FFCA3B547048E7FA655B0C72D9EEB^pimgpsh_fullsize_distr


    1.2 Kentico

    The kentico documentation

    1.2.1 Azure support

    Kentico is supported as a standard, scalable web role. The following diagram illustrates the relations between the individual elements that together form Kentico CMS in the cloud environment. The different components depicted in the diagram are described in the text that follows.

    23

    The fact that Kentico CMS can run in multiple instances on Windows Azure creates the need for synchronization of data between the instances. The CMS handles this by considering each instance a web farm server. Unlike the traditional web farm comprising multiple physical servers, you don’t have to configure the web farm servers manually in the multiple-instance Azure environment. The only configuration that needs to be done is setting the number of instances in the service configuration file. Data is synchronized via web farm tasks, which are created and executed automatically.

    Storing session state

    Every complex web application needs to store information about its state, especially user session data. Since the Azure environment is dynamic and the application doesn’t reside constantly in one place, its state has to be stored separately.

    Kentico CMS is pre-configured to use the Windows Azure AppFabric caching service to take care of session information. This way, all instances of the application have access to their data, which keeps them synchronized.

    1.2.2 Social Media Autentication

    Kentico supports the following authentication providers:

    1. Windows Live ID
    2. OpenID > OpenID is an open, decentralized standard for authenticating users. It is currently being used by Google, Yahoo!, MySpace, Flickr and many more. Logon credentials used on all of these sites can be used to log on to your Kentico site. This follows OAUTH/2 protocol.
    3. Facebook Connect
    4. LinkedIn