Tag: Power Automate

  • Power of Prompts in Microsoft 365 Copilot

    Power of Prompts in Microsoft 365 Copilot

    When working with systems—or even with people—the quality of the input plays a crucial role in determining the output.
     Just like giving vague instructions to someone and expecting perfect results is unrealistic, providing unclear or poorly structured input to a system will lead to inaccurate or subpar outcomes.
     Whether you’re dealing with a human or an AI, the principle is the same: clear, well-formatted input leads to reliable and high-quality output.

    Why Prompts Are Important in Enterprise Automation:

    1. Accurate Prompts = Accurate Result
      • Inconsistent or vague prompts can lead to incorrect data, confused conversations, or automation failures. Precise prompts reduce the risk of errors and increase confidence in the automation system.
    2. Prompts Drive Personalized Experiences
      • Good prompts can help the AI respond in a context-aware and personalized manner. For example, a prompt can instruct the AI to greet the user by name, refer to past interactions, or adjust responses based on user roles.
    3. Consistency Across Departments
      • When teams use standardized prompts (especially in Copilot Studio), they ensure consistent messaging and workflow logic across HR, IT, Finance, and Customer Service.

    How to create prompt library in your Org:

    Microsoft provided a way so you can create, and store prompts related to your org and also share them within teams.

    To create a prompt library in Microsoft Copilot Studio, go to the Power Automate app. Click on “More” in the left-hand navigation pane, and you’ll see an option called “Prompts.”
     From there, you can create and store multiple reusable prompts that can be used across different flows and Copilot agents within your organization. This helps ensure consistency, efficiency, and standardization in how your AI assistants interact.
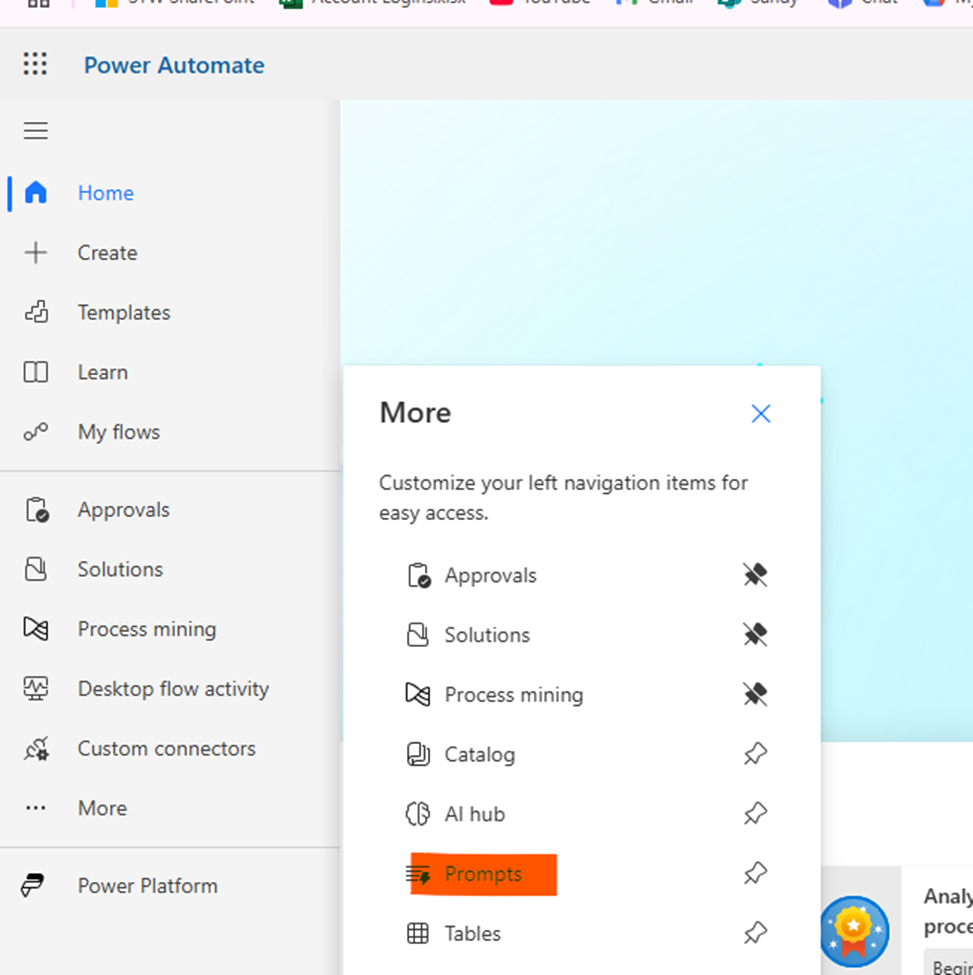
    Same list of prompts you can also use in Copilot Studio for agents or in Microsoft 365 Copilot.

    How to use prompts for Copilot:

    If you are using Copilot studio you might be thinking that all those prompts you can see by default by Microsoft that is true but you can customize that and add your own. Click on see more button below chat box.
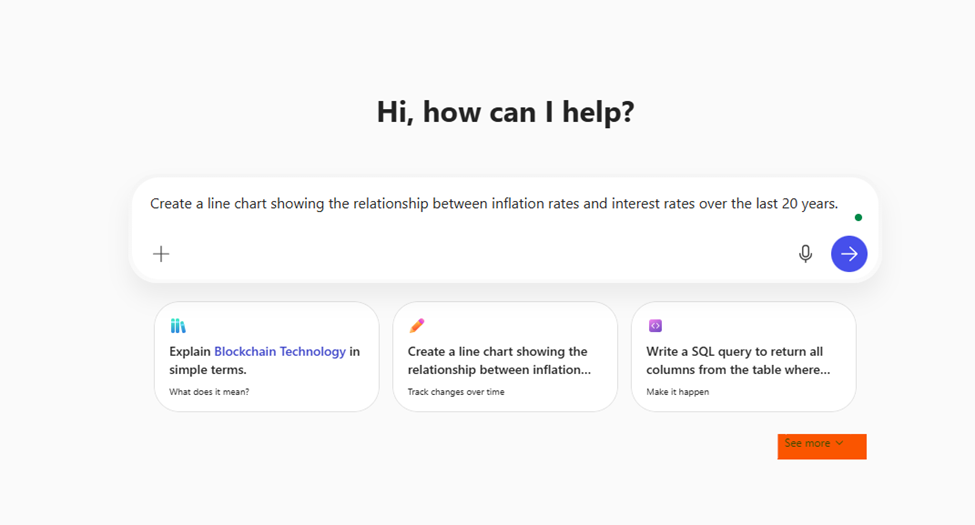
    You will then see the Prompt Gallery, which gives you access to Microsoft’s collection of ready-to-use prompts. You can also create your own custom prompts and share them within your organization, making it easy to maintain consistency and reuse across teams and solutions.
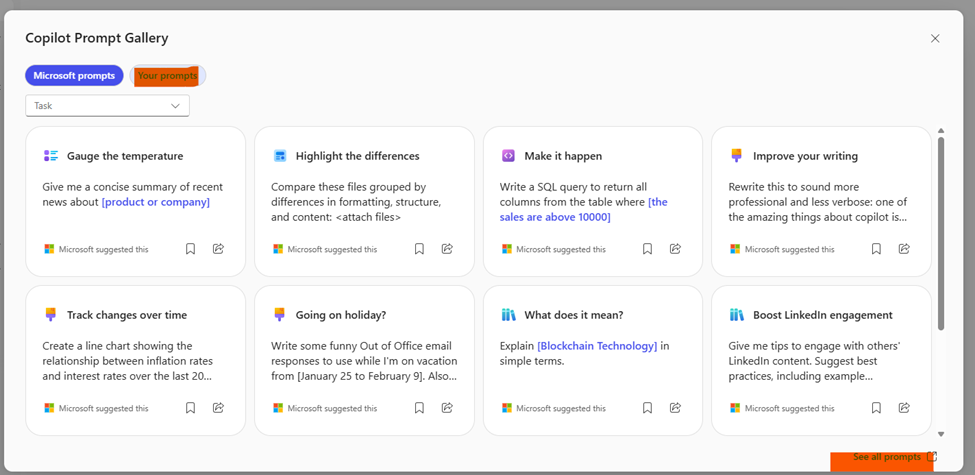
    Once you create prompts, they will be visible everywhere within the organization.

    How do I take a prompt and make it my own?

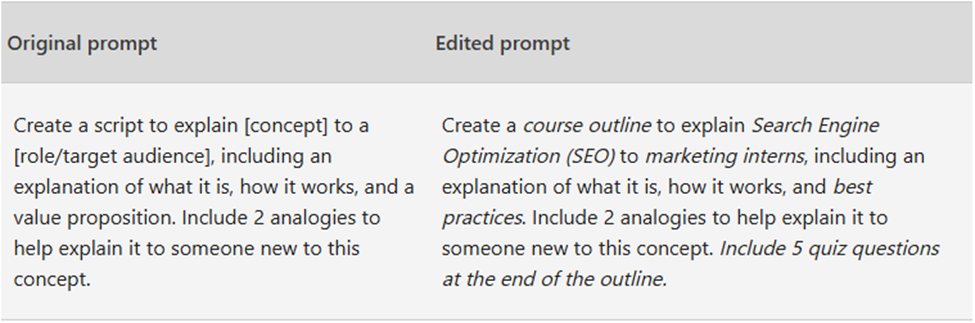
    The Prompt Gallery is like a toolbox filled with ready-made ideas, you don’t have to start from scratch. Microsoft gives you editable prompts with clear placeholders like [file] or [your title] that act as your starting points. But the real magic? You’re not limited to just filling in the blanks.
     You can reshape the entire prompt, weak the goal, adjust the context, set different expectations, or even change the source to perfectly match your business scenario. It’s flexible by design, so your AI speaks your language, not just Microsoft’s.
    Cooking up a great prompt:

    1. Be Clear About What You Need

    Copilot works best when you give it a clear and specific instruction. Instead of saying “Summarize this,” try “Give me a concise summary of recent news about [Product X].” Treat it like a smart teammate—clarity is key.2. Use the 4 Key Ingredients

    Great prompts include:

    • Goal – What should Copilot do?
    • Context – Background info to guide it
    • Source – File or content to use
    • Expectation – Format or tone you want

    This makes the output more accurate and useful.

    3. Keep the Conversation Going

    Don’t stop at one prompt. Ask follow-ups, request changes in tone, or go deeper into a topic. This helps refine the response just like you would with a human assistant.

    4. Smart Prompting Tips

    • Provide enough context
    • Use clear grammar and punctuation
    • Put quotes around exact text
    • Type “new topic” when changing tasks

    These habits lead to better and faster results.

    Conclusion

    Prompts are the key to getting the best results from Microsoft Copilot Studio. Clear, goal-driven instructions help the AI deliver accurate, useful responses. Using tools like the Prompt Library and Prompt Gallery, teams can create, reuse, and share effective prompts. With the right input, Copilot becomes a powerful assistant—boosting productivity and consistency across your organization
  • Automate Zendesk Ticket Alerts to Teams and Mobile No More Manual Tracking!

    Automate Zendesk Ticket Alerts to Teams and Mobile No More Manual Tracking!

    Introduction

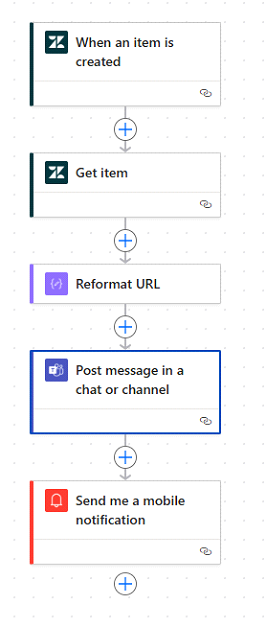
    As developers, we always want to avoid repetitive manual tasks. In this blog, I’ll show how I used Power Automate to create a flow that listens to new Zendesk tickets, gets the full user info, reformats a custom link, and sends alert messages in Microsoft Teams and as mobile notifications. This kind of automation helps IT support teams respond faster and stay updated. As per this Image –

    Let’s break it down step-by-step.

    Flow Breakdown –

    Here is the complete blog which we can going to break down in part and with details –

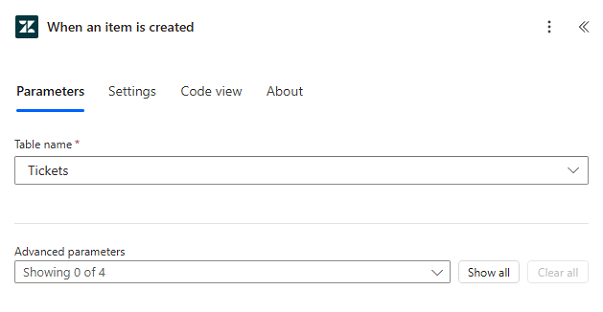
    Step 1: Trigger – When an item is created

    This is the starting point of our flow. We selected the Tickets table from Zendesk. Whenever a new ticket is created, the flow will trigger automatically.

    🛠️ Table name used: Tickets

    📌 Purpose: Detect new ticket instantly

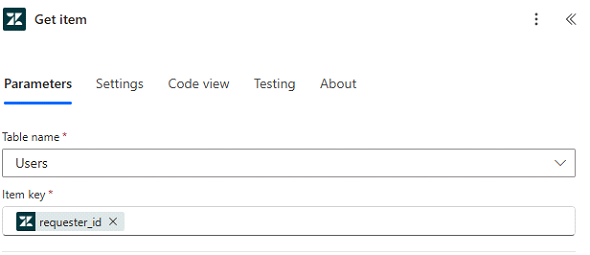
    Step 2: Get item – Pull requester details

    Next, we used the Zendesk Users table to fetch more info about the person who raised the ticket. We used requester_id as the lookup key.

    🛠️ Table name: Users

    🔍 Item key: requester_id

    This step helps us include the customer’s name in our Teams message.

    Step 3: Reformat URL – Custom logic

    We added a small logic (probably using an expression or script action) to create a usable Zendesk ticket URL. This step is useful for giving direct clickable access in alerts.

    concat(
    split(triggerOutputs()?[‘body/url’], ‘:’)[0],
    slice(triggerOutputs()?[‘body/url’], indexOf(triggerOutputs()?[‘body/url’], ‘:’), nthIndexOf(triggerOutputs()?[‘body/url’], ‘/’, 3)),
    slice(triggerOutputs()?[‘body/url’], nthIndexOf(triggerOutputs()?[‘body/url’], ‘/’, 5), nthIndexOf(triggerOutputs()?[‘body/url’], ‘.’, 3))
    )

    🔗 Example output: https://yourcompany.zendesk.com/ticket/12345

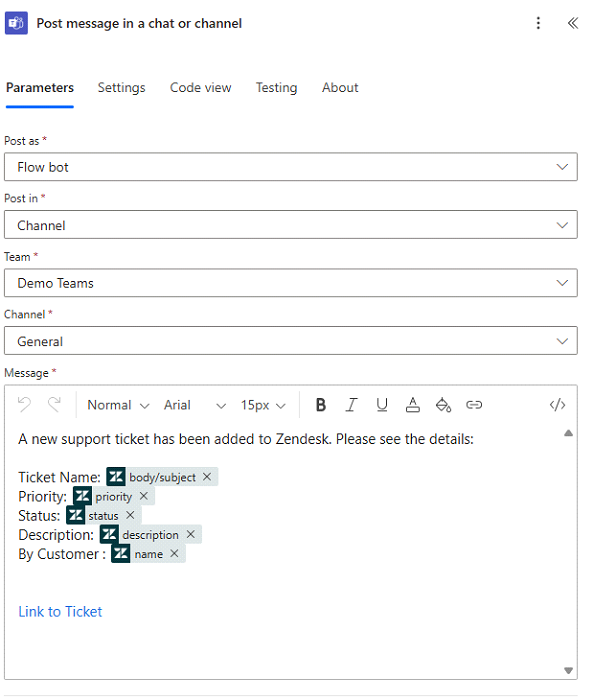
    Step 4: Post message to Teams channel

    This is the heart of the notification system. We send all ticket details in a Teams channel using a Flow bot. Here’s what goes in the message:

    A new support ticket has been added to Zendesk. Please see the details:

    Ticket Name:
    Priority:
    Status:
    Description:
    By Customer:

    Link to Ticket

    📢 Team: Demo Teams

    💬 Channel: General

    Makes it easy for your support team to stay in loop and click straight to the ticket.

    Step 5: Send mobile notification

    Lastly, we added a Power Automate mobile push notification step. This helps alert support leads even when they’re not checking Teams.

    📱 Message example: “New Zendesk ticket raised by John Doe: Printer not working”

    Summary

    In this flow, we used Power Automate to build a full Zendesk-to-Teams notification pipeline:

    • Trigger on new ticket
    • Fetch requester info
    • Reformat the ticket URL
    • Send full details to Teams
    • Send mobile alert for instant visibility

    This setup is simple to build, low-maintenance, and helps teams react faster to support tickets. Ideal for small-to-mid size service desks!

  • Automating Customer Approval Workflows in Business Central with Power Automate

    Automating Customer Approval Workflows in Business Central with Power Automate

    Introduction:

    In any growing organization, approvals play a critical role in maintaining process integrity, whether it’s for sales orders, purchase requests, or customer-specific terms. However, manual approval handling in Dynamics 365 Business Central can be time-consuming and prone to delays.

    This blog walks you through a fully automated customer approval process using Power Automate connected to Business Central, designed to streamline workflows, notify stakeholders, and ensure auditability at every step.

    Scenario: Customer Approval Flow

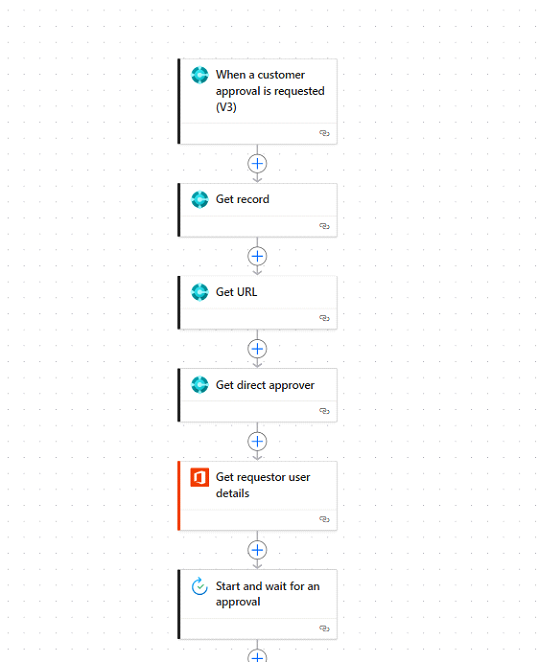
    Let’s consider a use case where a sales order or customer record in Business Central requires approval before proceeding. The process includes:

    • Detecting the approval request in Business Central.
    • Fetching relevant data and approver details.
    • Sending approval requests.
    • Processing the outcome (Approved, Rejected, Cancelled).
    • Sending conditional email notifications.

    Part 1: Initiation and Preparation

    Step-by-Step Breakdown of the Flow

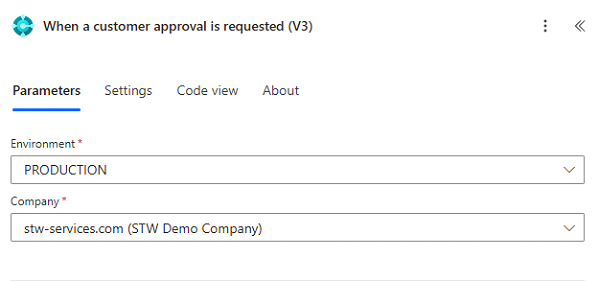
    1. Trigger – When a Customer Approval is Requested (V3)

    This Power Automate flow is triggered when a new customer approval request is initiated in Business Central via the “Workflows” module or a custom approval setup.

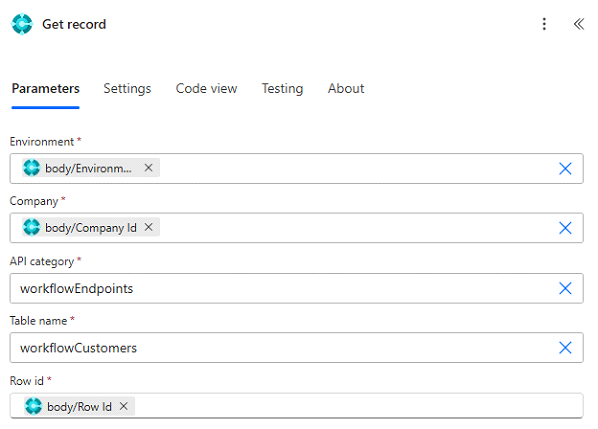
    2. Get Record

    The flow fetches detailed information about the customer or transaction from Business Central using the “Get record” action.

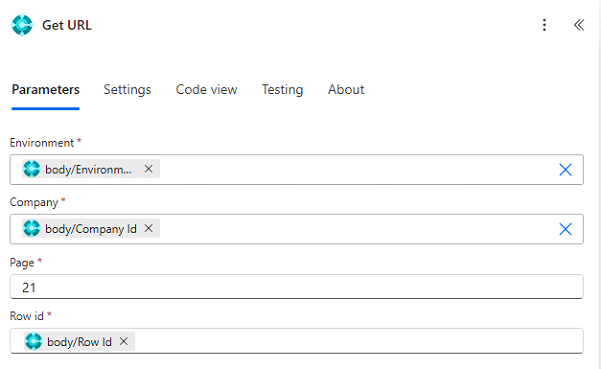
    3. Get URL

    This step constructs or retrieves a direct URL to the Business Central record so the approver can quickly access the relevant data for decision-making.

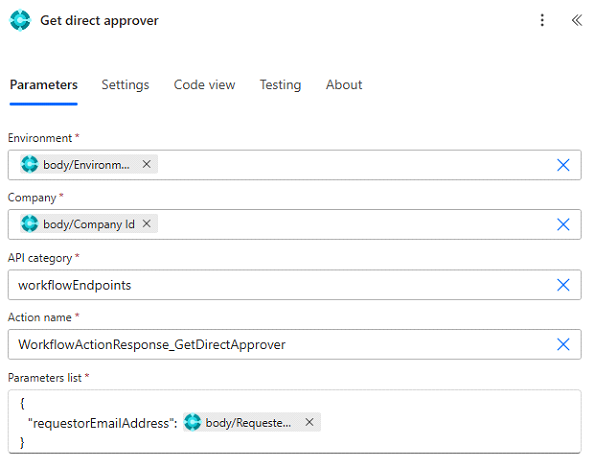
    4. Get Direct Approver

    The flow determines who the direct approver is—based on the requestor’s department, role, or custom logic. This step ensures the approval is routed correctly.

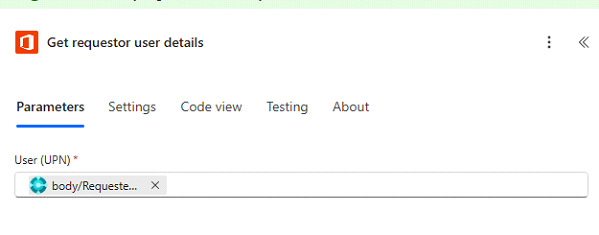
    5. Get Requestor User Details

    Using Office 365 Users, we retrieve the user profile of the original requestor for personalization and notifications.

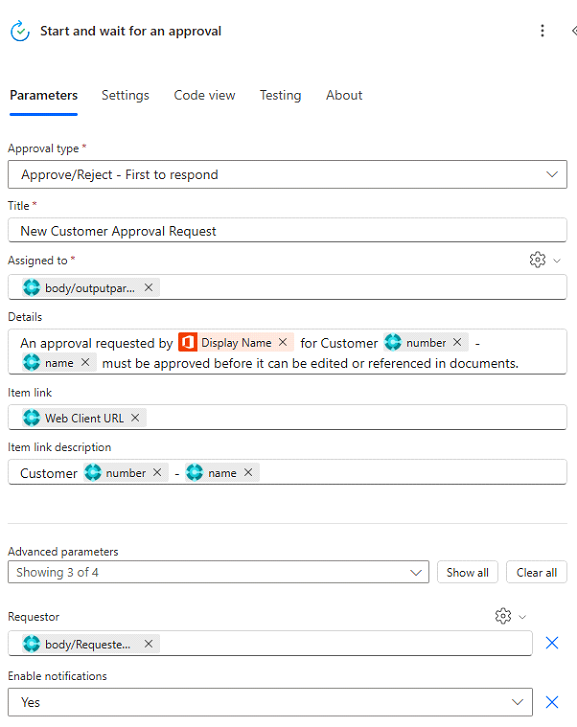
    6. Start and Wait for an Approval

    This is the core approval action. A request is sent with key information, and the flow pauses until the approver responds.

    Part 2: Handling Approval Responses

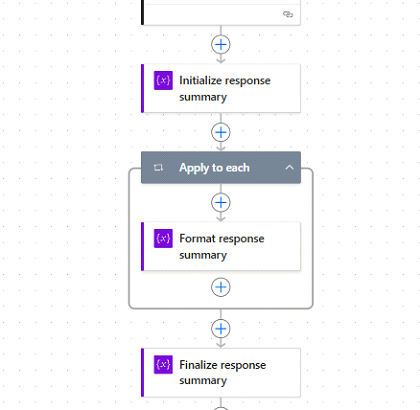
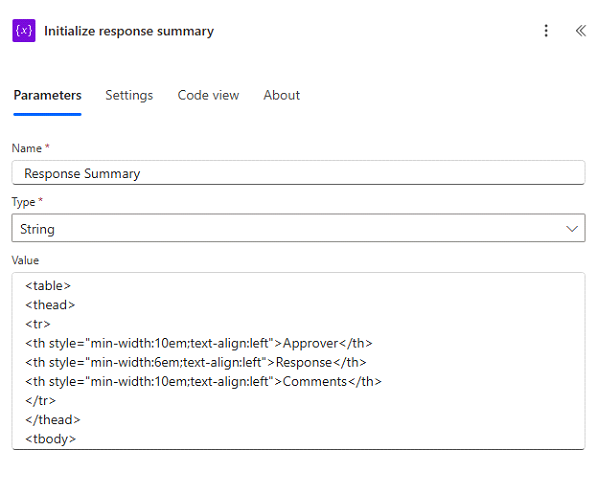
    7. Initialize and Format Response Summary

    The flow initializes a variable to hold a response summary. It then iterates through responses (if multiple approvers are involved), formats them, and stores a summary for recordkeeping or reporting.

    Part 3: Reacting to the Outcome

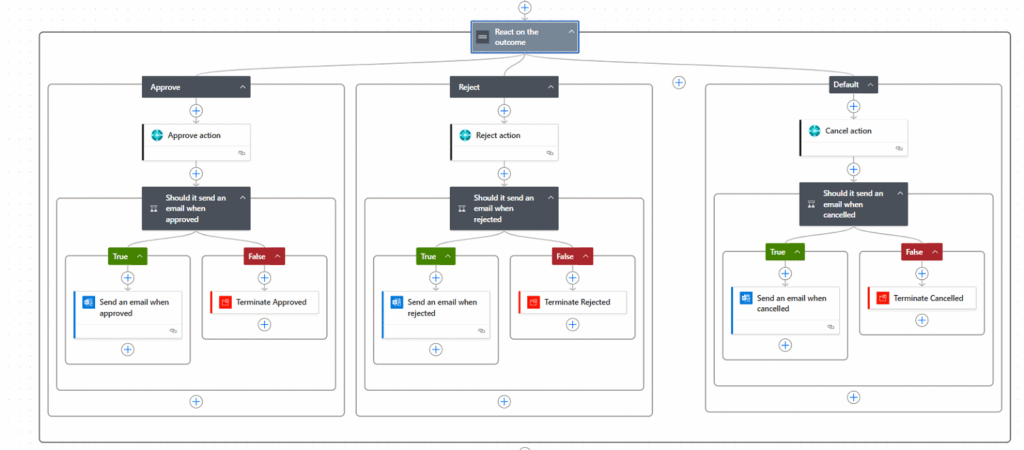
    Using a Switch-like structure, the flow branches into three sections:

    Approved

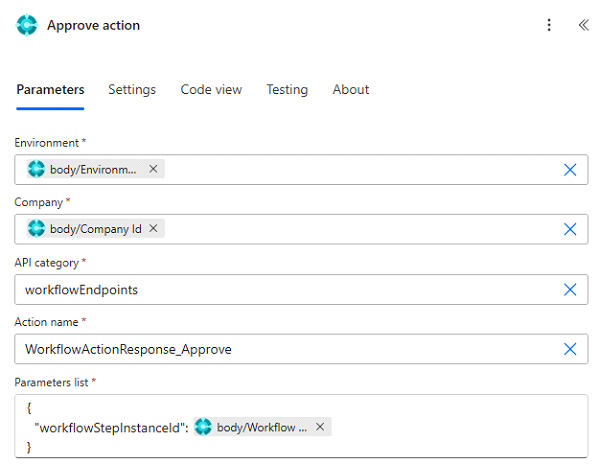
    Approve Action: Marks the approval as successful.

    Conditional Email: If configured, an email is sent to notify relevant parties of the approval. If not, the flow terminates cleanly.

    Rejected

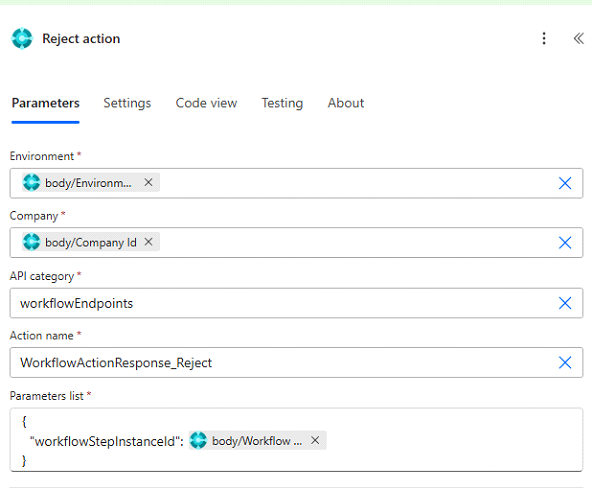
    Reject Action: Marks the approval as rejected.

    Conditional Email: Optionally sends an email stating that the request was denied.

    Cancelled (Default Path)

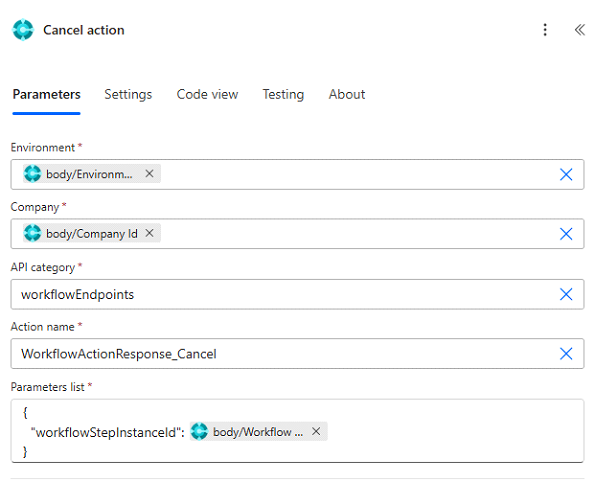
    Cancel Action: Treats any fallback or unhandled scenario as a cancellation.

    Conditional Email: Sends a cancellation notice if needed.

    Each path ends in a Terminate action to gracefully end the flow, ensuring no unintended actions proceed after final decision handling.

    Conclusion

    Automating customer approval workflows with Power Automate not only streamlines internal processes but also enhances transparency, accountability, and speed of execution. This solution ensures that every approval request is handled consistently, routed to the right person, and tracked properly — with minimal manual intervention.

    By integrating Dataverse, Outlook, and Microsoft 365 services, you can build an end-to-end approval system that adapts to your business needs. Whether it’s sending conditional notifications or handling various approval outcomes smartly, this flow empowers organizations to operate more efficiently and make faster, data-driven decisions.

  • Automate Reimbursement Approvals with Microsoft Forms, Power Automate & Excel

    Automate Reimbursement Approvals with Microsoft Forms, Power Automate & Excel

    Introduction

    Managing employee reimbursements manually? You’re not alone. Many finance teams still rely on email threads, spreadsheet juggling, and back-and-forth approvals that waste valuable time and increase the risk of errors.

    But what if you could automate the entire reimbursement approval process—from collecting claims to logging approved entries in Excel—without writing a single line of code?

    In this blog, we’ll walk you through a practical, step-by-step solution using Microsoft Forms, Power Automate, and Excel Online. By the end, you’ll have a fully automated system where employees submit claims through a form, finance receives approval requests instantly, and approved claims are automatically logged into a centralized Excel file for processing.

    Let’s make your finance workflow faster, smoother, and error-free.

    Prerequisites

    You’ll need a Microsoft 365 account and access to the following:

    • Microsoft Forms
    • Power Automate
    • OneDrive or SharePoint
    • Excel Online
    • An Excel sheet with a table
    • A Microsoft Form for collecting reimbursement requests

    Step-by-Step Guide

    First things first, head over to Microsoft Power Automate. You’ll find hundreds of ready-to-use templates there—we’ll use one of them to build our reimbursement approval flow.

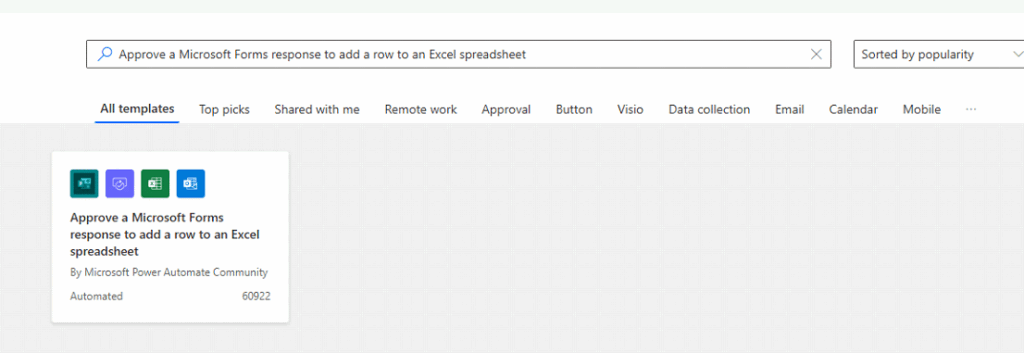
    Search for this template:

    “Approve a Microsoft Forms response to add a row to an Excel spreadsheet”

    Search this template you will get result-

    But before using this template, let’s prepare the Microsoft Form and Excel sheet required to set up this flow.

    To go https://forms.office.com/ and click on create new form and add these fields to create a form use title it: “Reimbursement Claim Form” or what ever depends on your business need.

    Add the following fields (example):

    • Full Name
    • Department
    • Expense Type
    • Amount
    • Date of Expense
    • Comments
    • Status (Approved/Rejected)
    • Approval Date

    Select the range and click Insert → Table. Name the table as ClaimsTable.

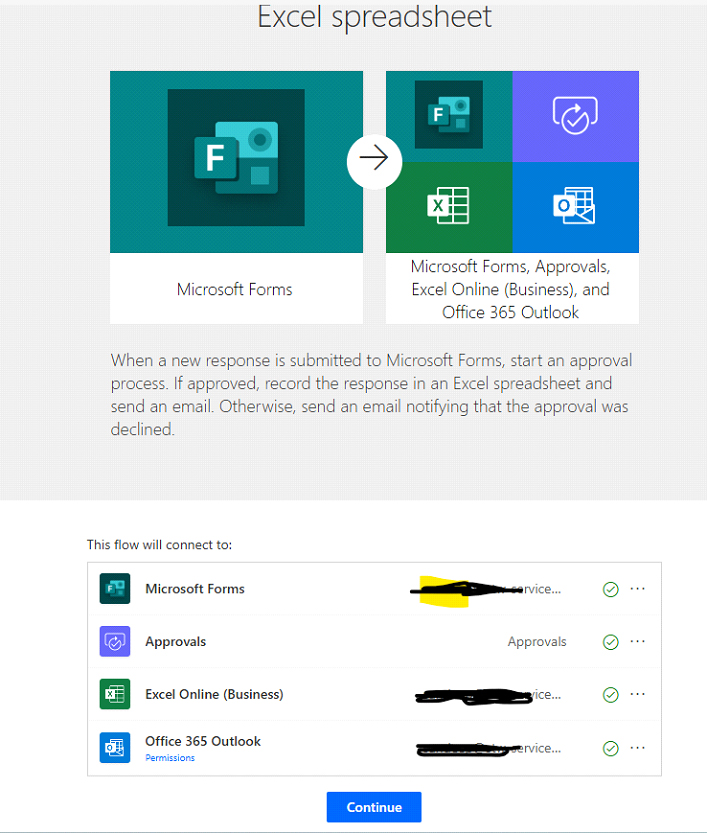
    Now go back to template and select template make sure all app connection or okay like this.

    Check the connection for Microsoft Form, approval, Excel online, and Office 365 Outlook. If all connections are okay, click on continue or fix the connection issue using your Microsoft login.

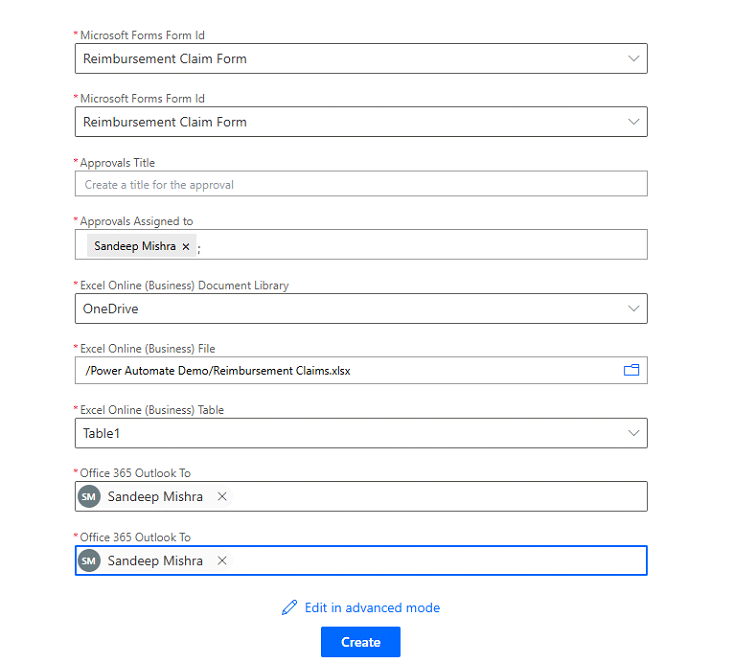
    Once you click on continue, it requires all details to be filled in in the next step. Fill details like form ID, Excel path and table, also the person who will approve/ disapprove the request, like given example:

    Once filled click on continue and your flow will be read.

    Testing:

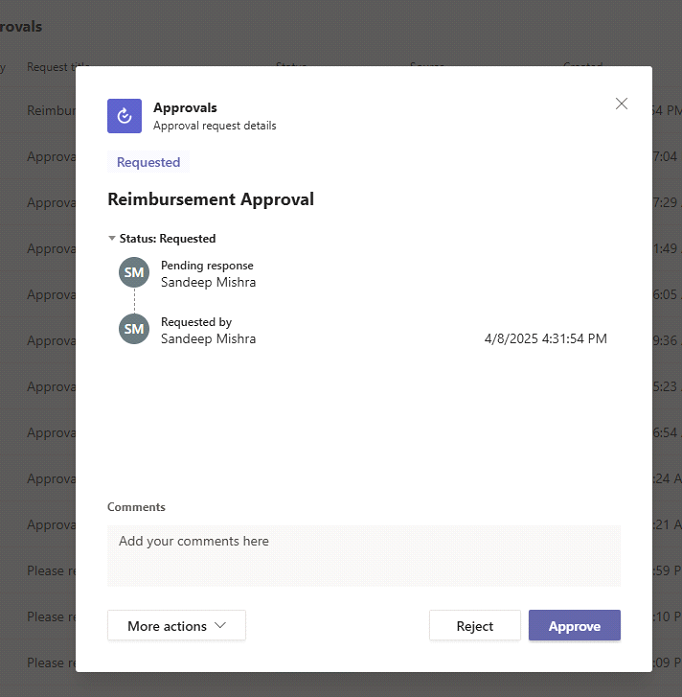
    Click on Test in the top right-side bar and fill out the Microsoft form and submit it. You can see an approval/disapproval request in Microsoft Teams like this:

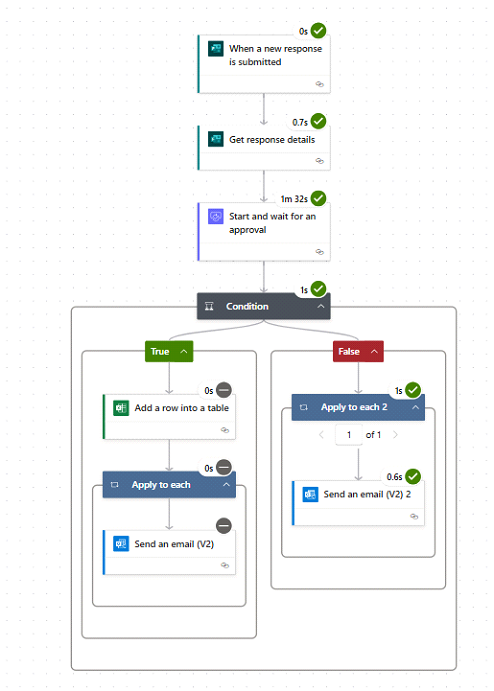
    Your action will run accordingly. Wow, the flow is running fine.

    Conclusion

    With just a few simple tools—Microsoft Forms, Power Automate, and Excel Online—you can completely transform how your finance team handles reimbursement claims. What once required manual emails, approvals, and spreadsheet updates can now be streamlined into an automated, error-free workflow.

    Not only does this save valuable time, but it also improves transparency, speeds up approvals, and ensures that no request falls through the cracks.

    Ready to go further? You can enhance this setup by integrating notifications in Microsoft Teams, tracking metrics in Power BI, or adding file uploads for receipts. The possibilities with Power Platform are endless!

    Start small, automate one process, and you’ll quickly see the impact across your entire organization.