Category: Micrososft

  • Which .NET platform suits your project best?

    Which .NET platform suits your project best?

    Understanding the difference between .NET Core, .NET Framework and Xamarin

    For quite some time now, coders have been flooded with various unique innovations, making it complicated for them to choose the right platforms for developing projects. Today, their focus is not only on developing IT solutions that achieve the pre-decided functionality, but also on ensuring that the solution doesn’t get outdated soon, is compatible on multiple platforms and is easy to build, with the necessary pre-built libraries and widgets making the work faster.

    Technologies like .NET Core, .NET Framework, and Xamarin have changed the face of application development and made it easier for developers to adapt to different screens like laptops, tablets and mobile phones. Even though all three of them might seem overlapping, each one is considerably different from the other.

    Prima facie, the main distinction between the three is simple. The .NET Framework is the traditionally used platform for building .NET applications on Windows. The .NET Core is a cross-platform which is used to develop consoles and web-apps that can run on any platform – Windows, Linux or Mac. Xamarin is an open-source Mono-based cross-platform used for building mobile apps that are compatible with iOS, Android and Windows phones.

    .NET Framework

    The .NET Framework proves to be highly beneficial in providing services such as memory management, type safety, networking, application deployment, security and data structures. It is recommended to use .NET Framework if the existing application already operates on it and you are looking to extend its functionality, or if you want access to third-party libraries.

    Applications of .NET Framework are written in C#, F# or Visual Basic and compiled to Common Intermediate Language (CIL). The main components of .NET Framework include Common Language Runtime (CLR) and .NET Framework Class Library. Since the CLR runs .NET applications on a given machine, it converts the CIL to machine code. Along with this, the .NET Framework Class Library provides language interoperability among supported languages.

    .NET Core

    .NET Core is a high-performing, open-source cross-platform for building websites, services and console apps on Windows, Linux and Mac. Its performance with regard to mapping is better as compared to .NET Framework, as well as it has the ability to self-host or host on Docker, IIS, Apache or Nginx and requires only a single NuGet package.

    .NET Core definitely has its own advantages. It can be used for server applications when:

    • You are targeting microservices.
    • You are using Docker containers.
    • You need scalable systems.
    • You want to use several versions of .NET in the same project.

    .NET Core has been designed to cater to a modular approach and it is fast and lightweight.

    Xamarin

    Xamarin is a .NET implementation for running applications on all the major mobile operating systems, including iOS and Android. It uses Mono as the .NET implementation for running the apps, and projects can be created from Visual Studio or Visual Studio for Mac. In the age where apps run on iOS and Android, Xamarin promises to create the best User Interface. In fact, Microsoft claims that Xamarin is the finest way to optimize performance in apps on multiple platforms. It is the best choice for developing native mobile apps with the best UI performance.

    Xamarin brings some exciting features to the .NET ecosystem such as base framework for accessing native features, platform-specific libraries, and Extensible Markup Language (known as XAML) for building dynamic mobile apps using C#. In order to build any mobile app using C#, Xamarin is the only available choice for developers.

    All the three platforms provide unique options for building various desktop, mobile, cloud, gaming and IoT applications within the .NET Ecosystem, as they share many underlying technologies. Moving ahead, Microsoft is heavily investing in .NET Forward to open up more avenues for developers on these platforms. Each of these software-building technologies has varying characteristics and implementations which gives each their distinct characteristics. But it becomes necessary for developers to compare them and gain sufficient knowledge about them, so that they can choose what’s best according to their requirements.

    If you are looking to develop an idea and want to explore your options, connect with us at support@stw-services.com and we can help you choose the best platform to build optimized solutions.
  • How to create Power BI embed token to host reports in Web Application

    How to create Power BI embed token to host reports in Web Application

    In area of data visualization Microsoft Power BI is leading. Using this blog we are going to learn how to generate Embed token to host Power BI reports in any web application. Sometimes it will take hours to figure out how to embed token. Use these steps to do it in hour.

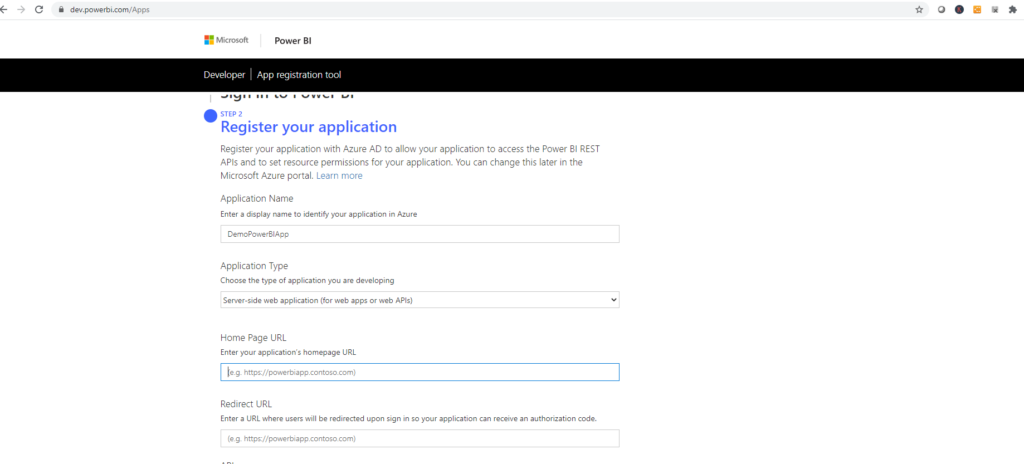
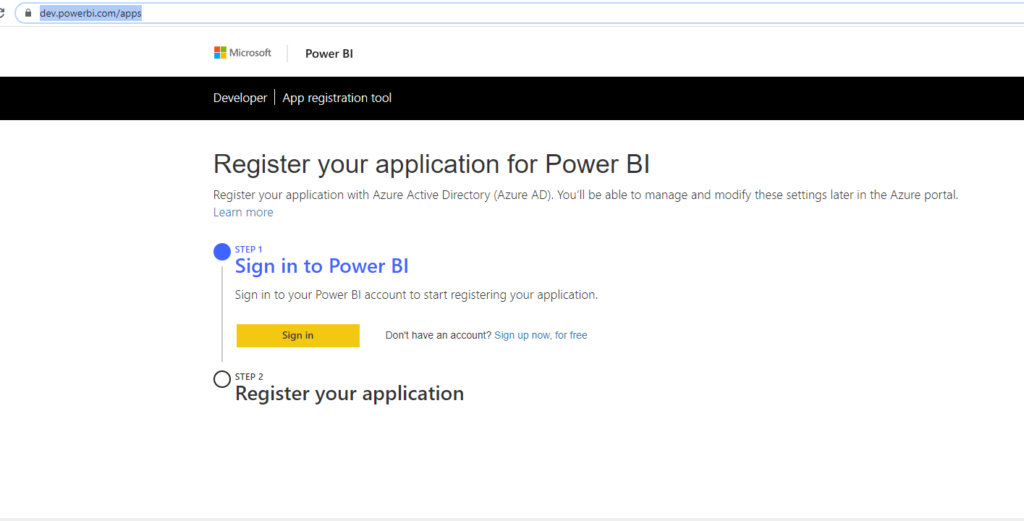
    To embed Power BI report, it must be authorized by Azure AD. In regard of that we have to create Azure Ad application and give right permission. In case of Power BI Microsoft created a simple flow to register app and get Client ID and Client Secret code. Use this https://dev.powerbi.com/apps  to register application in Azure.  Similar screen will come to register application. For example I register DemoPowerBIApp.

    Select Application type as server side web application.  And add redirect URL.

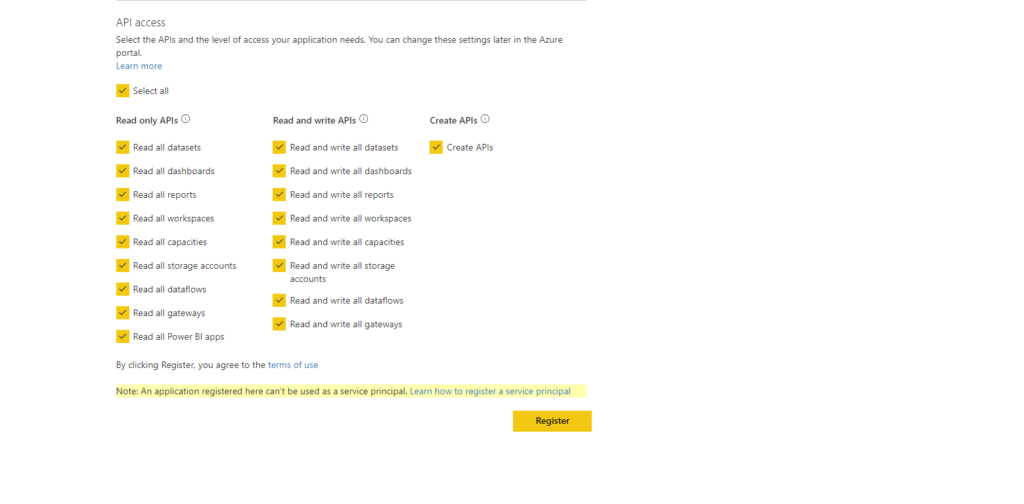
    In permission part select all –

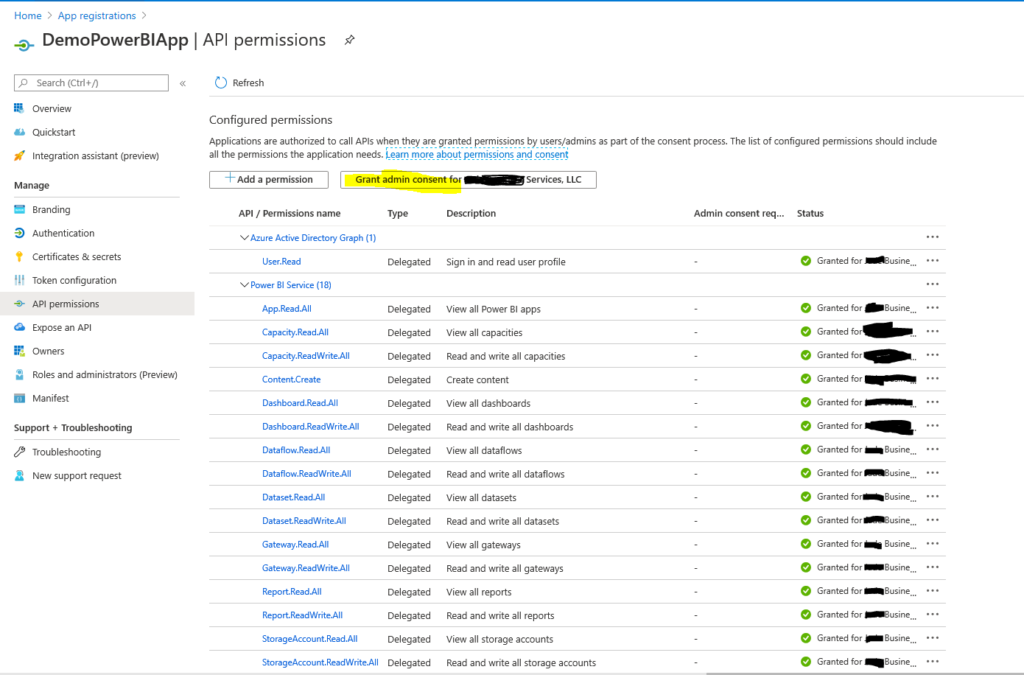
    Next step to assign right permission to created AD application. For that login to your Azure portal and go to Azure Active Directory and select created app in my case I selected “DemoPowerBIApp”. Select API permission and click on Grand Admin consent for application. For reference use this image.

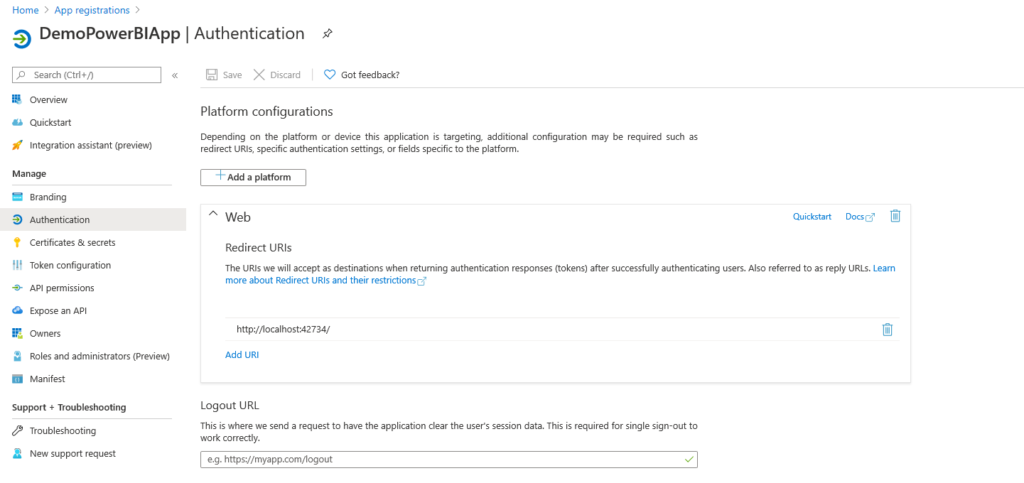
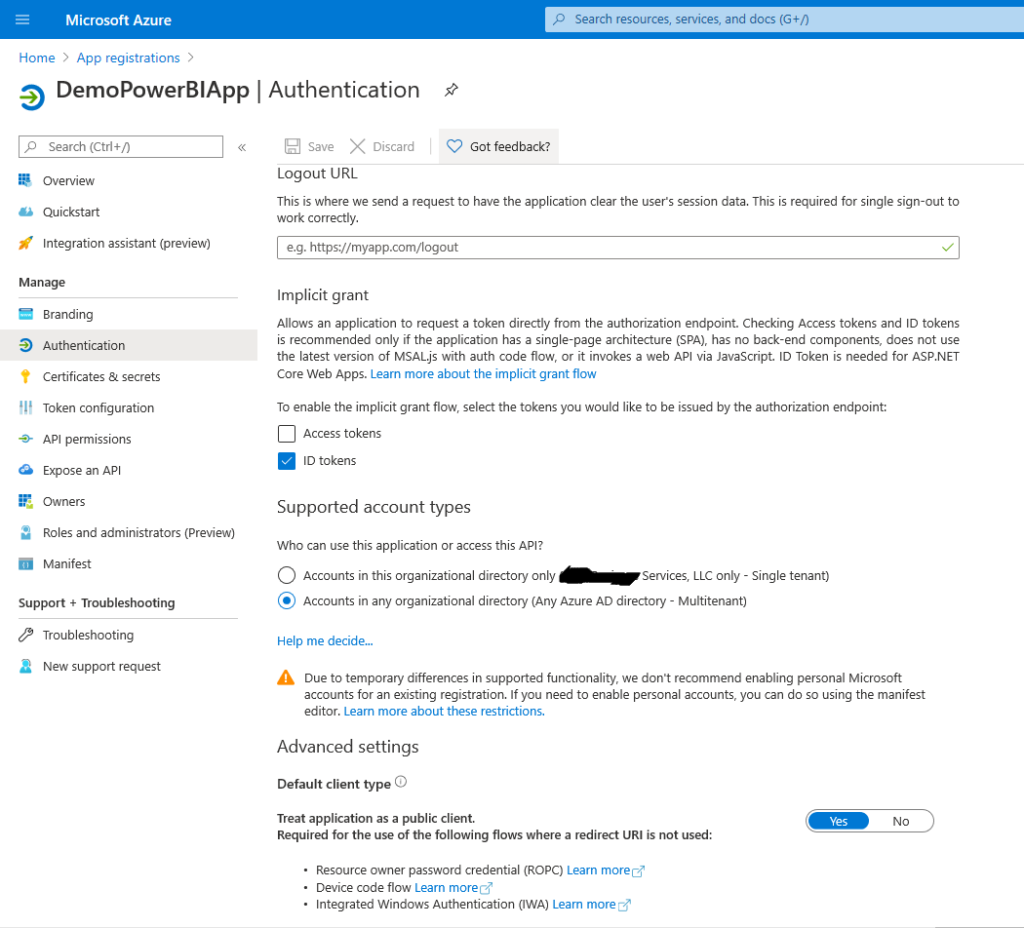
    Select Authentication left Navigation and add redirect URL. This setting is quite important to authorize your client domain to Azure token API. Add platform select web and add redirect URL. In our case it will be already added as we created app using above URL.

    Also allow Default client Type to yes and save.

    Next to use STW source code in our git report to get token – https://github.com/stw-services/PowerBIembedTokenSourceCode .

    For test application you can use this URL – https://opensource.microsoft.com/ .

    For any Power BI consultant connect us on info@softechworld.com.

    Thanks,

    Happy Programming!!

  • Adding Content Templates to Editor in Kentico 9

    Adding Content Templates to Editor in Kentico 9 – It’s handy to adding site typography as content templates in Kentico CKeditor. Follow steps given below to add and customize CKeditor toolbar and include new content templates.

    Important : Must check Kentico CKeditor version to download content templates from given link http://ckeditor.com/addon/templates.

    Step1: Download sample content template from http://ckeditor.com/addon/templates. Extract downloaded zip folder and copy template folder in \CMS\CMSAdminControls\CKeditor\plugins. It should look like example image.

    Content Template Plugin

    Step 2: Adding config properties  – Open config.js file under CKeditor folder and add these lines on top of file along with other properties-

    config.extraPlugins = ‘templates’;

    /* CMS */

    config.plugins += ‘,showborders’;

    /* Templates */

    config.plugins += ‘,templates’;

    It should be like image example.

    Kentico Template

    Step3: Customize toolbar : Add template after source in toolbar_FULL

    config.toolbar_Full = [

    [sourceName, ‘-‘, ‘Templates’],

    [‘Cut’, ‘Copy’, ‘Paste’, ‘PasteText’, ‘PasteFromWord’, ‘Scayt’, ‘-‘],

    [‘Undo’, ‘Redo’, ‘Find’, ‘Replace’, ‘RemoveFormat’, ‘-‘],

    [‘Bold’, ‘Italic’, ‘Underline’, ‘Strike’, ‘Subscript’, ‘Superscript’, ‘-‘],

    [‘NumberedList’, ‘BulletedList’, ‘Outdent’, ‘Indent’, ‘Blockquote’, ‘CreateDiv’, ‘-‘],

    [‘JustifyLeft’, ‘JustifyCenter’, ‘JustifyRight’, ‘JustifyBlock’, ‘-‘],

    ‘/’,

    [‘InsertLink’, ‘Unlink’, ‘Anchor’, ‘-‘],

    [‘InsertImageOrMedia’, ‘QuicklyInsertImage’, ‘Table’, ‘HorizontalRule’, ‘SpecialChar’, ‘-‘],

    [‘InsertForms’, ‘InsertPolls’, ‘InsertRating’, ‘InsertYouTubeVideo’, ‘InsertWidget’, ‘-‘],

    [‘Styles’, ‘Format’, ‘Font’, ‘FontSize’],

    [‘TextColor’, ‘BGColor’, ‘-‘],

    [‘InsertMacro’, ‘-‘],

    [‘Maximize’, ‘ShowBlocks’]

    ];

    It should be like:

    Kentico

    Step4: Setup toolbar_Full, At bottom of config file change value –

    config.toolbar = config.toolbar_Full;

    Now ckeditor is ready to use templates and can do testing after login in CMSDesk. Open editable page. Ckeditor should show template icon along with source.

    Kentico Template

    After clicking in template icon, it will show all available content templates.  You can select any of these templates and insert in editable part and modify accordingly. You don’t need to be worried about styling content text. It helps non technical person to make pages and style it easily.

    capture5

    Next part is,  how to add new templates in editor. Open default.js file under CKeditor/plugins/templates/templates/default.js

    capture6

    Default.js already has some inbuilt templates, you can add more templates using same structure. Using example I added youtube responsive video template at bottom of default.js file.

    {

    title: ‘Responsive YouTube Video (with controls)’,

    //image: ‘template1.gif’,

    description: ‘Responsive YouTube Video (with controls)’,

    html: ‘<div class=”youtube-container”><div class=”youtube-player” data-controls=”1″ data-id=”h6w0uEgMXuQ”><div class=”play-button”> </div></div>’ +

    ‘\r\n</div><div style=”color:red;”>You must view source, edit the data-id and replace value with YouTube video id (then delete this line)</div>\r\n’

    }

    capture7
  • Connection from PHP to Microsoft Dynamics CRM

    Connection from PHP to Microsoft Dynamics CRMThis time we will learn how to connect Microsoft dynamics CRM using PHP code. Microsoft dynamics CRM soap service can be a way to make calls from PHP source code. A valid soap header is required to execute soap request. Let’s see how to create a valid header using PHP code:

    To get valid soap request, first need to create token1, token2, and keyIdentifer which can be created using online user name and password.

    Soap enavlop for getting token1, token2, ekyidentifer:

    $xml = “<s:Envelope xmlns:s=\”http://www.w3.org/2003/05/soap-envelope\” xmlns:a=\”http://www.w3.org/2005/08/addressing\” xmlns:u=\”http://docs.oasis-open.org/wss/2004/01/oasis-200401-wss-wssecurity-utility-1.0.xsd\”>”;

    $xml .= “<s:Header>”;

    $xml .= “<a:Action s:mustUnderstand=\”1\”>http://schemas.xmlsoap.org/ws/2005/02/trust/RST/Issue</a:Action>”;

    $xml .= “<a:MessageID>urn:uuid:” . $this->newGUID () . “</a:MessageID>”;

    $xml .= “<a:ReplyTo>”;

    $xml .= “<a:Address>http://www.w3.org/2005/08/addressing/anonymous</a:Address>”;

    $xml .= “</a:ReplyTo>”;

    $xml .= “<a:To s:mustUnderstand=\”1\”>https://login.microsoftonline.com/RST2.srf</a:To>”;

    $xml .= “<o:Security s:mustUnderstand=\”1\” xmlns:o=\”http://docs.oasis-open.org/wss/2004/01/oasis-200401-wss-wssecurity-secext-1.0.xsd\”>”;

    $xml .= “<u:Timestamp u:Id=\”_0\”>”;

    $xml .= “<u:Created>” . gmdate ( ‘Y-m-d\TH:i:s.u\Z’, $now ) . “</u:Created>”;

    $xml .= “<u:Expires>” . gmdate ( ‘Y-m-d\TH:i:s.u\Z’, strtotime ( ‘+60 minute’, $now ) ) . “</u:Expires>”;

    $xml .= “</u:Timestamp>”;

    $xml .= “<o:UsernameToken u:Id=\”uuid-” . $this->newGUID () . “-1\”>”;

    $xml .= “<o:Username>” . $username . “</o:Username>”;

    $xml .= “<o:Password>” . $password . “</o:Password>”;

    $xml .= “</o:UsernameToken>”;

    $xml .= “</o:Security>”;

    $xml .= “</s:Header>”;

    $xml .= “<s:Body>”;

    $xml .= “<trust:RequestSecurityToken xmlns:trust=\”http://schemas.xmlsoap.org/ws/2005/02/trust\”>”;

    $xml .= “<wsp:AppliesTo xmlns:wsp=\”http://schemas.xmlsoap.org/ws/2004/09/policy\”>”;

    $xml .= “<a:EndpointReference>”;

    $xml .= “<a:Address>urn:” . $urnAddress . “</a:Address>”;

    $xml .= “</a:EndpointReference>”;

    $xml .= “</wsp:AppliesTo>”;

    $xml .= “<trust:RequestType>http://schemas.xmlsoap.org/ws/2005/02/trust/Issue</trust:RequestType>”;

    $xml .= “</trust:RequestSecurityToken>”;

    $xml .= “</s:Body>”;

    $xml .= “</s:Envelope>”;

    In response, you will get element “CipherValue” which has both tokens which you can fetch from response. See sample code:

    $response = curl_exec ( $ch );

    curl_close ( $ch );

    $responsedom = new DomDocument ();

    $responsedom->loadXML ( $response );

    $cipherValues = $responsedom->getElementsbyTagName ( “CipherValue” );

    $token1 = $cipherValues->item ( 0 )->textContent;

    $token2 = $cipherValues->item ( 1 )->textContent;

    Next is to get KeyIdentifier value which you can get using “KeyIdentifier” element name from response.

    $keyIdentiferValues = $responsedom->getElementsbyTagName ( “KeyIdentifier” );

    Now need to get online header using token1, token2 and KeyIdentifier. Below you can see example of header xml for Soap request:

    $xml = “<s:Header>”;

    $xml .= “<a:Action s:mustUnderstand=\”1\”>http://schemas.microsoft.com/xrm/2011/Contracts/Services/IOrganizationService/Execute</a:Action>”;

    $xml .= “<Security xmlns=\”http://docs.oasis-open.org/wss/2004/01/oasis-200401-wss-wssecurity-secext-1.0.xsd\”>”;

    $xml .= “<EncryptedData Id=\”Assertion0\” Type=\”http://www.w3.org/2001/04/xmlenc#Element\” xmlns=\”http://www.w3.org/2001/04/xmlenc#\”>”;

    $xml .= “<EncryptionMethod Algorithm=\”http://www.w3.org/2001/04/xmlenc#tripledes-cbc\”/>”;

    $xml .= “<ds:KeyInfo xmlns:ds=\”http://www.w3.org/2000/09/xmldsig#\”>”;

    $xml .= “<EncryptedKey>”;

    $xml .= “<EncryptionMethod Algorithm=\”http://www.w3.org/2001/04/xmlenc#rsa-oaep-mgf1p\”/>”;

    $xml .= “<ds:KeyInfo Id=\”keyinfo\”>”;

    $xml .= “<wsse:SecurityTokenReference xmlns:wsse=\”http://docs.oasis-open.org/wss/2004/01/oasis-200401-wss-wssecurity-secext-1.0.xsd\”>”;

    $xml .= “<wsse:KeyIdentifier EncodingType=\”http://docs.oasis-open.org/wss/2004/01/oasis-200401-wss-soap-message-security-1.0#Base64Binary\” ValueType=\”http://docs.oasis-open.org/wss/2004/01/oasis-200401-wss-x509-token-profile-1.0#X509SubjectKeyIdentifier\”>” . $keyIdentifer . “</wsse:KeyIdentifier>”;

    $xml .= “</wsse:SecurityTokenReference>”;

    $xml .= “</ds:KeyInfo>”;

    $xml .= “<CipherData>”;

    $xml .= “<CipherValue>” . $token1 . “</CipherValue>”;

    $xml .= “</CipherData>”;

    $xml .= “</EncryptedKey>”;

    $xml .= “</ds:KeyInfo>”;

    $xml .= “<CipherData>”;

    $xml .= “<CipherValue>” . $token2 . “</CipherValue>”;

    $xml .= “</CipherData>”;

    $xml .= “</EncryptedData>”;

    $xml .= “</Security>”;

    $xml .= “<a:MessageID>urn:uuid:” . $this->newGUID () . “</a:MessageID>”;

    $xml .= “<a:ReplyTo>”;

    $xml .= “<a:Address>http://www.w3.org/2005/08/addressing/anonymous</a:Address>”;

    $xml .= “</a:ReplyTo>”;

    $xml .= “<a:To s:mustUnderstand=\”1\”>” . $url . “XRMServices/2011/Organization.svc</a:To>”;

    $xml .= “</s:Header>”;

    CRM URN Address based on the Online region of customer. You can use this function to get correct URN:

    function GetUrnOnline($url) {

    if (strpos ( strtoupper ( $url ), “CRM2.DYNAMICS.COM” )) {

    return “crmsam:dynamics.com”;

    }

    if (strpos ( strtoupper ( $url ), “CRM4.DYNAMICS.COM” )) {

    return “crmemea:dynamics.com”;

    }

    if (strpos ( strtoupper ( $url ), “CRM5.DYNAMICS.COM” )) {

    return “crmapac:dynamics.com”;

    }

    if (strpos ( strtoupper ( $url ), “CRM6.DYNAMICS.COM” )) {

    return “crmoce:dynamics.com”;

    }

    if (strpos ( strtoupper ( $url ), “CRM7.DYNAMICS.COM” )) {

    return “crmjpn:dynamics.com”;

    }

    if (strpos ( strtoupper ( $url ), “CRM9.DYNAMICS.COM” )) {

    return “crmgcc:dynamics.com”;

    }

    return “crmna:dynamics.com”;

    }

    Using header you can connect Dynamics CRM from PHP code. See example code lines to get list data from PHP code:

    / Get Dynamics CRM Online Header

    $url = “https://org.crm.dynamics.com/”;

    $username = “user@dynamics.net”;

    $password = “password”;

    $dynamicsCrmHeader = new DynamicsCrmHeader ();

    $authHeader = $dynamicsCrmHeader->GetHeaderOnline ( $username, $password, $url );

    // Get Dynamics CRM Online Header

    Soap request for getting list:

    $xml .= “<s:Envelope xmlns:s=\”http://www.w3.org/2003/05/soap-envelope\” xmlns:a=\”http://www.w3.org/2005/08/addressing\”>”;

    $xml .= $authHeader->Header;

    $xml =”<s:Body>”;

    $xml .=”<Execute xmlns=\”http://schemas.microsoft.com/xrm/2011/Contracts/Services\” xmlns:i=\”http://www.w3.org/2001/XMLSchema-instance\”>”;

    $xml .=”<request i:type=\”a:RetrieveMultipleRequest\” xmlns:a=\”http://schemas.microsoft.com/xrm/2011/Contracts\”>”;

    $xml .=”<a:Parameters xmlns:b=\”http://schemas.datacontract.org/2004/07/System.Collections.Generic\”>”;

    $xml .=”<a:KeyValuePairOfstringanyType>”;

    $xml .=”<b:key>Query</b:key>”;

    $xml .=”<b:value i:type=\”a:QueryExpression\”>”;

    $xml .=”<a:ColumnSet>”;

    $xml .=”<a:AllColumns>true</a:AllColumns>”;

    $xml .=”<a:Columns xmlns:c=\”http://schemas.microsoft.com/2003/10/Serialization/Arrays\”>”;

    $xml .=”</a:Columns>”;

    $xml .=”</a:ColumnSet>”;

    $xml .= “<a:Criteria>”;

    $xml .= “<a:Conditions />”;

    $xml .= “<a:FilterOperator>And</a:FilterOperator>”;

    $xml .= “<a:Filters />”;

    $xml .= “</a:Criteria>”;

    $xml .=”<a:Distinct>false</a:Distinct>”;

    $xml .=”<a:EntityName>list</a:EntityName>”;

    $xml .=”<a:LinkEntities />”;

    $xml .=”<a:Orders />”;

    $xml .=”<a:PageInfo>”;

    $xml .=”<a:Count>0</a:Count>”;

    $xml .=”<a:PageNumber>0</a:PageNumber>”;

    $xml .=”<a:PagingCookie i:nil=\”true\” />”;

    $xml .=”<a:ReturnTotalRecordCount>false</a:ReturnTotalRecordCount>”;

    $xml .=”</a:PageInfo>”;

    $xml .=”<a:NoLock>false</a:NoLock>”;

    $xml .=”</b:value>”;

    $xml .=”</a:KeyValuePairOfstringanyType>”;

    $xml .=”</a:Parameters>”;

    $xml .=”<a:RequestId i:nil=\”true\” />”;

    $xml .=”<a:RequestName>RetrieveMultiple</a:RequestName>”;

    $xml .=”</request>”;

    $xml .=”</Execute>”;

    $xml .=”</s:Body>”;

    $xml .= “</s:Envelope>”;

    You need to make soap call and convert response as  DomDocument.

    $client = new DynamicsCrmSoapClient ();

    $response = $client->ExecuteSOAPRequest ($xml, $url );

    //echo $response;

    $responsedom = new DomDocument ();

    $responsedom->loadXML ( $response );
    Please find code sample here: https://github.com/stw-services/Dynamics-CRM/tree/master/PHP-MSCRM

    🙂

    Thanks for reading 

  • Dynamics CRM 2015 setup a demo Virtual Machine.

    Dynamics CRM 2015  setup a demo Virtual Machine.

    With most MicroSoft  products this is pretty easy to setting up, but Dynamics has a more heavier requirements list.

    The prerequisites include:

    let’s get started:

    Step 1: First Install Windows 2012 R2 Standard Edition

    I’m using VMWare (but you could use HyperV, Virtual Box as well).

    1. Create a new Virtual Machine, assign 4GB RAM, 40 GB HDD, 1 CPU (it’s only a demo environment so these specs should be fine)
    2. Attach the Windows 2012 ISO and do a vanilla installation

    Step 2, Run the Active Directory wizard

    CRM needs Active Directory, so run the Active directory wizard:

    Figure: Configure Active Directory

    1. In Server Manager select ManageAdd Roles and Feature
    2. Installation Type | Roles-based or Feature-based installation 
    3. Server RolesActive Directory Domain Services
    4. Select Add Features
    5. Proceed through the wizard and then select Install
    6. Once completed select Promote this server to a domain controller

    Figure: Promote Domain Controller

    1. Deployment Configuration | Add new forest and enter your Root domain name which is Demo.Local
    2. Select Windows Server 2012 R2for forest and domain function level
    3. Set Password for Directory Services Restore Mode
    4. Click on Next, Install
    5. Now sit back and wait, after a reboot you will be able to login in to the domain

    Note: It’s a good idea to have a static IP address on this machine, but it’s only a warning at this stage.

    Step 3, Windows Server Prerequisites

    • Indexing Service
    • IIS Admin
    • World Wide Web Publishing
    1. Server Manager | Manage | Add Roles and Features
    2. Server Roles:
      1. Application Server
      2. Web Server (IIS)
    3. Features:
      1. .Net Framework 3.5 Features
      2. .Net Framework 4.5 FeaturesNET 4.5
    4. Web Server Role (IIS) | Role Services:
      1. Application Development | ASP.NET 3.5
      2. Application Development | ASP.NET 4.5
    5. Install

    Step 4, Install SQL Server

    I’ll be installing SQL Server 2014 Developer Edition with the following options:

    Feature Selection:

    1. Database Engine Services
    2. Full-Test and Semantic Extractions for Search
    3. Reporting Services Native
    4. Management Tools Basic
      1. Management Tools – Complete

    Step 5,Database Engine Configuration:

    1. Select Mixed Mode (personal preference)
    2. Specify SQL Server Administrators| select Add Current User 

    Step 6 ,Reporting Services Native Mode:

    1. Select Install Only

    Install using all other defaults.

    Step 7, Configure Reporting Services Native Install

    Run SQL Server 2014 Reporting Services Configuration Manager and set-up the Native Reporting Services installation.

    This is should pretty much be a next, next, apply thing,

    Mine fired up straight away by just using the defaults:

    Figure: Reporting Services Configuration Manager
    Figure: Reporting Services Home Page

    Step 8, Now Install CRM 2015 finally..!!

    Figure: CRM Installation

    1. Get Recommended Updates| select Get Updates (Which is optional)
    2. Enter your license key
    3. Accept the EULA
    4. At this point you may have a bunch of missing required components, install them (We will take a while, also you may need to reboot system)

    Figure: Install Required Components

    1. Select Default Installation Path
    2. Specify Server RolesSelect All Options

    Figure: Server Roles

    1. Specify Deployment Options| Enter SQL Server Hostname ie: CRM2014Demo
    2. Select the Organizational UnitEnter the Organizational Unit
      1. At this point it’s probably a good idea to jump into Active Directory Users and Computersand create an OU for CRM

    Figure: Create CRM OU
    Figure: Assign CRM OU

    1. Specify Service Accounts, Now we’ll need to specify our service accounts for the various CRM Services, since we don’t have any accounts setup, we’ll end up jumping back and forth between Active Directory Users and Computers and the CRM Installation wizard, As this is a DEMO environment I’m going to use NETWORK SERVICE for the accounts.

    Figure: Service Accounts

    1. Select Website | Default Website
    1. Email Router Setting | EmptyOrganization Settings| Populate with your Organisation Name and other settings
    1. Report Server URL |Should be pre-populated check the URL

    Click next wizard button and install CRM.

    After installation of MS CRM it will auto start reporting in service setup.

    Click Do not get updates and click next button. In next screen accept line cne and click next.

    Select server server computer name and click next

    Select database name

    Click next wizard button and install, finally you will get finish screen.

    Figure: CRM Install Finished
    And finally let’s start CRM 2015, wow worked first go!

  • User permission in Sharepoint 2013

    User Permission In Sharepoint 2013 – Permission level is always confusing for SharePoint beginners. By this article, I am going to make it easier.

    Our first step is to add users in SharePoint site and there are couples of ways you can do this. Users can be added using – Settings menu >> Site settings >> People and groups:

    sharepoint 2013

    By default “softechword members” group is selected. But we are not going to add user’s members so select “Softechword visitors” group. You can select “New” to add users in visitor group. Popup appears. Search user by name and add in group.

    Capture2

    As we do not allow external access of SharePoint site so any user which you want to add must have workspace username and password. If your requirement to delete a user from a group, select user which you want to delete from items and click on action >> Remove users from Group. Same actions you can use for add owners and other group users.

    The next question is how we can check group permission. To understand this go back to site settings >> site permissions. You can find all available groups are listed over there. More custom groups can be added with site permission accordingly. You can see in ribbon check permission button to check user permission. It will show user permission levels for SharePoint site.

    Capture3

    Using Grant Permissions button uses to grant permissions level or direct permissions to a particular user. There is one important ribbon button “Site Collection Administrators”. “Site Collection Administrators” has full control over all site lists/ libraries/ documents etc. So “Site Collection Administrators” has access to everything in SharePoint. So if you want to add more user as site collection administrator, you can add using “Site Collection Administrators”.

    Capture4

    Next one is “Permission level”. A permission level is basically what you can assign to a group or what you can assign to a User.

    Capture5

    In other word you can say a permission level is collection of small permissions. Here by you can add/modify permission level. It is not recommended to modify any default permission level. But you can add new permission level using available small permissions. There are three blocks of small permissions of SharePoint are List permissions, Site permissions and Personal permissions. Easier way to create a permission level is just copy a default permission level and customizes it as per your required new permission level.

    Capture6
    Capture7

    Next topic is to set unique permission to a document library. So click on document and select library tab and click on shared with.

    You can see list of users to whom this document is shared with. Here by you can also invite more users for view or edit documents.

    Go library settings >> Permissions for this document library.

    Capture8

    At the top yellow line warning says “this library inherits permissions form it parents”. But we want to set unique permission for this document library and do not to share with everyone. Let’s do that. From ribbon menu, click on “Stop Inheriting Permissions” to stop inheriting permission from site.

    Capture9

    First you need to remove all existing associated permission groups for this library. Select all and click “Remove User Permissions” from ribbon. After removing you can check user permissions using “Check permission” to verify which user has permission for this document library. So to assign new permission, click on “Grant Permissions” from ribbon and search user to assign.

    Capture10

    You can grant direct permission to users. As unique permission is granted to user, no other user can see document library even if this library is added on home page.

    New step is to grant permissions to only few folders or documents within document library. So let’s do that. Go back to document library and click “Library Settings” from ribbon. First of all you need to delete unique permission to reset permissions for document library.

    Capture11

    As you deleted unique permissions, it once again inherits from parents. And all permission levels will be back in list. Now go back to document library.

    And click on three ellipse and scroll down to “Shared with”.

    Capture13

    You can click on “advanced” and now you again see yellow warning “this document inherits permissions form parent”. We don’t want parent permissions for this document so stop inheriting permission and remove all listed groups over there like we did previously while we were assigning unique permissions. So select “Stop inheriting permission” from ribbon, selects all listed permission group and click “Remove User Permissions” from ribbon. Now click “Grant Permissions” from ribbon and use same process as we did previously to grand permission to a selected user. Now only selected user can see folder in document list. Let’s check that. Go on Document >> Library Settings >> Permissions for this library.

    Capture14

    In yellow warning you can see “Some items in this list may have unique permissions which are not controlled from this page. This library inherits permissions from its parents”. To see which items has unique permission click on “Show these items”

    Capture15

    It means that this library inherits permissions from parent. But some of items in this library do not.  Click on manage permission. You can see which user has full control over ADMINFOLDER.

    So we learnt how to create permissions group, assign unique permissions to document library/ sites, and assign unique permission to a particular document/folder or item in library. Same processes you can use to assign permission to any SharePoint object.

    That’s it. I can share in this article regarding SharePoint Permissions level. Hope it helps you. Thanks.

  • Dynamics CRM 2016 – Custom plugin development using CRM Development Tool Kit

    Dynamics CRM 2016 – Custom plugin development – This time we are going through a process of building a custom plug-in for Microsoft Dynamics CRM and its deployment on development server.  I assume that you already downloaded and setup Development Tool Kit. And make sure CRM templates are imported in Visual Studio.

    Start with creating a solution using Dynamics CRM. Navigate to Settings >> Customization >> Solution. Create a new Solution “AccountPlugin” and choose any name based on project and company requirement. In case, you are going to develop plugin for any existing solution skip this steps.

    PluginSolution

    Save CRM solution and publish.

    PublishSolution_2

    In Visual Studio, Create new project using Dynamics CRM 2013 Package template. If templates are not available, make sure that you already imported development tool kit templates in Visual Studio.

    Dynamics CRM package is selected instead of Dynamics CRM 2013 plugin because it will make our process easy for plugin registration and deployment using tool kit.

    ConnectionTOCRM_3

    You will be asked to connect CRM live before Visual Studio setup package solution. CRM connection screen pops up. You can also open it from Tool >> CRM connection.

    Connection To CRM

    Fill out required details and connect development Dynamics CRM server.

    URL: CRM URL.

    User Name: Domain Administrator

    Password:   Domain Administrator Password

    Browse all organizations and select appropriate organization and solution to hook plugin.

    ConnectionTOCRM_3

    After a successful connection with CRM server, CRM package solution will be created in Visual Studio. Next step is to add a CRM plugin library project in solution. More plug-in projects can be added in one solution.

    add plugin solution

    Now Visual Studio solution is set up and ready for plugin development. Some important file and DLLs are added in projects which are required. Let me elaborate important of these files.

    RegisterFile.crmregistration is xml file contains details of all added plugins and workflows and register those in Dynamics CRM when package is deployed. Its auto created file using CRM Development Tool Kit.

    Microsoft.Crm.Sdk.Proxy and Microsoft.Xrm.Sdk are two very important DLLs referenced in plugin project. These DLLs contain core classes of Microsoft dynamics CRM which are used for plugin operations.

    Next step is to create strong name key for plugin project. Right click on project and select properties and create new Strong Name key (SNK). SNK is system oriented and when you move this development code on another machine, SNK needs to create again.

    SNLKey_11

    Open CRM explorer from View>>CRM explorer and expend entities. Right click on Account entity and select create plugin. It’s popping up Create Plug-in window.

    Let’s go through Create Plug-in form attributes. First one “Project” is default set to “AccountPlugin” as it’s related to a single plugin project, in case we have more than one plugin projects. It will be enabled for selection.

    Next is “Primary entity” is about to entity for which plugin is being created and it “Account” entity.

    Next one is “Message” is about to CRM action, it’s associated with.

    AccountActionMessage_7

    Next important attribute is “Pipeline Stage” and it’s specifying execution time of plugin. In this example, we created “PostAccountcreate” plugin. So Pipeline Stage is to determine on which stage of “PostAccountCreate”, this plug-in will fire.

    PluginPipelineStage_8

    Next one is “Class” to specify class name for plug-in. Next important attribute is “Execution order” to specify order of plugin execution. In case of many plugins are associated with an action stage, it will be used to determine the execution order of this plug-in. Click Ok and plugin will be created.

    After successful creation of “AccountPlugin”. Open “RegisterFile.crmregister” file and a new code line is added in xml for created “AccountPlugin” plugin.

    Account Plugin Registration_9

    “PostAccountCreate” class is added in plug-in project, where custom code will be written for operations required under this plugin. “ExecutePostAccountCreate” method is responsible for plugin operations.

    Sample code lines for update Account entity Name attribute:

    protected void ExecutePostAccountCreate(LocalPluginContext localContext)

    {

    if (localContext == null)

    {

    throw new ArgumentNullException(“localContext”);

    }

    // TODO: Implement your custom Plug-in business logic.

    IPluginExecutionContext Context = localContext.PluginExecutionContext;

    IOrganizationService service = localContext.OrganizationService;

    ITracingService trace = localContext.TracingService;

    Entity entity = null;

    EntityReference parentCustomerIdAttribRef = null;

    // If we have a target

    if (Context.InputParameters.Contains(“Target”) && Context.InputParameters[“Target”] is Entity)

    {

    // Obtain the target entity

    entity = (Entity)Context.InputParameters[“Target”];

    // Only perform this code if this is a create

    if (Context.MessageName != “Update”) { return; }

    // Only perform this code for a certain entity

    if (Context.PrimaryEntityName != “account”) { return; }

    // Only perform this code if this column is included in the collection of attributes

    else { return; }

    }

    else { return; }

    try

    {

    // update entity attribute with attribute value

    entity.Attributes[“name”] = “John”;

    //Update account entity

    service.Update(entity);

    }

    }

    catch (FaultException<OrganizationServiceFault> e)

    { trace.Trace(string.Format(“Exception: {0}”, e.ToString())); }

    catch (Exception ex)

    { trace.Trace(string.Format(“Exception: {0}”, ex.ToString())); }

    }

    }

    Sample code lines use to update Account attribute name value as John. So after an account is created in CRM, account name attribute is updated as “john”.

    At the end build project and right click on package and select deploy.

    Deploy_10
  • Connect SharePoint Online using SharePoint Designer 2013

    download designer_1
    Error message.

    Connect SharePoint Online using – As a beginner SharePoint developer, you may face problem while connecting SharePoint Online using SharePoint Designer. In this post, I am going to share some steps which will make your life easier.
    Download SharePoint designer using SharePoint Online, and install on your local machine.


    In case of on premises SharePoint server, SharePoint designer uses to open sites directly. But in case of SharePoint Online, we might get message “You do not have permission to open this website in SharePoint Designer.”

    Above screens are examples which you will face while connecting to SharePoint Online server.

    Here are some settings we need to do before we connect to SharePoint Online.

    Step 1:  Default scripting capability settings are set to “Prevent users from running custom script on personal site/self-service created sites”. Because of this, custom script will be blocked in site and also for some web parts like, content editor (CEWP) & script editor web part (SEWP). This setting is essential for running all web parts properly/ or adding scripts using SharePoint Designer.

    Navigate to Office  365> Admin  >  Admin Center  > SharePoint  > Settings .

    Custom Script _3
    SharePoint MS_2

    Open SharePoint Online Admin Center, and allow these settings.

    Step 2: Download SharePoint Online Management Shell, and install on same machine where SharePoint designer is already installed.
    Note: SharePoint Online Management Shell is a tool that contains a Windows PowerShell Module to manage your SharePoint Online subscription in the Office 365.
    Step 3: Run SharePoint Management Shell, and execute these commands-

    Connect-SPOService -Url https://contoso-admin.sharepoint.com -credential admin@contoso.com

    -Url : Pass Sharepoint Online site url.
    -Credential : Admin user Name/ Password(It will prompt screen for enter password).
    Following link you can visit for reference:
    https://technet.microsoft.com/en-us/library/fp161392.aspx
    https://technet.microsoft.com/en-us/library/fp161372.aspx

    If command does not return any error, execute next one:

    WindowPower Shell

    Set-SPOSite -Identity https://.sharepoint.com -DenyAddAndCustomizePages $false

    You have to make sure scripting setting in the admin matches what you set using SharePoint Online PowerShell or the site collection setting, may be overridden again in next day cycle (24 hours).
    Hope you like this article.
    Thanks.

  • DotNetNuke CSS Precedence

    DotNetNuke CSS Precedence – DotNetNuke skinning isn’t easy exactly how CSS files from the framework get loaded at runtime. You need to spend time for fine tuning the details such as typography, padding, margin, and so on. There is secret of understanding DotNetNuke CSS precedence.

    There are many CSS files being loaded on a page when a user lands on your site. Depending on how your site is configured (how many modules you have on a page, etc), there can be several CSS files the user must download and it can definitely affect performance. In HTML development it’s a good practice to separate content and design. The CSS styles that make up the actual design are defined in separate files called stylesheets.DotNetNuke loads several style sheets for a page. For every level of DotNetNuke there is a style sheets that could be loaded / used.

    Hierarchy of CSS in DotNetNuke:

    • Module.css
    • Default.css
    • Skin.css
    • NewSkin.css
    • Container.css
    • NewContainer.css
    • Portal.css

    FRAMEWORK STYLESHEET:

    This file that contains basic framework CSS, gets loaded for every portal (Site) in your installation of DotNetNuke.This is the only stylesheet that always gets loaded.

    File Location:

    /Portals/Default/Default.css

    PORTAL / SITE STYLESHEET:

    This file is specific to a portal.
    By default it does not contain any CSS, but it can be edited by a site admin from within DNN to overrule CSS in the skins. (Mostly used for small tweaks).

    File Location: /Portals/”PortalFolder/Portal.css

    Points to Ponder:

    If you remove this file from the portal folder it does not get loaded through the file manager. This is the file you edit if you use the stylesheet editor on the Site Settings page. It is there to allow an admin to overwrite CSS defined in one of the other stylesheets.Currently there is no possibility to edit the other stylesheets from the admin interface.

    SKIN PACKAGE RELATED STYLESHEETS:

    These style sheets only get loaded if they exist in the skin package.
    (if you don’t add them to the skin package, there won’t be a link in the head of the page)
    STYLESHEETS FOR ALL SKINS:

    Style sheet that contains CSS for all the skins in a package. If a Skin.css file exists in the package it will load for every skin in the package.
    Location:
    /Portals/~Default/Skins/”NewSkin”/Skin.css
    or
    /Portals/”PortalFolder”/Skins/”NewSkin”/Skin.css
    STYLESHEET FOR A SPECIFIC SKIN:

    Style sheet with the same name as a skin file (.ascx).It is used to overwrite styles from Skin.css for that specific skin variation.

    Location:
    /Portals/~Default/Skins/”NewSkin”/”SkinName”.css
    or
    /Portals/”PortalFolder”/Skins/”NewSkin”/”SkinName”.css
    STYLESHEET FOR ALL CONTAINERS:

    Style sheet that contains CSS for all the Containers in a package. If a Container.css file exists in the package it will load for every container used from the package.
    Location:
    /Portals/~Default/Containers/NewContainer/Container.css
    or
    /Portals/”PortalFolder”/Containers/NewContainer/Container.css

    STYLESHEET FOR A SPECIFIC CONTAINER:

    Style sheet with the same name as a container file (.ascx).It is used to overwrite styles from Container.css for that specific container variation.
    Location:
    /Portals/~Default/Containers/ NewContainer /”ContainerName”.css
    or
    /Portals/”PortalFolder”/Containers/ NewContainer /”ContainerName”.css
    STYLESHEETS FOR MODULES:

    Some modules come with a style sheet with some basic CSS to make sure the module renders ok.
    If a module on the page has a Module.css file it will get loaded.
    Obviously only the Style sheets of modules on the page are loaded.

    Location:
    /DestopModules/”ModuleName”/Module.css