Author: Sandeep Mishra

  • Youtube video XML url : Part 5

    Youtube video XML url : Part 5- So open youtube.com and open a play list

    Search a channel on youtube and open it. You will find a playlist tab . Open that tab and it will display playlist. Click on any play list and you will see url of play list

    https://www.youtube.com/watch?v=DPbnQFxdpPg&list=LLA34Z3lq8FozSQzDHsSLcmQ

    In this url last parameter is playlist id LLA34Z3lq8FozSQzDHsSLcmQ

    By using this playlist id you can find xml data of youtube videos

    So we will now use video.xml url of youtube to display xml data

    https://www.youtube.com/feeds/videos.xml?playlist_id=LLA34Z3lq8FozSQzDHsSLcmQ

    We will get Title , thumnail url and video id from this xml feed to display list of all videos. To achieve this goal we need to parse xml and get data.

    This process I will describe in further Step

  • Process to get data from Youtube XML : Part 7

    Process To Get Data From Youtube – If you will see youtube video.xml url, there are many xml node. We  need only all video id , thumbnail url to display image and Title to show on top of Card

    XML display data different way than Json. So first we parse xml data and use text to get its value.

    First install xmldom so run command

    npm install -S xmldom

    So after last import line, after a line line break  add parse function which will help to parse data of xml

    1. const DOMParser = require(‘xmldom’).DOMParser;

    before component start. For example

    …..

    const DOMParser = require(‘xmldom’).DOMParser;

    class VideoList extends Component {

    ………

    First you need to understand few things before we start coding. In this process I am going to use ComponentWillMount, fetch, and state

    componentWillMount: this is a lifecycle method . It invoke immediately before mounting occurs.

    Fetch: Fetch Networking api used in react native to get content from arbitrary URL

    For more details please take a look here

    https://facebook.github.io/react-native/docs/network.html


    Now in our next process we will use componentWillMount before render function and so

    So in VideoList.js remove condole.log(this.props.playlistid); and start writing componentWillMount()

    componentWillMount should be called before render() function of component

    But before componentWillMount function we will define a state video as array. Because after  fetch were are going to get data in array so open VideoList.js and add before render() function

    1. state = { videos: [], }
    2. componentWillMount() {
    3. const playerid = this.props.playlistid; /* to get playlist id value*/
    4. /* Now make url of youtube video smal feed */
    5. const url = ‘http://www.youtube.com/feeds/videos.xml?playlist_id=’ + playerid;
    6. /* now its time to fetch data from url */
    7. fetch(url)
    8. .then(Data => Data.text())
    9. /* now we will run console.log to check if data coming after fetch */
    10. .then(DataText => console.log(DataText));
    11. }

    Now refresh simulator and you will see xml data in condole.

    But this data is not in array and it is not useful for us to setState with array. As you can see we are getting whole xml as it is. To process our video listing we need a array of Title, Image and Video id. To process this we will process to parse data using a helper function . so create a function called getXMLData

    So in componentWillMount function add a new function

    1. componentWillMount() {
    2. const getXMLData = (listdata) => {
    3. }
    4. ……

    No we will expand our function getXMLData. In this function i have passed a parameter which is used to get data which we get from fetch and parse it

    So

    1. const getXMLData = (listdata) => {
    2. const parseData = new DOMParser().parseFromString(listdata, ‘text/xml’);
    3. const allVideoTitle = parseData.getElementsByTagName(‘title’);
    4. const allVideoId = parseData.getElementsByTagName(‘yt:videoId’);
    5. const allThumbnails = parseData.getElementsByTagName(‘media:thumbnail’);
    6. /* define a new array */
    7. const finalArray = [];
    8. /* push all items in one array */
    9. for (const i = 0; i < allVideoId.length; i++) {
    10. finalArray.push({
    11. title: allVideoTitle[i].textContent,
    12. id: allVideoId[i].textContent,
    13. thumbnail: allThumbnails[i].getAttribute(‘url’)
    14. });
    15. }
    16. return finalArray;
    17. };

    In above function you can see we have passed our listdata paramer in parseFromString and then we are getting title, video id and Thumbnail by tag name of xml. But is is not enough because we need a series of array in which we can get all values in one array

    So I created a variable with name finallArray as array then using for function I have adding each values in finalArray using push function

    Push: This  method help to add new item in  array

    Now our function returning array of all items which we need in one array. Now we will call this function to setState of Video array state. It may be little confusing but no need to worry much about it . I will show you further process

    Now go to this line of componentWillMount function

    .then(DataText => console.log(DataText));

    And now remove console.log(DataText) and replace with

    1. .then(DataText => this.setState({ videos: getXMLData(DataText) }));

    Here we have set state video with array using our helper function getXMLData passing Data of fetch

    Now if you need to check what is result of this video state you can write a line of console.log in render function of component.

    So go to render function of component and write like this

    render() {

       console.log(this.state);

       return (

    ………

    If you will open console you will see result as video array

    Now remove console.log from render function.

    1. import React, { Component } from ‘react’;
    2. import { View, Text } from ‘react-native’;
    3. import CardWrapper from ‘../common/CardWrapper’;
    4. import CardInner from ‘../common/CardInner’;
    5. const DOMParser = require(‘xmldom’).DOMParser;
    6. class VideoList extends Component {
    7. state = { videos: [], }
    8. componentWillMount() {
    9. const getXMLData = (listdata) => {
    10. const parseData = new DOMParser().parseFromString(listdata, ‘text/xml’);
    11. const allVideoTitle = parseData.getElementsByTagName(‘title’);
    12. const allVideoId = parseData.getElementsByTagName(‘yt:videoId’);
    13. const allThumbnails = parseData.getElementsByTagName(‘media:thumbnail’);
    14. /* define a new array */
    15. const finalArray = [];
    16. /* push all items in one array */
    17. for (const i = 0; i < allVideoId.length; i++) {
    18. finalArray.push({
    19. title: allVideoTitle[i].textContent,
    20. id: allVideoId[i].textContent,
    21. thumbnail: allThumbnails[i].getAttribute(‘url’)
    22. });
    23. }
    24. return finalArray;
    25. };
    26. const playerid = this.props.playlistid; /* to get playlist id value*/
    27. const url = ‘http://www.youtube.com/feeds/videos.xml?playlist_id=’ + playerid;
    28. fetch(url)
    29. .then(Data => Data.text())
    30. .then(DataText => this.setState({ videos: getXMLData(DataText) }));
    31. }
    32. render() {
    33. return (
    34. <View>
    35. <CardWrapper>
    36. <CardInner>
    37. <Text>For Title</Text>
    38. </CardInner>
    39. <CardInner>
    40. <Text>For Image</Text>
    41. </CardInner>
    42. <CardInner>
    43. <Text>For Buttons</Text>
    44. </CardInner>
    45. </CardWrapper>
    46. </View>
    47. );
    48. }
    49. }
    50. export default VideoList;
  • Navigation Screen Using React Navigation : Part 10

    Navigation in react native is based on many plateform which you can install and use from npm. I am going to use here react navigator

    So open terminal or command prompt and run this command

    npm install –save react-navigation

    If you want to read more about react navigation please go here https://facebook.github.io/react-native/docs/navigation.html

    When installation is complete. Please open root file index.js and we will create Screen and use it . Here i am going to use react-navigation to import StackNavigator so you can easily understand how navigator work in react native

    To define screen we will use index.js and in that file we will define YoutubeVideo component to load first. We have added YoutubeVideo in App.js and already imported on index.js on root

    So first import stack navigator  in index.js on top. So after this line

    import { AppRegistry } from ‘react-native’;

    add

    1. import { StackNavigator, } from ‘react-navigation’;

    Now create new screen component in index.js

    1. const AppNav = StackNavigator({
    2. YoutubeVideo: {
    3. screen: YoutubeVideo
    4. }
    5. });

    And in app registry change component name AppNav

    1. AppRegistry.registerComponent(‘youtube_video’, () => AppNav);

    Now refresh simulator and see same screen will show

    It means you are in right direction and react navigator is working

    So your index.js file whole code should look like this

    1. import { StackNavigator, } from ‘react-navigation’;
    2. import { AppRegistry } from ‘react-native’;
    3. import YoutubeVideo from ‘./App’;
    4. const AppNav = StackNavigator({
    5. YoutubeVideo: {
    6. screen: YoutubeVideo
    7. }
    8. });
    9. AppRegistry.registerComponent(‘youtube_video’, () => AppNav);

    Note: “if you are getting 500 error after installation of React Navigation, Please delete it and re-install by npm command. To delete please use command npm uninstall –save react-navigation”

  • Calling Screens in Stack Navigator : Part 11

    Calling Screens In Stack Navigator- Here one need to notice. When we use navigation we should call all component through navigator props. If you will include direct then props from one component to another component will not go and we get error when navigate.

    So before video play we will change all component call using navigate function . Here is further process

    So first import all component pages in index.js

    1. import ViewVideo from ‘./src/components/ViewVideo’;
    2. import VideoList from ‘./src/components/VideoList’;
    3. import Index from ‘./src/components/Index’;

    Then define screen for all components

    1. YoutubeVideo: {
    2. screen: YoutubeVideo
    3. },
    4. Index: {
    5. screen: Index
    6. },
    7. VideoList: {
    8. screen: VideoList
    9. }

    Now our index.js page code should look like this

    1. import React from ‘react’;
    2. import { StackNavigator, } from ‘react-navigation’;
    3. import { AppRegistry } from ‘react-native’;
    4. import YoutubeVideo from ‘./App’;
    5. import VideoList from ‘./src/components/VideoList’;
    6. import Index from ‘./src/components/Index’;
    7. const AppNav = StackNavigator({
    8. YoutubeVideo: {
    9. screen: YoutubeVideo
    10. },
    11. Index: {
    12. screen: Index
    13. },
    14. VideoList: {
    15. screen: VideoList
    16. }
    17. });
    18. AppRegistry.registerComponent(‘youtube_video’, () => AppNav);

    so now our all screen are added in Stack Navigator function. Now we call any screen to load by using navigation props anywhere without import. Now in next post i will show you how we can call any page instead of import

  • Steps to upgrade Online CRM to Dynamics 365

    Steps to upgrade Online CRM to Dynamics 365 – Microsoft Dynamics 365 CRM out into the market and to use new features like field services etc, you have to upgrade online CRM to 365. Upgrading online CRM is very confusing as users have not full control over instance and have fear to lose data or customizations. To give Dynamics CRM upgrade a clear view you can refer this article.

    Step1: Setup Sandbox instance of your Online CRM.

    Dynamics CRM Sandbox account is useful for development and to test customizations before publishing on a production instance. It’s also useful for upgrade process from lower version to upper version.

    Sandbox instance as can be purchased as add-on subscription or with 25 user’s subscription licenses. To setup, sandbox instance using production instance, select production instance and click on copy icon.

    Dynamic 365

    It takes to Copy instance window.

    The properties you need to care about are:

    1. Target Instance: In the current case, it will be production instance.
    2. Copy Type: Recommended type is a Minimal copy.
    3. Name: should be the name of Sandbox instance.

    And click on Copy. It will take a while to update sandbox account copy of production.

    update sandbox account copy of production

    Step 2: Test upgrade of sandbox instance

    When a copy of production as sandbox instance, is ready to test CRM instance upgrade process using sandbox CRM instance.

    One thing you need to know that is when production instance is ready for an upgrade, to let that know go to Admin Center > Dynamics CRM.

    Admin Center Dynamics CRM

    Instances that are eligible to update will see Update is Available. You can see along with your CRM instance.

    Select updates tab and schedule upgrade for sandbox instance.

    Dynamics Online CRM

    The process you have to follow for a lower version to upper version upgrade is:

    To Upgrade

    1. Dynamics Online CRM To Dynamics Online CRM Update 1
    2. Dynamics Online CRM Update 1 To Dynamics 365 CRM

    After scheduling dynamics CRM upgrade process, it will be updated on your scheduled time. It might be possible, current customizations are not supported by updated version. Upgrade process gets failed. So you have to reset sandbox back to old version and fix all those issues in sandbox instance and again follow the same process of schedule sandbox instance upgrade to the target version.

    Dynamic 365

    Step 3: Upgrade Production Instance

    Once your sandbox instance is upgraded, approve upgrade. Same process you need to follow to upgrade production instance upgrade. Also, keep in mind your instance upgrade will not be upgraded till you approve upgrades.

  • Adding Content Templates to Editor in Kentico 9

    Adding Content Templates to Editor in Kentico 9 – It’s handy to adding site typography as content templates in Kentico CKeditor. Follow steps given below to add and customize CKeditor toolbar and include new content templates.

    Important : Must check Kentico CKeditor version to download content templates from given link http://ckeditor.com/addon/templates.

    Step1: Download sample content template from http://ckeditor.com/addon/templates. Extract downloaded zip folder and copy template folder in \CMS\CMSAdminControls\CKeditor\plugins. It should look like example image.

    Content Template Plugin

    Step 2: Adding config properties  – Open config.js file under CKeditor folder and add these lines on top of file along with other properties-

    config.extraPlugins = ‘templates’;

    /* CMS */

    config.plugins += ‘,showborders’;

    /* Templates */

    config.plugins += ‘,templates’;

    It should be like image example.

    Kentico Template

    Step3: Customize toolbar : Add template after source in toolbar_FULL

    config.toolbar_Full = [

    [sourceName, ‘-‘, ‘Templates’],

    [‘Cut’, ‘Copy’, ‘Paste’, ‘PasteText’, ‘PasteFromWord’, ‘Scayt’, ‘-‘],

    [‘Undo’, ‘Redo’, ‘Find’, ‘Replace’, ‘RemoveFormat’, ‘-‘],

    [‘Bold’, ‘Italic’, ‘Underline’, ‘Strike’, ‘Subscript’, ‘Superscript’, ‘-‘],

    [‘NumberedList’, ‘BulletedList’, ‘Outdent’, ‘Indent’, ‘Blockquote’, ‘CreateDiv’, ‘-‘],

    [‘JustifyLeft’, ‘JustifyCenter’, ‘JustifyRight’, ‘JustifyBlock’, ‘-‘],

    ‘/’,

    [‘InsertLink’, ‘Unlink’, ‘Anchor’, ‘-‘],

    [‘InsertImageOrMedia’, ‘QuicklyInsertImage’, ‘Table’, ‘HorizontalRule’, ‘SpecialChar’, ‘-‘],

    [‘InsertForms’, ‘InsertPolls’, ‘InsertRating’, ‘InsertYouTubeVideo’, ‘InsertWidget’, ‘-‘],

    [‘Styles’, ‘Format’, ‘Font’, ‘FontSize’],

    [‘TextColor’, ‘BGColor’, ‘-‘],

    [‘InsertMacro’, ‘-‘],

    [‘Maximize’, ‘ShowBlocks’]

    ];

    It should be like:

    Kentico

    Step4: Setup toolbar_Full, At bottom of config file change value –

    config.toolbar = config.toolbar_Full;

    Now ckeditor is ready to use templates and can do testing after login in CMSDesk. Open editable page. Ckeditor should show template icon along with source.

    Kentico Template

    After clicking in template icon, it will show all available content templates.  You can select any of these templates and insert in editable part and modify accordingly. You don’t need to be worried about styling content text. It helps non technical person to make pages and style it easily.

    capture5

    Next part is,  how to add new templates in editor. Open default.js file under CKeditor/plugins/templates/templates/default.js

    capture6

    Default.js already has some inbuilt templates, you can add more templates using same structure. Using example I added youtube responsive video template at bottom of default.js file.

    {

    title: ‘Responsive YouTube Video (with controls)’,

    //image: ‘template1.gif’,

    description: ‘Responsive YouTube Video (with controls)’,

    html: ‘<div class=”youtube-container”><div class=”youtube-player” data-controls=”1″ data-id=”h6w0uEgMXuQ”><div class=”play-button”> </div></div>’ +

    ‘\r\n</div><div style=”color:red;”>You must view source, edit the data-id and replace value with YouTube video id (then delete this line)</div>\r\n’

    }

    capture7
  • Connection from PHP to Microsoft Dynamics CRM

    Connection from PHP to Microsoft Dynamics CRMThis time we will learn how to connect Microsoft dynamics CRM using PHP code. Microsoft dynamics CRM soap service can be a way to make calls from PHP source code. A valid soap header is required to execute soap request. Let’s see how to create a valid header using PHP code:

    To get valid soap request, first need to create token1, token2, and keyIdentifer which can be created using online user name and password.

    Soap enavlop for getting token1, token2, ekyidentifer:

    $xml = “<s:Envelope xmlns:s=\”http://www.w3.org/2003/05/soap-envelope\” xmlns:a=\”http://www.w3.org/2005/08/addressing\” xmlns:u=\”http://docs.oasis-open.org/wss/2004/01/oasis-200401-wss-wssecurity-utility-1.0.xsd\”>”;

    $xml .= “<s:Header>”;

    $xml .= “<a:Action s:mustUnderstand=\”1\”>http://schemas.xmlsoap.org/ws/2005/02/trust/RST/Issue</a:Action>”;

    $xml .= “<a:MessageID>urn:uuid:” . $this->newGUID () . “</a:MessageID>”;

    $xml .= “<a:ReplyTo>”;

    $xml .= “<a:Address>http://www.w3.org/2005/08/addressing/anonymous</a:Address>”;

    $xml .= “</a:ReplyTo>”;

    $xml .= “<a:To s:mustUnderstand=\”1\”>https://login.microsoftonline.com/RST2.srf</a:To>”;

    $xml .= “<o:Security s:mustUnderstand=\”1\” xmlns:o=\”http://docs.oasis-open.org/wss/2004/01/oasis-200401-wss-wssecurity-secext-1.0.xsd\”>”;

    $xml .= “<u:Timestamp u:Id=\”_0\”>”;

    $xml .= “<u:Created>” . gmdate ( ‘Y-m-d\TH:i:s.u\Z’, $now ) . “</u:Created>”;

    $xml .= “<u:Expires>” . gmdate ( ‘Y-m-d\TH:i:s.u\Z’, strtotime ( ‘+60 minute’, $now ) ) . “</u:Expires>”;

    $xml .= “</u:Timestamp>”;

    $xml .= “<o:UsernameToken u:Id=\”uuid-” . $this->newGUID () . “-1\”>”;

    $xml .= “<o:Username>” . $username . “</o:Username>”;

    $xml .= “<o:Password>” . $password . “</o:Password>”;

    $xml .= “</o:UsernameToken>”;

    $xml .= “</o:Security>”;

    $xml .= “</s:Header>”;

    $xml .= “<s:Body>”;

    $xml .= “<trust:RequestSecurityToken xmlns:trust=\”http://schemas.xmlsoap.org/ws/2005/02/trust\”>”;

    $xml .= “<wsp:AppliesTo xmlns:wsp=\”http://schemas.xmlsoap.org/ws/2004/09/policy\”>”;

    $xml .= “<a:EndpointReference>”;

    $xml .= “<a:Address>urn:” . $urnAddress . “</a:Address>”;

    $xml .= “</a:EndpointReference>”;

    $xml .= “</wsp:AppliesTo>”;

    $xml .= “<trust:RequestType>http://schemas.xmlsoap.org/ws/2005/02/trust/Issue</trust:RequestType>”;

    $xml .= “</trust:RequestSecurityToken>”;

    $xml .= “</s:Body>”;

    $xml .= “</s:Envelope>”;

    In response, you will get element “CipherValue” which has both tokens which you can fetch from response. See sample code:

    $response = curl_exec ( $ch );

    curl_close ( $ch );

    $responsedom = new DomDocument ();

    $responsedom->loadXML ( $response );

    $cipherValues = $responsedom->getElementsbyTagName ( “CipherValue” );

    $token1 = $cipherValues->item ( 0 )->textContent;

    $token2 = $cipherValues->item ( 1 )->textContent;

    Next is to get KeyIdentifier value which you can get using “KeyIdentifier” element name from response.

    $keyIdentiferValues = $responsedom->getElementsbyTagName ( “KeyIdentifier” );

    Now need to get online header using token1, token2 and KeyIdentifier. Below you can see example of header xml for Soap request:

    $xml = “<s:Header>”;

    $xml .= “<a:Action s:mustUnderstand=\”1\”>http://schemas.microsoft.com/xrm/2011/Contracts/Services/IOrganizationService/Execute</a:Action>”;

    $xml .= “<Security xmlns=\”http://docs.oasis-open.org/wss/2004/01/oasis-200401-wss-wssecurity-secext-1.0.xsd\”>”;

    $xml .= “<EncryptedData Id=\”Assertion0\” Type=\”http://www.w3.org/2001/04/xmlenc#Element\” xmlns=\”http://www.w3.org/2001/04/xmlenc#\”>”;

    $xml .= “<EncryptionMethod Algorithm=\”http://www.w3.org/2001/04/xmlenc#tripledes-cbc\”/>”;

    $xml .= “<ds:KeyInfo xmlns:ds=\”http://www.w3.org/2000/09/xmldsig#\”>”;

    $xml .= “<EncryptedKey>”;

    $xml .= “<EncryptionMethod Algorithm=\”http://www.w3.org/2001/04/xmlenc#rsa-oaep-mgf1p\”/>”;

    $xml .= “<ds:KeyInfo Id=\”keyinfo\”>”;

    $xml .= “<wsse:SecurityTokenReference xmlns:wsse=\”http://docs.oasis-open.org/wss/2004/01/oasis-200401-wss-wssecurity-secext-1.0.xsd\”>”;

    $xml .= “<wsse:KeyIdentifier EncodingType=\”http://docs.oasis-open.org/wss/2004/01/oasis-200401-wss-soap-message-security-1.0#Base64Binary\” ValueType=\”http://docs.oasis-open.org/wss/2004/01/oasis-200401-wss-x509-token-profile-1.0#X509SubjectKeyIdentifier\”>” . $keyIdentifer . “</wsse:KeyIdentifier>”;

    $xml .= “</wsse:SecurityTokenReference>”;

    $xml .= “</ds:KeyInfo>”;

    $xml .= “<CipherData>”;

    $xml .= “<CipherValue>” . $token1 . “</CipherValue>”;

    $xml .= “</CipherData>”;

    $xml .= “</EncryptedKey>”;

    $xml .= “</ds:KeyInfo>”;

    $xml .= “<CipherData>”;

    $xml .= “<CipherValue>” . $token2 . “</CipherValue>”;

    $xml .= “</CipherData>”;

    $xml .= “</EncryptedData>”;

    $xml .= “</Security>”;

    $xml .= “<a:MessageID>urn:uuid:” . $this->newGUID () . “</a:MessageID>”;

    $xml .= “<a:ReplyTo>”;

    $xml .= “<a:Address>http://www.w3.org/2005/08/addressing/anonymous</a:Address>”;

    $xml .= “</a:ReplyTo>”;

    $xml .= “<a:To s:mustUnderstand=\”1\”>” . $url . “XRMServices/2011/Organization.svc</a:To>”;

    $xml .= “</s:Header>”;

    CRM URN Address based on the Online region of customer. You can use this function to get correct URN:

    function GetUrnOnline($url) {

    if (strpos ( strtoupper ( $url ), “CRM2.DYNAMICS.COM” )) {

    return “crmsam:dynamics.com”;

    }

    if (strpos ( strtoupper ( $url ), “CRM4.DYNAMICS.COM” )) {

    return “crmemea:dynamics.com”;

    }

    if (strpos ( strtoupper ( $url ), “CRM5.DYNAMICS.COM” )) {

    return “crmapac:dynamics.com”;

    }

    if (strpos ( strtoupper ( $url ), “CRM6.DYNAMICS.COM” )) {

    return “crmoce:dynamics.com”;

    }

    if (strpos ( strtoupper ( $url ), “CRM7.DYNAMICS.COM” )) {

    return “crmjpn:dynamics.com”;

    }

    if (strpos ( strtoupper ( $url ), “CRM9.DYNAMICS.COM” )) {

    return “crmgcc:dynamics.com”;

    }

    return “crmna:dynamics.com”;

    }

    Using header you can connect Dynamics CRM from PHP code. See example code lines to get list data from PHP code:

    / Get Dynamics CRM Online Header

    $url = “https://org.crm.dynamics.com/”;

    $username = “user@dynamics.net”;

    $password = “password”;

    $dynamicsCrmHeader = new DynamicsCrmHeader ();

    $authHeader = $dynamicsCrmHeader->GetHeaderOnline ( $username, $password, $url );

    // Get Dynamics CRM Online Header

    Soap request for getting list:

    $xml .= “<s:Envelope xmlns:s=\”http://www.w3.org/2003/05/soap-envelope\” xmlns:a=\”http://www.w3.org/2005/08/addressing\”>”;

    $xml .= $authHeader->Header;

    $xml =”<s:Body>”;

    $xml .=”<Execute xmlns=\”http://schemas.microsoft.com/xrm/2011/Contracts/Services\” xmlns:i=\”http://www.w3.org/2001/XMLSchema-instance\”>”;

    $xml .=”<request i:type=\”a:RetrieveMultipleRequest\” xmlns:a=\”http://schemas.microsoft.com/xrm/2011/Contracts\”>”;

    $xml .=”<a:Parameters xmlns:b=\”http://schemas.datacontract.org/2004/07/System.Collections.Generic\”>”;

    $xml .=”<a:KeyValuePairOfstringanyType>”;

    $xml .=”<b:key>Query</b:key>”;

    $xml .=”<b:value i:type=\”a:QueryExpression\”>”;

    $xml .=”<a:ColumnSet>”;

    $xml .=”<a:AllColumns>true</a:AllColumns>”;

    $xml .=”<a:Columns xmlns:c=\”http://schemas.microsoft.com/2003/10/Serialization/Arrays\”>”;

    $xml .=”</a:Columns>”;

    $xml .=”</a:ColumnSet>”;

    $xml .= “<a:Criteria>”;

    $xml .= “<a:Conditions />”;

    $xml .= “<a:FilterOperator>And</a:FilterOperator>”;

    $xml .= “<a:Filters />”;

    $xml .= “</a:Criteria>”;

    $xml .=”<a:Distinct>false</a:Distinct>”;

    $xml .=”<a:EntityName>list</a:EntityName>”;

    $xml .=”<a:LinkEntities />”;

    $xml .=”<a:Orders />”;

    $xml .=”<a:PageInfo>”;

    $xml .=”<a:Count>0</a:Count>”;

    $xml .=”<a:PageNumber>0</a:PageNumber>”;

    $xml .=”<a:PagingCookie i:nil=\”true\” />”;

    $xml .=”<a:ReturnTotalRecordCount>false</a:ReturnTotalRecordCount>”;

    $xml .=”</a:PageInfo>”;

    $xml .=”<a:NoLock>false</a:NoLock>”;

    $xml .=”</b:value>”;

    $xml .=”</a:KeyValuePairOfstringanyType>”;

    $xml .=”</a:Parameters>”;

    $xml .=”<a:RequestId i:nil=\”true\” />”;

    $xml .=”<a:RequestName>RetrieveMultiple</a:RequestName>”;

    $xml .=”</request>”;

    $xml .=”</Execute>”;

    $xml .=”</s:Body>”;

    $xml .= “</s:Envelope>”;

    You need to make soap call and convert response as  DomDocument.

    $client = new DynamicsCrmSoapClient ();

    $response = $client->ExecuteSOAPRequest ($xml, $url );

    //echo $response;

    $responsedom = new DomDocument ();

    $responsedom->loadXML ( $response );
    Please find code sample here: https://github.com/stw-services/Dynamics-CRM/tree/master/PHP-MSCRM

    🙂

    Thanks for reading 

  • How to install Magento 2 – beginner’s guide (Windows)

    How to install Magento 2 – beginner’s guide (Windows)

    Install Magento 2 – beginner’s guide – Before continuing, make sure you have all the prerequisites, required for running Magento 2, below are system requirements

    System requirements:
    1. Apache Version: 2.2 or 2.4
    2. PHP version: 5.5.x, where x is 22 or greater
    3. MySQL Version : 5.6.x and upper


    Installation
    1. First and easiest way is to download the Magento installation package from official Magento site https://www.magentocommerce.com/download (Install from archive file – In this installation Magento core code is stored under /vendor directory and updating is possible through Magento admin.)

    See below screenshot

    2. Create one folder and Unzip in and put it under C:\xampp\htdocs\FOLDER_NAME
    3. Create a MySQL Database for Magento2 form phpmyadmin.
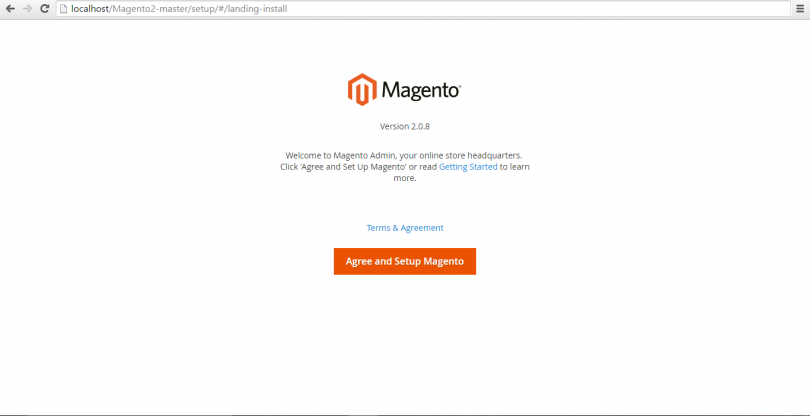
    4. Go through the Magento installation process, below is the first screen

    Click on button Agree and Setup Magento

    Click to start Readiness Check button to move forword

    If all the requirements are ok then it’ll show tick mark for that, click on Next button

    Here add all the fields properly as mentioned, host, Database Username and password, database name, Table prefix, etc

    and continue with the next button.

    In this step it’ll ask for your store’s admin url.


    5. After successful installation you will get this page
    6. Your frontend will look like this

    7. Your backend will look like this

  • Installation of Magento 2 on Ubuntu 16.04 LTS

    Installation of Magento 2 on Ubuntu 16.04 LTS

    Installation of Magento 2 on Ubuntu 16.04 LTS – I am writing this article for absolute beginner with deeper explanation of all steps which are required to install and configure Magento 2.0 on Ubuntu OS.
    Let’s start:
    a) Install Apache2, PHP, MySQL Server, composer and required packages for Magento 2.0.       Using command:

    1. $ sudo apt-get install apache2 php libapache2-mod-php mysql-server php-mysql php- dom php-simplexml php-curl php-intl php-xsl php-mbstring php-zip php-xml composer
    1. $ sudo a2enmod rewrite

    b) After successfully installation of these packages, make changes in the apache2.conf file     and AllowOverride all for Directory permission.

    1. $ cd /etc/apache
    2. $ Sudo nano apache2.conf

    Changes from

    Options Indexes FollowSymLinks
    AllowOverride none
    Require all granted

    To

    Options Indexes FollowSymLinks
    AllowOverride all
    Require all granted

    c) Use ^x (Ctrl + X) to exit from edit file screen. After making change in Config file, you need     to restart Apache. Use this command:

    1. $ sudo systemctl restart apache2.service

    d) Next step to install Magento 2 in var/www/html document using these commands:

    1. cd /var/ww/html/
    2. git clone https://github.com/magento/magento2.git
    3. cd magento2
    4. composer install

    e) You might face problem while installing Composer in Magneto 2 directory, like some of          PHP extensions are missing. Don’t be panic in this case and install missing extensions.

    Using commands like-

    1. $ Sudo apt-get install php-exnteionname (like php-gd)

    After installing all missing PHP extensions, change current directory to Magento 2 and            install composer:

    1. $ cd /var/www/html/magento2
    2. $ composer install

    f) Following messages come on screen:
    Loading composer repositories with package information
    Installing dependencies (including require-dev) from lock file

    – Installing magento/magento-composer-installer (0.1.6)
    Downloading: 100%

    – Installing braintree/braintree_php (2.39.0)
    Downloading: 100%

    – Installing justinrainbow/json-schema (1.6.1)
    Downloading: 100%

    – Installing symfony/console (v2.6.13)
    Downloading: 100%

    – Installing symfony/process (v2.8.4)
    Downloading: 100%

    ………………………………………………………………………………………….
    ………………………………………………………………………………………….

    – Installing composer/composer (1.0.0-alpha10)
    Downloading: 100%

    – Installing magento/composer (1.0.2)
    Authentication required (repo.magento.com):

    Username:
    Password:

      If composer prompts for authentication.

      Login to Login here https://www.magentocommerce.com/ and use public key as    Username and private key as Password.

    Installation of Magento 2 on Ubuntu 16.04 LTS

    g) Next step is to change directories permission to

    1. $ sudo chmod -R 777 /var/www/html/magento2/
    2. $ sudo chmod -R 777 /var/www/html/magento2/var/
    3. $ sudo chmod -R 777 /var/www/html/magento2/pub/

    Now we move to Mysql. To create Mysql database for magento 2 installation.

    Use Following command:
    $ sudo mysql –u root -p
    Enter Sudo password and now you are ready to execute Sql queries using mysql prompt.      Enter the following commands in the order to create a database instance named     magento2 with user name magento2
    h) Create database magento2;
    GRANT ALL ON magento.* TO magento2@localhost IDENTIFIED BY ‘magento2’;
    Database magento2 is created and all permissions are granted to magent2@localhost         user with password magento2.
    To check you can use:

    1. $ sudo mysql –u magento2 -p

    Enter password magento2 and use sql query:

    1. Mysql > show database;

    Use exit to come out from mysql prompt.

    Now you are ready for final step to install magento2.

        Open http://localhost/magento2/setup/

    Magento Installation

    If you face any permission issue, grant permission to Magento 2 root directory-

    1. $ sudo chmod -R 777 /var/www/html/magento2/

    When you get green check for file permission check, click next till installation finish.
    You can browse magento 2 using
         http://localhost/magento2/
         or
         http://{ipaddress}/magento2/

    At this stage, we are completed with Magento 2 installation on Ubuntu 16.04 LTS. Hope it       helps you!