
Approvals are a crucial part of any sales process. Whether it’s a quote, proposal, or sales contract, routing it to the right approver and getting timely feedback can often be time-consuming. In this guide, I’ll walk you through how to build a sales document approval workflow using Power Automate.
This flow automatically triggers when a sales document is submitted, fetches the right data, identifies the approver, waits for their decision, and sends emails based on the outcome. Let’s dive in.
Step 1: Trigger the Flow When Approval is Requested
We begin by using the trigger: “When a sales document approval is requested (V3)”.
This trigger fires the moment a new approval request is raised from your system (for example, from a model-driven app or another form submission). It ensures the rest of the flow runs only when needed.
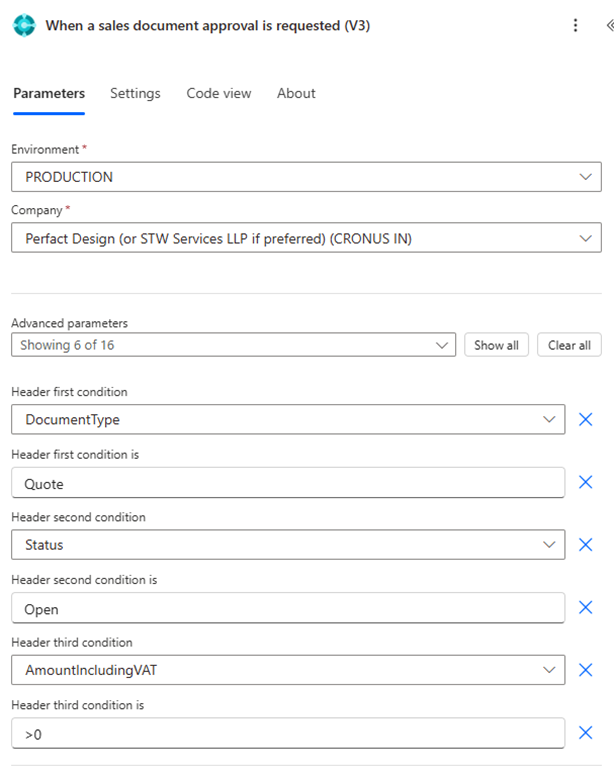
Here’s how we’ve configured it:
- Environment: PRODUCTION
- Company: Perfact Design (or STW Services LLP if preferred) (CRONUS IN)
- DocumentType: Quote
- Status: Open
- AmountIncludingVAT: Greater than 0
This setup ensures that the flow only runs when:
- A sales quote (not order or invoice) is submitted.
- The status is marked as “Open” (i.e., still under processing).
- The amount is more than zero (we skip zero-value quotes).
These filters help make the workflow efficient by only processing valid, actionable quotes and avoiding noise from draft or empty documents.
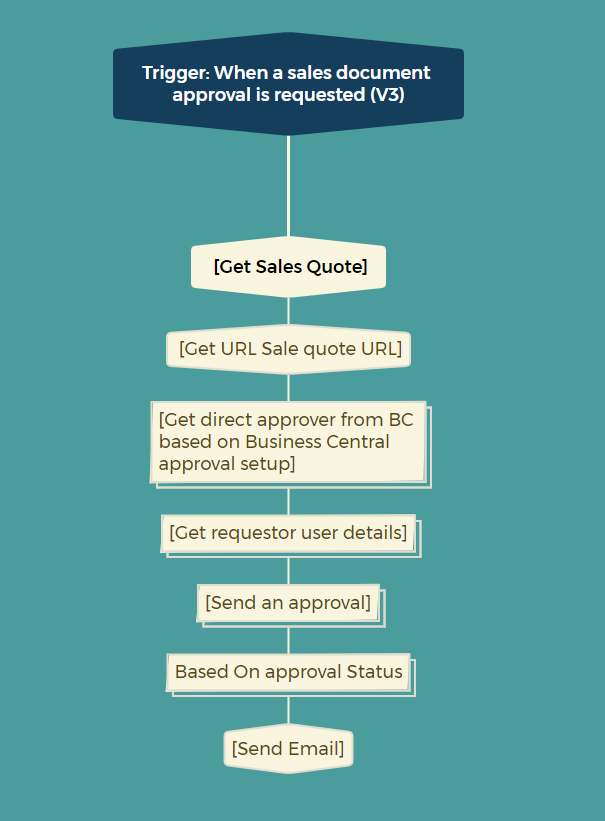
Step 2: Retrieve Required Data
After the trigger, we use several steps to gather information:
- Get record – This fetches the full details of the sales document submitted for approval.
- Get URL – This step constructs a direct link to the document so the approver can open it quickly.
- Get direct approver – The flow then determines who the approver should be, usually based on the requestor’s reporting manager or business logic.
- Get requestor user details – This pulls user profile information (like name and email) so we can use it later in emails or logs.
Step 3: Start the Approval Process
Now that we have everything ready, we send out the approval request using “Start and wait for an approval”.
This step sends a prompt (via Teams, email, etc.) to the approver with details of the sales document and waits for them to either approve or reject it. It supports parallel or first-response approvals if you have more than one person involved.
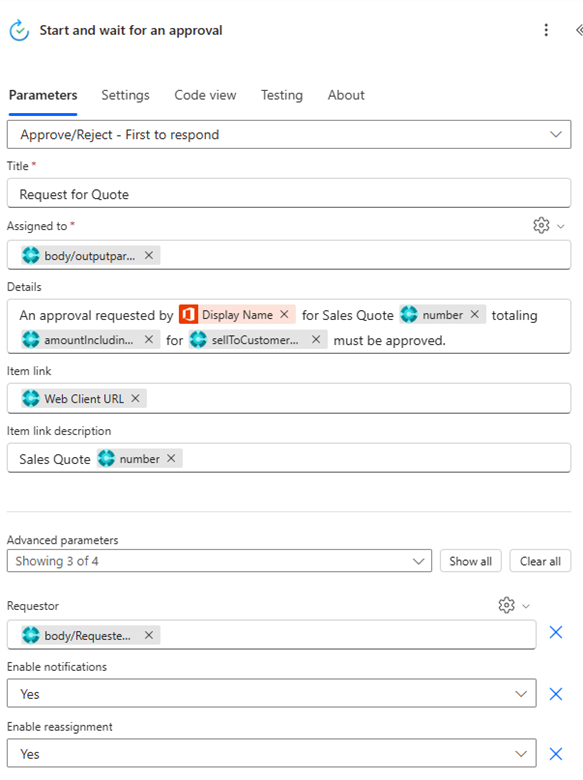
Here’s how the approval is configured:
- Title: “Request for Quote” — this is what the approver sees in their notification.
- Assigned to: This pulls in the direct approver’s email or user ID dynamically, based on earlier steps.
- Details field: This provides a summary of the approval request.
The format used here is:
“An approval requested by [Requestor Name] for Sales Quote #[Quote Number] totaling [AmountIncludingVAT] for [Customer Name] must be approved.”
This message gives the approver everything they need to make a decision without having to dig for more info. - Item link: This includes a link to open the sales quote directly in Business Central’s web client.
- Item link description: It will simply show something like “Sales Quote #1007” as a clickable link.
Under advanced settings:
- Requestor: This is pulled from the Microsoft 365 user profile of the person who created the quote.
- Enable notifications: Yes — this ensures the approver is notified via email or Teams.
- Enable reassignment: Yes — allows the approver to delegate if needed.
Step 4: Track Responses
Once the approval request is out, we initialize a response summary. This is where we store the outcome of the approval.
- Initialize response summary – Creates a variable to hold the outcome.
- Apply to each – In case there are multiple approvers, this loops through each of their responses.
- Finalize response summary – Once all responses are collected, we finalize and summarize the decision.
Step 5: React Based on the Outcome
After summarizing the outcome, we branch the flow based on the decision.
The three possibilities are:
- Approved
- The system performs whatever “approve action” is defined (e.g., update a record, change document status).
- There’s a condition to check if an email should be sent.
- If yes, an email is sent to notify the requestor that their document has been approved.
- Rejected
- The “reject action” runs (e.g., log the reason, update status).
- Again, we check whether an email should be sent.
- If yes, the requestor gets notified of the rejection and possibly the reason.
- Cancelled or No Response (Default)
- The system performs a cancel or timeout handling action.
- It checks if cancellation emails are enabled and notifies the requestor accordingly.
These conditional checks are helpful because in some cases, you might not want to send an email for every scenario—especially in testing or internal flows.
Step 6: Optional Email Notifications
The email sending logic is wrapped inside conditions. You can easily toggle whether emails should go out for each scenario (approved, rejected, cancelled) by adjusting these flags.
This setup is useful if you want to control email noise or if you want the flexibility to turn off certain messages for a temporary phase.
Summary
This Power Automate flow is a simple but powerful tool to streamline your sales approval process. It ensures documents don’t get stuck waiting, and everyone is kept in the loop.
Here’s what we achieved:
- Automatically triggered approval process
- Dynamic approver selection
- Full decision tracking
- Smart conditional email alerts
Whether you’re using this with Dataverse, SharePoint, or any custom app, the steps remain largely the same.
If you’d like to extend this further, you could add due date reminders, escalate overdue approvals, or log everything in a SharePoint list for historical tracking.
Let me know if you’d like help adapting this for your business—happy to assist!