Category: CMS

  • The Latest Addition to the Laravel Eco-system

    The Latest Addition to the Laravel Eco-system

    If you’ve been a user of Laravel, you must’ve surely heard about their latest offering. Nova is an administration panel for Laravel. This sleek and beautifully designed single-page application, built on the Vue.js platform and Tailwind, is highly customizable in a true Laravel fashion.

    Nova is a composer package, which can be installed in an existing Laravel package. It does not interfere with an existing application in any way. In fact, you can install Nova in the existing Laravel applications which you have already built, without hampering the application, as well as removing the need of starting all over again, if you want to integrate resource management in your application. On the front-end, Nova is powered by Vue.js, Vue components and Tailwind.css. This makes for a powerful and flexible combination, especially with regards to customization – it is easier than ever to build custom cards, tools and fields.

    With Nova, you can forget the clumsy, unmanageable administration panels. You can configure the whole dashboard with a simple PHP class. None of your configuration is stored in the database. It is a piece of cake to add an administration panel to the existing Laravel applications without interfering with the eloquent and potent models.

    Before you begin, here is a list of requirements which you need to preload before installing Laravel Nova:

    1. Composer
    2. Laravel Framework 5.8+
    3. Laravel Mix
    4. Node.js and NPM

     Nova supports all the new versions of Google Chrome, Apple Safari and Microsoft Edge web browsers.

    Features of Nova Laravel:

    The primary feature of Nova is to be able to create, read, update and delete resources from the database. The versatility of the app helps to create an easy to use and simplistic platform to get it done.

    • Resource Management
    • Search Integration
    • Filters
    • Lens
    • Actions
    • Metrics
    • Customization

    If you’ve been a user of Laravel, you must’ve surely heard about their latest offering. Nova is an administration panel for Laravel. This sleek and beautifully designed single-page application, built on the Vue.js platform and Tailwind, is highly customizable in a true Laravel fashion.

    Nova is a composer package, which can be installed in an existing Laravel package. It does not interfere with an existing application in any way. In fact, you can install Nova in the existing Laravel applications which you have already built, without hampering the application, as well as removing the need of starting all over again, if you want to integrate resource management in your application. On the front-end, Nova is powered by Vue.js, Vue components and Tailwind.css. This makes for a powerful and flexible combination, especially with regards to customization – it is easier than ever to build custom cards, tools and fields.

    With Nova, you can forget the clumsy, unmanageable administration panels. You can configure the whole dashboard with a simple PHP class. None of your configuration is stored in the database. It is a piece of cake to add an administration panel to the existing Laravel applications without interfering with the eloquent and potent models.

    Before you begin, here is a list of requirements which you need to preload before installing Laravel Nova:

    1. Composer
    2. Laravel Framework 5.8+
    3. Laravel Mix
    4. Node.js and NPM

     Nova supports all the new versions of Google Chrome, Apple Safari and Microsoft Edge web browsers.

    Features of Nova Laravel:

    The primary feature of Nova is to be able to create, read, update and delete resources from the database. The versatility of the app helps to create an easy to use and simplistic platform to get it done.

    • Resource Management
    • Search Integration
    • Filters
    • Lens
    • Actions
    • Metrics
    • Customization
  • How to create theme in Magento 2

    How to create theme in Magento 2

    How to create theme in Magento 2-

    1. Install magento 2.
    2. Go to admin panel and login.
    3. Now you may see this window ( links not working )

    4. To solve the issue, open your xampp shell

    5. Specify your path

    6.  Run following command from Magento root:
    php bin/magento setup:static-content:deploy

    7. Go to admin panel and check if the issue has fixed. You can see the admin panel like this.

    8. Now you can start with creating your custom theme.
    9. At first, create your folder in C:\xampp\htdocs\Magento2_new\app\design\frontend\ and create your folder within

    10. Add or copy from an existing theme.xml to your theme directory app/design/frontend/

    11.  Add a composer.json file to the theme directory and register the package on a packaging server.

    12. To register your theme in the system, in your theme directory add a registration.php file with the following content:

    13. Copy a media folder from an existing theme to your theme directory.
    14. Create directories for static files. Your theme will likely contain several types of static files: styles, fonts, JavaScript and images. Each type should be stored in a separate sub-directory of web in your theme folder:

    15. At this point your theme file structure looks as follows:

    16. Your theme is created now. Login to admin panel and go to Stores -> Configuration -> Design, you can see your theme. Select your theme and save it.

    17. Run the following commands for static content deployment and database update from your root directory
    php bin/magento setup:static-content:deploy
    php bin/magento setup:upgrade
    18. You can customize your site now, using your own theme.

  • How to install Magento 2 – beginner’s guide (Windows)

    How to install Magento 2 – beginner’s guide (Windows)

    Install Magento 2 – beginner’s guide – Before continuing, make sure you have all the prerequisites, required for running Magento 2, below are system requirements

    System requirements:
    1. Apache Version: 2.2 or 2.4
    2. PHP version: 5.5.x, where x is 22 or greater
    3. MySQL Version : 5.6.x and upper


    Installation
    1. First and easiest way is to download the Magento installation package from official Magento site https://www.magentocommerce.com/download (Install from archive file – In this installation Magento core code is stored under /vendor directory and updating is possible through Magento admin.)

    See below screenshot

    2. Create one folder and Unzip in and put it under C:\xampp\htdocs\FOLDER_NAME
    3. Create a MySQL Database for Magento2 form phpmyadmin.
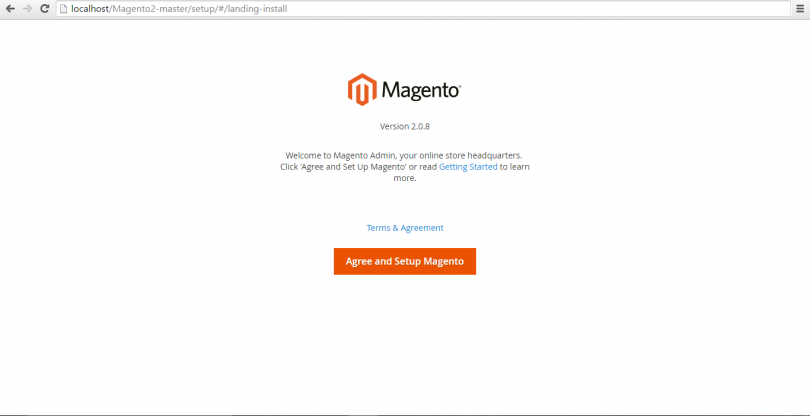
    4. Go through the Magento installation process, below is the first screen

    Click on button Agree and Setup Magento

    Click to start Readiness Check button to move forword

    If all the requirements are ok then it’ll show tick mark for that, click on Next button

    Here add all the fields properly as mentioned, host, Database Username and password, database name, Table prefix, etc

    and continue with the next button.

    In this step it’ll ask for your store’s admin url.


    5. After successful installation you will get this page
    6. Your frontend will look like this

    7. Your backend will look like this

  • Installation of Magento 2 on Ubuntu 16.04 LTS

    Installation of Magento 2 on Ubuntu 16.04 LTS

    Installation of Magento 2 on Ubuntu 16.04 LTS – I am writing this article for absolute beginner with deeper explanation of all steps which are required to install and configure Magento 2.0 on Ubuntu OS.
    Let’s start:
    a) Install Apache2, PHP, MySQL Server, composer and required packages for Magento 2.0.       Using command:

    1. $ sudo apt-get install apache2 php libapache2-mod-php mysql-server php-mysql php- dom php-simplexml php-curl php-intl php-xsl php-mbstring php-zip php-xml composer
    1. $ sudo a2enmod rewrite

    b) After successfully installation of these packages, make changes in the apache2.conf file     and AllowOverride all for Directory permission.

    1. $ cd /etc/apache
    2. $ Sudo nano apache2.conf

    Changes from

    Options Indexes FollowSymLinks
    AllowOverride none
    Require all granted

    To

    Options Indexes FollowSymLinks
    AllowOverride all
    Require all granted

    c) Use ^x (Ctrl + X) to exit from edit file screen. After making change in Config file, you need     to restart Apache. Use this command:

    1. $ sudo systemctl restart apache2.service

    d) Next step to install Magento 2 in var/www/html document using these commands:

    1. cd /var/ww/html/
    2. git clone https://github.com/magento/magento2.git
    3. cd magento2
    4. composer install

    e) You might face problem while installing Composer in Magneto 2 directory, like some of          PHP extensions are missing. Don’t be panic in this case and install missing extensions.

    Using commands like-

    1. $ Sudo apt-get install php-exnteionname (like php-gd)

    After installing all missing PHP extensions, change current directory to Magento 2 and            install composer:

    1. $ cd /var/www/html/magento2
    2. $ composer install

    f) Following messages come on screen:
    Loading composer repositories with package information
    Installing dependencies (including require-dev) from lock file

    – Installing magento/magento-composer-installer (0.1.6)
    Downloading: 100%

    – Installing braintree/braintree_php (2.39.0)
    Downloading: 100%

    – Installing justinrainbow/json-schema (1.6.1)
    Downloading: 100%

    – Installing symfony/console (v2.6.13)
    Downloading: 100%

    – Installing symfony/process (v2.8.4)
    Downloading: 100%

    ………………………………………………………………………………………….
    ………………………………………………………………………………………….

    – Installing composer/composer (1.0.0-alpha10)
    Downloading: 100%

    – Installing magento/composer (1.0.2)
    Authentication required (repo.magento.com):

    Username:
    Password:

      If composer prompts for authentication.

      Login to Login here https://www.magentocommerce.com/ and use public key as    Username and private key as Password.

    Installation of Magento 2 on Ubuntu 16.04 LTS

    g) Next step is to change directories permission to

    1. $ sudo chmod -R 777 /var/www/html/magento2/
    2. $ sudo chmod -R 777 /var/www/html/magento2/var/
    3. $ sudo chmod -R 777 /var/www/html/magento2/pub/

    Now we move to Mysql. To create Mysql database for magento 2 installation.

    Use Following command:
    $ sudo mysql –u root -p
    Enter Sudo password and now you are ready to execute Sql queries using mysql prompt.      Enter the following commands in the order to create a database instance named     magento2 with user name magento2
    h) Create database magento2;
    GRANT ALL ON magento.* TO magento2@localhost IDENTIFIED BY ‘magento2’;
    Database magento2 is created and all permissions are granted to magent2@localhost         user with password magento2.
    To check you can use:

    1. $ sudo mysql –u magento2 -p

    Enter password magento2 and use sql query:

    1. Mysql > show database;

    Use exit to come out from mysql prompt.

    Now you are ready for final step to install magento2.

        Open http://localhost/magento2/setup/

    Magento Installation

    If you face any permission issue, grant permission to Magento 2 root directory-

    1. $ sudo chmod -R 777 /var/www/html/magento2/

    When you get green check for file permission check, click next till installation finish.
    You can browse magento 2 using
         http://localhost/magento2/
         or
         http://{ipaddress}/magento2/

    At this stage, we are completed with Magento 2 installation on Ubuntu 16.04 LTS. Hope it       helps you!

  • What’s the Difference between Zen Cart & Magento?

    What’s the Difference between Zen Cart & Magento?- Zen Cart & Magento are both open source products but each comes with features that make it preferable over the other. It is only by looking at the features of each that you can make a decision on the best for your e-commerce platform.

    Magento

    This is a perfect platform for companies in search of a professional online appearance. It accommodates standard add-ons to enhance the experience of your users. Here are some of the features to expect.

    • Incredible flexibility when dealing with pricing and coupons
    • An impressively advanced filter function that allows you to achieve numerous categories
    • An admin function that allows you to add, remove and edit orders
    • An incredible number of modules
    • Does not require advanced coding skills
    • An impressive template system

    Zen Cart

    This is the perfect option for beginners because of the coding aspect. It is preferred by shop owners who wish to handle coding on their own. The features to expect include

    • A comprehensive package of features to enable online sales
    • Perfect for beginner coding
    • Its footprints are light which increases accessibility on a shared environment
    • Very user friendly
    • An active development teams means that you get new and exciting products on regular basis
  • Kentico Deployment on Azure

    Kentico Deployment on Azure – 1 Deployment

    1.1 Kentico Deployment on Azure

    1.1.1 Azure Support

    On the Scale page of the Azure Management Portal, you can manually scale your application or you can set parameters to automatically scale it.

    A. Manually scale an application running Web Roles or Worker Roles

    On the Scale page, you can manually increase or decrease the number of running instances in a cloud service.

    1. In the Management Portal, click Cloud Services, and then click the name of the cloud service to open the dashboard.

    2. Click Scale. Automatic scaling is disabled by default for all roles, which means that you can manually change the number of instances that are used by your application.

    1

    3. Each role in the cloud service has a slider for changing the number of instances to use. To add a role instance, drag the bar right. To remove an instance, drag the bar left.

    2

    You can only increase the number of instances that are used if the appropriate number of cores are available to support the instances. The colors of the slider represent the used and available cores in your subscription:

    o Blue represents the cores that are used by the selected role
    o Dark grey represents the cores that are used by all roles and Virtual Machines in the subscription
    o Light grey represents the cores that are available to use for scaling
    o Pink represents a change made that has not been saved

    4. Click Save. Role instances will be added or removed based on your selections.

    B. Automatically scale an application running Web Roles, Worker Roles, or Virtual Machines

    On the Scale page, you can configure your cloud service to automatically increase or decrease the number of instances or Virtual Machines that are used by your application. You can configure scaling based on the following parameters:

    • Average CPU usage – If the average percentage of CPU usage goes above or below specified thresholds, role instances are created or deleted, or Virtual Machines are are turned on or turned off from an availability set.
    • Queue messages – If the number of messages in a queue goes above or below a specified threshold, role instances are created or deleted, or Virtual Machines are are turned on or turned off from an availability set.

    C. Average CPU usage

    1. In the Management Portal, click Cloud Services, and then click the name of the cloud service to open the dashboard.
    2. Click Scale.
    3. Scroll to the section for the role or availability set, and then click CPU. This enables automatic scaling of your application based on the average percentage of CPU resources that it uses.

    3

    4. Each role or availability set has a slider for changing the number of instances that can be used. To set the maximum number of instances that can be used, drag the bar on the right to the right. To set the minimum number of instances that can be used, drag the bar on the left to the left.

    Note: On the Scale page, Instance represents either a role instance or an instance of a Virtual Machine.

    4

    The maximum number of instances is limited by the cores that are available in the subscription. The colors of the slider represent the used and available cores in your subscription:

    o Blue represents the maximum number of cores that the role can use.
    o Dark grey represents the cores that are used by all roles and Virtual Machines in the subscription. When this value overlaps the cores used by the role, the color turns to dark blue.
    o Light grey represents the cores that are available to use for scaling.
    o Pink represents a change has been made that has not been saved.

    5. A slider is used for specifying the range of average percentage of CPU usage. When the average percentage of CPU usage goes above the maximum setting, more role instances are created or Virtual Machines are turned on. When the average percentage of CPU usage goes below the minimum setting, role instances are deleted or Virtual Machines are turned off. To set the maximum average CPU percentage, drag the bar on the right to the right. To set the minimum average CPU percentage, drag the bar on the left to the left.

    5

    6. You can specify the number of instances to add or turn on each time your application is scaled up. To increase the number of instances that are created or turned on when your application is scaled up, drag the bar right. To decrease the number, drag the bar left.

    6

    7. Set the number of minutes to wait between the last scaling action and the next scale-up action. The last scaling action can be either scale-up or scale-down.

    7

    All instances are included when calculating the average percentage of CPU usage and the average is based on use over the previous hour. Depending on the number of instances that your application is using, it can take longer than the specified wait time for the scale action to occur if the wait time is set very low. The minimum time between scaling actions is five minutes. Scaling actions cannot occur if any of the instances are in a transitioning state.

    8. You can also specify the number of instances to delete or turn off when your application is scaled down. To increase the number of instances that are deleted or turned off when your application is scaled down, drag the bar right. To decrease the number, drag the bar left.

    8

    If your application can have sudden increases in CPU usage, you must make sure that you have a sufficient minimum number of instances to handle them.

    9. Set the number of minutes to wait between the last scaling action and the next scale-down action. The last scaling action can be either scale-up or scale-down.

    9

    10. Click Save. The scaling action can take up to five minutes to finish.

    D. Queue messages

    1. In the Management Portal, click Cloud Services, and then click the name of the cloud service to open the dashboard.
    2. Click Scale.
    3. Scroll to the section for the role or availability set, and then click Queue. This enables automatic scaling of your application based on a target number of queue messages.

    10

    4. Each role or availability set in the cloud service has a slider for changing the number of instances that can be used. To set the maximum number of instances that can be used, drag the bar on the right to the right. To set the minimum number of instances that can be used, drag the bar on the left to the left.

    11

    Note: On the Scale page, Instance represents either a role instance or an instance of a Virtual Machine.

    The maximum number of instances is limited by the cores that are available in the subscription. The colors of the slider represent the used and available cores in your subscription:

    o Blue represents the maximum number of cores that the role can use.
    o Dark grey represents the cores that are used by all roles and Virtual Machines in the subscription. When this value overlaps the cores used by the role, the color turns to dark blue.
    o Light grey represents the cores that are available to use for scaling.
    o Pink represents a change has been made that has not been saved.

    5. Select the storage account that is associated with the queue that you want to use.

    12

    6. Select the queue.

    13

    7. Specify the number of messages that you expect each instance to support. Instances will scale based on the total number of messages divided by the target number of messages per machine.

    14

    8. You can specify the number of instances to add or turn on each time your application is scaled up. To increase the number of instances that are added or turned on when your application is scaled up, drag the bar right. To decrease the number, drag the bar left.

    15

    9. Set the number of minutes to wait between the last scaling action and the next scale-up action. The last scaling action can be either scale-up or scale-down.

    16

    The minimum time between scaling actions is five minutes. Scaling actions cannot occur if any of the instances are in a transitioning state.

    10. You can also specify the number of instances to delete or not use when your application is scaled down. A slider is used to specify the scaling increment. To increase the number of instances that are deleted or not used when your application is scaled down, drag the bar right. To decrease the number, drag the bar left.

    17

    11. Set the number of minutes to wait between the last scaling action and the next scale-down action. The last scaling action can be either scale-up or scale-down.

    18

    12. Click Save. The scaling action can take up to five minutes to finish.

    E. Scale linked resources

    Often when you scale a role, it’s beneficial to scale the database that the application is using also. If you link the database to the cloud service, you change the SQL Database edition and resize the database on the Scale page.

    1. In the Management Portal, click Cloud Services, and then click the name of the cloud service to open the dashboard.
    2. Click Scale.
    3. In the Linked Resources section, select the edition to use for the database.

    19

    4. Select the size of the database.
    5. Click Save to update the linked resources.

    F. Schedule the scaling of your application

    You can schedule automatic scaling of your application by configuring schedules for different times. The following options are available to you for automatic scaling:

    1. No schedule – This is the default option and enables your application to be automatically scaled the same way at all times.
    2. Day and night – This option enables you to specify scaling for specific times of day and night.

    Note: Schedules are currently not available for applications that use Virtual Machines.

    1. In the Management Portal, click Cloud Services, and then click the name of the cloud service to open the dashboard.
    2. Click Scale.
    3. On the Scale page, click set up schedule times.

    20

    4. Select the type of scaling schedule that you want to set up.
    5. Specify the times that the day starts and ends and set the time zone. For day and night scheduling, the times represent the start and end of the day with the remaining time representing night.
    6. Click the check mark at the bottom of the page to save the schedules.
    7. After you save the schedules, they will appear in the list. You can select the time schedule that you want to use and then modify your scale settings. The scale settings will only apply during the schedule that you selected. You can edit the schedules by clicking set up schedule times.

    G. Kentico Website Scalability and Performance

    Kentico performs extremely well on a very standard hardware configuration. Still, if you need more power and scaling up (adding more CPU and memory) isn’t enough; you can easily scale out and deploy Kentico in a webfarm. Kentico runs in a standard Windows Server web farm environment and it has built-in mechanisms for automatic synchronization of files and in-memory objects across servers. Based on our performance tests, adding a second web server doubles the overall performance.

    If the database server becomes a bottleneck, Kentico supports SQL Server Merge Replication which means you can also scale out your database servers. It means you can achieve virtually unlimited scalability with Kentico.

    Advanced Caching Options

    Kentico comes with granular cache settings that allow you to configure cache for files, web parts and pages. The full-page caching represents the most powerful option as it stores pages in memory and serves them without touching database or disk.

    1.1.2 How to deploy the core to Azure

    Deploying cloud service and kentico website over azure is very simple. You can follow following simple steps for deploying cloud service.

    1. Using Visual Studio 2012, Open Azure.Server solution. In the Server.DataAgents.Azure project, right click and select Publish

    21

    In a few seconds the Publish Web wizard appears. The wizard creates a new publish profile that contains settings such as the web site URL that Visual Studio needs in order to deploy your project to Azure. The profile is automatically saved so that later when you make changes to the project you can easily redeploy the project to the same site.

    2. Click Publish

    ^B369DD4B62C647AFA9197FFCA3B547048E7FA655B0C72D9EEB^pimgpsh_fullsize_distr


    1.2 Kentico

    The kentico documentation

    1.2.1 Azure support

    Kentico is supported as a standard, scalable web role. The following diagram illustrates the relations between the individual elements that together form Kentico CMS in the cloud environment. The different components depicted in the diagram are described in the text that follows.

    23

    The fact that Kentico CMS can run in multiple instances on Windows Azure creates the need for synchronization of data between the instances. The CMS handles this by considering each instance a web farm server. Unlike the traditional web farm comprising multiple physical servers, you don’t have to configure the web farm servers manually in the multiple-instance Azure environment. The only configuration that needs to be done is setting the number of instances in the service configuration file. Data is synchronized via web farm tasks, which are created and executed automatically.

    Storing session state

    Every complex web application needs to store information about its state, especially user session data. Since the Azure environment is dynamic and the application doesn’t reside constantly in one place, its state has to be stored separately.

    Kentico CMS is pre-configured to use the Windows Azure AppFabric caching service to take care of session information. This way, all instances of the application have access to their data, which keeps them synchronized.

    1.2.2 Social Media Autentication

    Kentico supports the following authentication providers:

    1. Windows Live ID
    2. OpenID > OpenID is an open, decentralized standard for authenticating users. It is currently being used by Google, Yahoo!, MySpace, Flickr and many more. Logon credentials used on all of these sites can be used to log on to your Kentico site. This follows OAUTH/2 protocol.
    3. Facebook Connect
    4. LinkedIn

  • Magento vs Woocommerce: Know the Best E-commerce Platform

    Magento vs Woocommerce: Know the Best E-commerce Platform

    Magento vs Woocommerce: Know the Best E-commerce Platform- Magento and Woocommerce are the top ranked platforms in the market today. One is a singular product provided by ebay while the other is a WordPress plugin. Each has attracted a community of supporters based on its strengths and weaknesses. Entry into the ecommerce business requires careful consideration of the options. Given the two platforms, which should be your best bet?

    Platform against Plugin:- 
    What makes magento benefits pronounced is that it is a complete platform as opposed to woocommerce which is a WordPress plugin. It means that Magento comes with an advanced structure and functionality that will enhance the performance of your website. You have to install the woocommerce plugin on to a content management system (CMS) to ease utilization. However, the features offered by each vary and therefore provides unique opportunities.

    Professional Requirements:- 
    A sound and professional requirement is required when launching your website using the Magento platform. These skills might not be available at all times and you might be required to pay huge amounts to use it. Amateurs can use woocommerce since it does not require any web development skills. With a single click, you can install it on your website. There are no professional fees required or advanced skills.

    Setting Up and Customization:- 
    You will require sufficient background and skills to setup a Magento platform. These skills and expertise is not available to everyone. This means that it will be a limitation to some people. This is a factor that limits magento benefits for potential users. Woocommerce on the other hand taps into the structure and functionality of WordPress. It comes with an intuitive and interactive panel for the admin to simplify your work.

    Exclusive Shopping Platform:- 
    To enjoy Magento benefits, you must be visiting a shopping website. It is designed exclusively ecommerce purposes. This means that you will enjoy a range of features that are designed to improve your experience. Woocommerce on the other hand is a plugin and therefore not created exclusively for ecommerce websites. It means that the features available will limit the enjoyment of your shopping experience. The fact that it is exclusively designed for WordPress limits its capability on other platforms.

  • Why Magento Development is the Foremost Choice for Ecommerce Business

    Why Magento Development is the Foremost Choice for Ecommerce Business

    The decision to settle for Magento as your preferred ecommerce platform should be informed by attested benefits. The benefits Magento ecommerce given below are as a result of customer reviews and the experiences of developers using this platform. Magento will open a new chapter for your business by offering the following advantages over other products in a similar category.

    Flexibility
    Magento allows you to create a perfect ecommerce store regardless of your sales target. You can design a site to sell as little as ten items or as much as ten million items. The type and size of your website will be accommodated by Magento.  It even allows you to handle fluctuating traffic with the changing seasons of the year.

    Open Source
    As a merchant, there are no cost implications when getting the Magento platform. Besides that, it comes with freely available extensions to allow you upgrade your site and improve on the shopping experience. There are no fees to be paid or licenses to be secured in order to use any of the excellent features. Open sourcing does not compromise your security, features or standards. It will make your website search friendly beyond improving customer experience.

    Mobile Friendly
    With more businesses moving into peoples arms through the mobile phone, this feature stands out among the other benefits Magento ecommerce. The features are easy to view on smart phones which further enhance the experience.

    Extensions
    Magento offers numerous extensions that are integrated to suit your ecommerce requirements. This is an opportunity to customize your website to meet the desires of your products and clientele. Some of these extensions are available for free while the others are affordable. Those that are sold offer excellent value for money.

    Advanced SEO
    Advanced SEO ranks top among the most notable benefits of Magento ecommerce. It comes with excellent features to ensure that your products rank top on Yahoo, Google, Bing and other search engines. Top ranking will increase your traffic and improve your chances of raking in huge profits.

    Simple yet Effective
    Though customization requires advanced skills, administering the system is very easy. The report and analysis modules are very easy to understand and operate. Making changes to the website is also simplified.